Pages

Tuesday, November 30, 2010

Another quick card

Gotta love a quick card! Yesterday I needed a quick thank you card, so I sat down, and had this one together in about 5 minutes flat! Love it when that happens. I had stamped the trees the night before, so I guess it took a little longer, but I was also using up something I had just been playing with, so maybe it counts as recycling! Either way, it worked out great and was easy. No cricut on this one - just stamps, some simple doodling, a little ribbon, and some buttons.


Sunday, November 28, 2010

No Cricut...but I am learning to LOVE clear stamps!

I used to hate stamps. I mean, really HATE stamps! Could never figure out what to do with them! And then they came out with the new clear stamps, so that you can actually see what you are doing, and where you are putting them! I tried them, and now I am hooked! Got these yesterday at JoAnns, and had to try them out. They are from Fiskars, and they work SO well, and leave such a great impression! Definately have to get more of those!

Birthday card for a dear friend...

I made this this morning for a dear friend of mine, whose birthday was on Friday. As you might guess, she LOVES her guitar, and anything music, so this seemed like a perfect fit for her! She was probably just being nice...but she said when I gave it to her that it was her favorite card ever! At least she liked it!

The guitar was cut from the Hannah Montana cartridge (which I got for all the NON-Hannah Montanta stuff!), the sentiment was one from my Pink by Design stamps, added some bling with my Jolee's heat set tool, a little doodling, and some ribbon along the bottom. I don't always do it, but made the inside special this time too! Thanks for looking!


Saturday, November 27, 2010

Thanksgiving thank you card...

My sister hosted our family Thanksgiving dinner this year, and since I know it is a lot of work and effort, I wanted to make her a thank you card! She always does a beautiful job - setting the table and preparing everything for the day - I wanted to make sure she knew how grateful we were for her! I hope she loves it!

I used the leaves from A Child's Year, using my Gypsy to hide the different contours. I then added a Peachy Keen face stamp, lots of inking on the edges, a Cuttlebug folder for the background, some ribbon, and a stamped sentiment. Also pop-dotted the leaves from the background.

Hope you had a wonderful Thanksgiving with your family!


Thursday, November 25, 2010

Thanksgiving Place Cards...

My sister is hosting Thanksgiving this year, and she asked me if I would make some placecards for the table. Well, live has been busy enough, that last night was the first chance I got to sit down and do them. I decided to make them as simple as possible, since I needed to make about 24 of them! However, I learned...that what looks simple when you try it on one of them, still ends up being a lot of work when you multiply it by 24!!! But it's okay, it was still fun!

I hope these match her colors alright, since all I had to go on was that she was decorating with green and silver! I started off with a card from Birthday Bash cartridge, and added another shape from Birthday Bash for the name plate. Used my hole punch to put holes in the side, thread some ribbon through, and tie in a simple knot. The leaves on the bottom came from the cartridge Give a Hoot, using the border feature. Doodled with a Sakura Gelly Roll pen called Silver Star - love how glittery it is! Finished by adding some Glossy Accents over the leaves.

Hope you all have a wonderful Thanksgiving!!! I am so thankful for all the ways God has blessed me - this year, and always! I praise Him for more things than I can possibly list here! Blessings to you and your family!!!


Wednesday, November 24, 2010

Hap-Bee Birthday!

This is another easel card I made last weekend! I picked the little bee from the Pooh and Friends cartridge to cut with my Cricut, then added Glossy Accents over the whole thing. Just couldn't resist, so I added a wiggly eye to him too! The yellow flower is one from my stash I got a while ago in a big pack in the dollor section at Michael's, the white one is a Prima Flower. Added some faux stitching, some ribbon, a few brads I had hiding in my stash, and a computer generated sentiment for the inside.

Tuesday, November 23, 2010

Little girl sewing

I love this cut from Nursery Rhyme! This was another simple easel card that I made over the weekend. The centers of the flowers on the paper inspired the little button decorations on the inside. I just cut a small square of brown paper, folded all four corners to the center, and secured it with a brad. I kind of like the effect! Added some ribbon underneath those, and a Martha Stewart edge punch to add a border under that, a stamped sentiment to the front, and finally, pop-dotted the main image and the sentiment from the background. Thanks for looking!


Monday, November 22, 2010

Liquid pearls

This card kind of came out a little different than any I've made before, but it was kind of fun nonetheless! I started off with the paper, and then found the flower that matched really well. I don't have any quilling tools, but decided to try out the idea just on my own, so I made the flower center and attached it with Glossy Accents. The pretty swirl was cut from Storybook cartridge, and then I wanted to try out my new liquid pearls, so I applied that over the entire piece and let it dry. Added a Martha Stewart border punch on the bottom, some sheer ribbon, some more dots of liquid pearls, and pop-dotted the swirl cut from the card.

Saturday, November 20, 2010

Peachy Keen Faces...with a twist!

Hello! I had so much fun with the card!!! I cut out the little birds, and then realized that I only had the medium size critter faces, and all of them were MUCH too big for these little birds. So...I got a little creative! I used one of the bird faces, but only inked the beak and stamped that on each of them. Then I picked a face from the Princess faces assortment in the right size, and only inked the eyes and stamped them on! So...I kind of built my own face! Worked like a charm!

Used my Cuttlebug on the background, a stack of Prima Flowers, buttons and ribbons, some little jewels set on with my Jolee's heat set tool, and finished off with a sentiment from My Pink Stamper's Tweety Hoo Puns stamp set. Pop-dotted the birds, and the background for lots of texture.
Have a tweet day!


Friday, November 19, 2010

Vintage Style Easel Card

The new challenge this week on the Cricut Circle Blog is to make something vintage inspired. This is kind of a different stretch for me, so I figured I would tackle it right away before I lost my nerve! I am really happy with how this turned out, even though it scared me to begin with!

Used A Child's Year for the black cutouts, Cuttlebug on the blue background piece, some ribbon, Prima Flowers, buttons, string pearls, and some heart shaped brads that I snapped the back off of and glued to the buttons. Also added a computer printed sentiment. Turns out Glossy Accents works great as a glue for sticking on pearls and buttons too!

 Thanks for looking!

Yummy!

Only got one card done last night - I think I was kind of tired! I struggled a little on this one, but I like the end results. Used Birthday Bash again for all the cuts, Cuttlebug on the background shape, some more Glossy Accents, and some bling with my Jolee's heat set tool. Added some ribbon, a little inking, and a stamped sentiment. Thanks for looking!


Thursday, November 18, 2010

Birthday Bash is in the house!!!

I had been wanting this cartridge, pretty much since the day it came out. However, I like to wait until they have been out for a bit and the price comes down some. So...I set myself a price limit on what I would pay for it, and have been watching on ebay, and FINALLY got it for the price I wanted! It came yesterday, so without a doubt, I knew what I would be working on last night! Here is the results (all cuts are from Birthday Bash):

The first one is COVERED in Glossy Accents and Stickles! I also pop-dotted the candles from the background.


This second picture shows a little better the way the candles are popped off the background. 


This next one also has some Glossy Accents, and I ran part of the critter through my Cuttlebug, then popped both him and the sentiment from the background. Added some bling with my Jolee's heat set tool.

Wednesday, November 17, 2010

2 fun cards!

Lucked out last night, ended up with 2 cards I really like! I wonder if it had something to do with actually accomplishing something useful before I sat down to play! (Cleaned my bedroom and bathroom after my two daughters went to bed - they were in desperate need of it!) Anyway, both of these came out really fun!

The first one I used a cut from the Country Life cartridge, and added a face on the watering can from the new Peachy Keen Snow Cuties face assortment (about time I finally used those!). Then I added glossy accents on the watering can and pot, and stickles on the water, flower, and stem. The lacy bottom piece is using a Martha Stewart edge punch, added some buttons and ribbon on tip, a stamped sentiment, and lots of faux stitching with my white gel pen.


On this second one, I used one of the "sticker" cuts from Just Because Cards. Then ran the background through the Cuttlebug. The sentiment came from Create a Critter. Added Glossy Accents (yep, I love the stuff!) over the blue part on the "sticker", and over the word "howdy". Finished off with a little faux stitching with my black Sakura Glaze pen.


Thanks for looking! Hope you have a fabulous day!!!

Tuesday, November 16, 2010

3 Cards for Challenges

Last night I was busy trying to keep up with some cards for some challenges I wanted to enter. I love challenges, because it makes me stretch out of my box, and make something completely different, or gives me inspiration when I don't know WHAT to do!

The first one was a color challenge - had to use burgundy, red, and rose. I just had to add a touch of brown! Used the cartridge From My Kitchen for the apron, a stamped sentiment, some ribbon, and lots of inking. It is a little hard to see, but I pop-dotted the apron from the background as well.


On the next one, the challenge was to use metallics. This was DEFINATELY a challenge for me, as that is something I don't use very often! I had the little stamped tree laying around that I had made in a moment of boredom sometime earlier and never used, and it had copper stickles on it, so when I found the papers, it kind of fell together. Also a little hard to see, but the brown paper is actually glitter cardstock.


The challenge on the last one was to make a thank you card! I couldn't resist making at least one easel card! I cut this mushroom from the Smiley Cards cartridge, and used my Gypsy's hide contour feature to hide the face. Then I placed a couple of circles on it to make cutouts through the top layer to let the bottom peak out. Love how that turned out, and love that I discovered another way to use this cartridge! The flowers for the inside are cut from Walk in my Garden, and layered with buttons for the center. This card also has a lot of inking, a stamped sentiment, and glossy accents on the outside edge of the circle as well as on the mushroom.

Monday, November 15, 2010

Thank you card

I love the color combination on this one! This is for the weekly challenge on the Cricut Circle Blog. There were four colors you had to use, and it had to be a thank you card! I loved the colors, so it was an easy card to make this time. Heart and bird are from the Give a Hoot cartridge. The ribbons were my initial inspiration, since I had ribbon in all of the right colors in my stash. Added a stamp sentiment, and a small flower stamp all over the background of the heart, as well as some dots with my Sakura Glaze pen.

Sunday, November 14, 2010

Another Shall We Dance Card

Just a really simple card using the Cricut Circle exclusive cartridge Shall we Dance. Put glossy accents on the cutout of the dancer, as well as around the stamped sentiment and around the outer edges, and added some ribbon. Super simple!


Friday, November 12, 2010

I really LOVE this one!

Okay, I don't know what it is about this card, maybe the paper and the colors, but I really LOVE this card! The cute little girl holding the presents is from Winter Frolic - I love all the things that you can do with this cartridge, that aren't necessarily Christmas-y. It is a very versatile cartridge. Anyway, added a face from my Peachy Keen Princess faces stamps, some ribbon and faux stitching, a stamp with some pop-dotting and some Prima Flowers to hold it up. The first picture shows the whole card, including the inside, and the second picture shows it when it is actually set up properly.Thanks for looking!


Thursday, November 11, 2010

Birds of a feather

Well, I cut it kind of close, but I got it done! This is for the weekly challenge on the Cricut Circle blog - the challenge was to create a project with birds, at least two Cricut cuts, and stitching of some kind (machine or hand). The little birds in their cage are from Winter Frolic, the scallop background is from Gypsy Wanderings, and the stamp sentiment are from My Pink Stamper's Tweety Hoo Puns set (my winnings from a previous challenge I entered!). Picked up some twine at Joann's today, and used that for the stitching around the scallop, and added a little ribbon along the bottom, as well as some inking. Thanks for looking, and have a "tweet" day!

Wish on a Star

Last night I took some time to clean up and organize my scrap table - it was getting to be a disaster!!! Found this paper, and had a challenge I wanted to participate on that I needed to use stars on - perfect!!! Since I am still loving the easel cards, this is what I came up with. Used Wall Decor and More for the "star" and "wish", some glossy accents on both those blue parts of the cuts, some buttons and ribbons, pop-dotted the sentiment, and the inside part to hold it open, and added some bling with my Jolee's heat set tool.

Tuesday, November 9, 2010

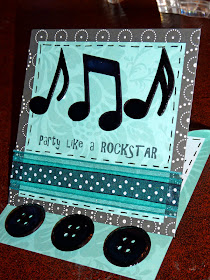
Party like a Rockstar!

One last easel card for a while (at least, I think so!) This was for my sister-in-law's 15th birthday! Used Hannah Montana cartridge for the musical notes, then a Martha Stewart button punch, added some glossy accents to the buttons and notes, a sentiment from my Pink by Design stamps, ribbon, and faux stitching around the outside. Also pop-dotted the notes and buttons to add dimension. Thanks for looking!

Monday, November 8, 2010

Pic of my girls!

Just had to share another picture of my daughters...we took a drive over the mountains to enjoy the fall colors, and the snow at the top! This picture was at a quick stop in the road - love how it captured their personalities so well!

Smiley Cards - Emoticons!

Needed to make a birthday card for my brother-in-law who is turning 12 (I think that's right!). Decided to try out one of the emoticons from the Smiley Cards cartridge on my Gypsy. I think it turned out pretty well! Having so much fun with the Easel Cards, that I, of course, had to make it into one of those! Used buttons and ribbon along the bottom of the inside, and some pen doodling around the edges.


Saturday, November 6, 2010

First Easel Cards!!!

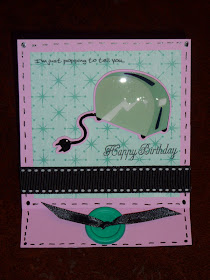
I can't believe that I put off making an Easel Card for SOOO long! For some reason, they just looked difficult, and I was intimidated by them. This afternoon, I saw a tutorial for them, and thought I would give it a try on one of them. I ended up making THREE - they were so easy, and look so neat when they are finished! Here they are:

This first one, I used the cartridge From My Kitchen for the toaster, stuck all the parts together, then coated it with Glossy Accents! Makes it look even more cool and retro! Added a button, some ribbon, and some fake stitching with my Sakura glaze pen...


The next one is a great "guy" card! Those are usually SOOO hard, so I was really excited about this one! Used Just Because Cards for the car, and like the toaster, stuck it all together, and topped it with Glossy Accents. Punched the "button" with the Martha Stewart button punch, and also applied Glossy Accents. A little scribbling, ribbon, and a stamp sentiment finished it off.


The last one, used Create a Critter for the bee, a Peachy Keen stamp for the face, Walk in My Garden for the daisy, Martha Stewart branch punch, some ribbon, and a stamped sentiment. (I couldn't believe that with all my stamps, I didn't have a single "Hap-bee birthday" stamp! So I had to settle for this...)

Friday, November 5, 2010

Shall We Dance card

My new circle cart, Shall We Dance, came yesterday, so I just HAD to try and make something! My oldest daughter, Katie, wanted to help, so she picked the cut to make, and helped choose the papers. Added a little bling, and instead of cutting out the face parts we used a Peachy Keen Stamp. Added a little bling to finish it off. Can't wait to play with this one some more!!!


Thursday, November 4, 2010

You melt my heart...

Since I had been playing with the Smiley Cards cartridge so much, I thought I should check out some of the other cartridges I gained through the Gypsy download! This one used Indie Art - and this is, hands down, my favorite cut from that cartridge. The picture doesn't show it very well, but I used some Glossy Accents on the ice cream and drip. Also some inking around the edges, My Pink Stamper for the sentiment, and a Fiskars paper punch for the lacy bit on the bottom. Super quick and easy!


Tuesday, November 2, 2010

My dear daughters!

Nothing to share tonight except a couple pictures of my two dear daughters that I took this morning! They make me so happy, and I loved these pictures, and just thought I would share them! Love these girls so much!


Ladybug hugs

From the first moment I saw this paper, I knew it had to make something with a ladybug on it! Maybe it is the red and white polka dots on the reverse side of it. So...I used the ladybug on Create a Critter, as well as a Peachy Keen Stamp. The oval in the center was originally going to be the reverse of the paper, but when it was all done, this is what I ended up liking better! Added a little ribbon and bling to finish it off.