Wednesday, November 21, 2012

Peachy Trees - and a FAB Peachy sale!!!

Can you believe that it is the day before Thanksgiving already? I've been busy cooking and getting ready for the day tomorrow - but thought I would quickly share a quick little card I made a while ago - and some info on the Thanksgiving sale going on at Peachy Keen! All the info is at the end of this post - trust me...you won't want to miss it! Here is my little card to share:
I used some of my FAVORITE recently released face stamps (which by the way would be a great thing to pick up at the sale this weekend!):

My trees were cut out with my Silhouette Cameo and a cut file from the Silhouette store.
I used Echo Park paper for the green, and the brown is Bo Bunny double dot paper.
I added the faces, and used my white gel pen and some Copic markers to add some color and character.
The background was embossed in a polka dot pattern using my Cuttlebug, then I attached the trees with foam adhesive.
Finished off with a bit of Baker's Twine wrapped and tied around!
And now - here is that info on the sale going on NOW!!! Thanks for stopping by to visit - and have a wonderful Thanksgiving!!!

GOBBLE UP SAVINGS SALE
START TIME: Wednesday, 11-21-12 at 6AM CST END TIME: Monday, 11-26-12 at 6PM CST
Happy Thanksgiving, Sweet Peaches!

We are ever so thankful for you! So thankful in fact, that we have upped our typical sale Thanksgiving Sale to aGOBBLE UP sale!
  • NO CODE NEEDED... the discounts and FREE stamp set are given automatically to those that qualify.
  • FIVE FULL DAYS OF 22 % SAVINGS on your entire purchase! *exceptions apply- however no minimum purchase required. Thanksgiving Day in the USA falls on the 22nd this year - which is how we determined the 22% off.
  • FREE SHIPPING USA! *restricted items include clip it ups and large gingerbread kits
  • DAILY GIVEAWAYS! FIVE GIFT CERTIFICATES of $50.00 EACH! *One to be given out each day of the sale!! Every order qualifies.
  • NEW STAMPS!! Don't look now but we will have LUCY's ABC's and 123's available for purchase at an awesome price..and they work great with the FREE STAMP SET.
new for Thanksgiving
  • FREE STAMP SET This is a set four pendant/banner stamps on mylar sheet made to go with Lucy's ABC's and 123's! There is a minimum purchase required of $30.00 after discounts to get the stamp set. Please note only ONE FREE STAMP SET per household per day of the sale.Also, PLEASE NOTE...there is NO CODE needed for the free stamp and it will not show up in your cart... HOWEVER, the stamps will be included with your order.
    PK-157 Pendants Banner Stamp Set
    These were made to go with Lucy's ABC's and 123's!
  • NEW SVGS!! I'm not going to tell you what this is about... but MANY have asked me for the SVG to this one!
We will not be able to be reached by phone on
11-22-12 through 11-25-12. You may call on 11-21-12 or on 11-26-12 though. However, for best results during sale dates, please send us an email immediately if there is an error on your order. I will be monitoring email during the sale :)
1-920-632-4175 M-F 9 am to 4pm


Monday, November 19, 2012

Sunshine Birthday

Good Monday morning to you! I couldn't resist putting together ONE last entry into the Moxie Fab World Canvas, Cork, and Burlap Challenge! So...when I had a few moments to play the other day, this is what I came up with:
I used some of my brand new sets of Lil' Inker dies to cut the sunshine out of cork, and the clouds out of vellum. Also cut the banner using the sentiment flag die, then heat embossed the sentiment on it.
Used my Cuttlebug to emboss some kraft paper, and then embossed the white paper with a woodgrain PTI impression plate.
Attached the clouds to the back of the self adhesive cork, then used a foam dot in the center of the sun to apply it to the kraft paper. Added an October Afternoon button, some jute twine, and a bit of washi tape along the side to make some tabs.
I'm going to run out of cork one of these days - but in the meantime, I can tell I have a new addiction! Thanks for stopping by! See you soon!

Sunday, November 18, 2012

Paper Smooches and Play Date Cafe

Okay - I re-posted better pictures taken in daylight for these! I just wasn't satisfied with the ones from last night with bad lighting!

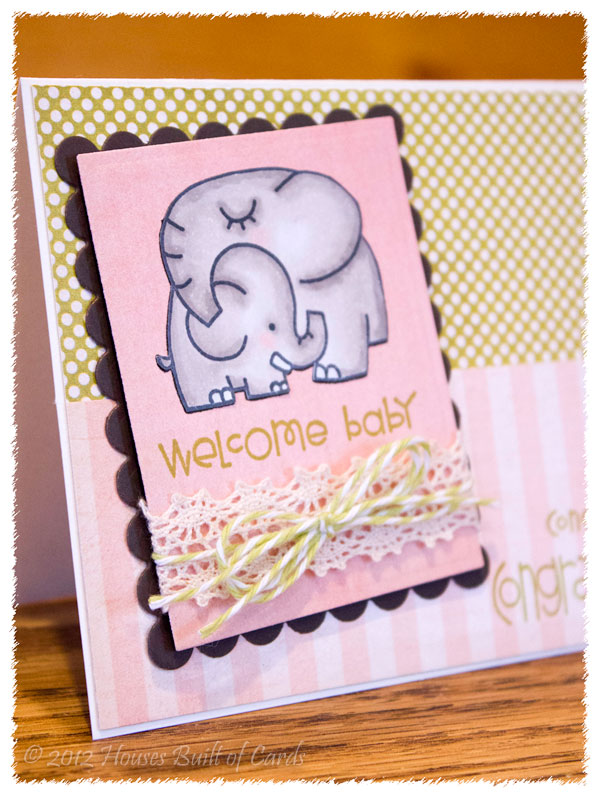
Anyway - I have been itching to play a bit more with my Paper Smooches stamps - and when I saw the color combo over at the Play Date Cafe for this week...I knew just what to do! Here is what I made:

I used the sketch for the Paper Smooches SPARKS challenge


And, of course, the color combo for this weeks Play Date Cafe Challenge:


I used pattern paper from My Mind's Eye, and cut the rectangles out with Spellbinder's dies. I colored the elephant on Copic Express blending cardstock, then hand cut out, and glued onto the pink background. 
Added the sentiment stamped with PTI ink, some lace trim, and some Baker's twine, and attached it with foam adhesive to the gray scallop rectangle. 
Added the sentiments on the bottom right - the little congratulations is from the same set as the elephant and welcome baby, and the large congratulations is from Sentiment Sampler. I stamped these also with PTI ink.
SOOO happy with how this came out! Now...just need to find someone who is having a little girl to give it too! Thanks as always for stopping by!

Saturday, November 17, 2012

Howdy with Paper Smooches

Good Saturday morning! I'm sharing another Paper Smooches card that I made recently - I actually used the first set I ever owned...but still hadn't had a chance to use! It is called Buckaroo and has TONS of adorable images! Here is what I made with it:
I stamped the cowboy boot, and the sentiment, and colored them with Copic Markers. Added the border along the bottom with colored ink from Papertrey Ink, the little face included in the set, and a couple of self adhesive tiny pearls for the cheeks.
And that is where the accidental change happened. I decided after that to run it through my Cuttlebug and cut it out with a Spellbinders Nestabilities Die...only it kind of flattened the pearls! Once I got over the surprise, I realized it was actually kind of a fun effect! So I left it that way! Here you can see the shading and coloring a little better - and those smooshed pearls! 
I cut a circle - also with my Spellbinders Dies - out of self adhesive cork, and mounted the cowboy boot panel on there with brads.
Finished off with some October Afternoon papers from the Sasparilla collection that I used my Tim Holtz distress tool on the edges, and then added some distress ink as well.  
I am linking this up with the Moxie Fab World Canvas, Cork, and Burlap Challenge, and throwing it in the hat for the Paper Smooches December Guest Designer Call (I haven't had that long to play with Paper Smooches yet - but have been having so much fun! So why not at least try, right?)

Thanks for stopping by to visit today! Hope you have a wonderful weekend, as we head into Thanksgiving in only a few day! Yikes how the year has flown!

Thursday, November 15, 2012

I LOVE YOU - shape card

Hello! I love those cards that pop into your head and you just know that they are going to be fun! This one took a little more work than I expected to make it look like I pictured in my head - but after 3 tries, I'm finally happy with how it turned out! Here it is:
 I had been rolling around in my head all of the different Moxie Fab Paper Crafting Tips and Tricks Week Challenges, in particular the Alphabet Stickers Challenge - and as I was trying to fall asleep the other night, this idea popped into my head! I took a few days to have time to put it together, but I'm so glad I was able to!
I used my Silhouette Cameo to weld together two large capital I's in to a card shape - this is about 5x7 inches high. I then cut out a smaller I for the center, and an elongated heart. The white cardstock is by Papertrey ink - rustic cream, and the red is from an older Echo Park 6x6 paper pad.
I used a PTI Linen Impression plate on the white letter I, then inked the edges of everything with Tim Holtz distress ink. Added the scrabble letters (they are Thickers that I just got recently and LOVE!!!), and a bit of natural jute twine in a bow along the bottom. Attached the heart with foam adhesive for a bit of dimension. 
I'm so glad you came to see me today! Hope you are having a wonderful day! 

Tuesday, November 13, 2012

MFT Getting Sketchy #97

Good morning! It has been a while since I have been caught up enough on stuff to join in with the MFT sketches - but I managed to sneak the current one (MFT Getting Sketchy #97) in yesterday! Here it is:
And here is the sketch for the week:

This came out pretty simple - and the lighting wasn't the best when I took the picture - so sorry for that! 
I used some washi tape from October Afternoon on a kraft paper card base, then used a hand trimmed banner, with a small tab cut with a MFT die-namics. I inked the edges of each with Tim Holtz distress ink. 
I used some tiny Cosmo Cricket stickers to spell out friend, then stamped a MFT sentiment stamp in 3 different colors of Papertrey Ink by masking off the edges. I intended to add stitching with my white gel pen after that, but accidentally grabbed a black glaze pen and didn't notice until after I drew the first stitch! Oops! So...black it was! To compensate, I added a bit of black jute twine to the right side to balance it out!
Finished off with a couple of coordinating self adhesive pearls! 

Thanks for stopping by today! Hope you are having a wonderful day!

Monday, November 12, 2012

Merry Christmas Trees - and WINNER!!!

Hi there! I am having so much fun with the beautiful new release from My Craft Spot! I love Christmas, and all the sentiments are as beautiful as can be. So...I was inspired to put together another card to share, using one of the newly released stamp sets!! Here it is:
I used a sentiment from this set (available HERE at My Craft Spot):


All my card elements were cut using my Silhouette Cameo, and a file from the Silhouette store.
I used a combination of older pattern papers from October Afternoon, and My Mind's Eye.
The trees are attached with foam adhesive for dimension, as well as the main scallop image. I also inked the edges of all my cuts with Tim Holtz distress ink.
Added some brown jute twine (also available HERE at My Craft Spot), and a couple of stick on pearls under the sentiment.
And now...want to know the lucky winner of the Joy to the World set from the release hop on Saturday? Random.org helped me pick a number:
Which means the winner is: 
CONGRATULATIONS Barb!!! Make sure and send me an email at housesbuiltofcards@gmail.com with your mailing info so I can pass it on to Kimberly and she can drop that in the mail for you! Again - congratulations!!!

And I hope you are all enjoying your Christmas preparations! If you need some wonderful Christmas and winter sentiments, make sure and check out the wonderful new release from My Craft Spot! Thanks for stopping by to see me today!