Thursday, August 18, 2011

My SISTER has a blog!!! (And a giveaway...)

Just thought I would put the word out for anyone who might be interested - my sister just started her first blog - A Fancy for Food! Not necessarily crafty related - but she is an AMAZING cook, and is working on writing her own cookbook and sharing some of her ideas on her blog! I promise you won't be disappointed!!!


 Click HERE if you are interested in checking her blog out! If you decide to follow her, leave a comment telling her I sent you over, come back and tell me, and I might have a little surprise giveaway!!!


You're OWL-dorable!

Sigh...I really DO love 6x6 paper pads! I love how easy it is to combine pattern paper with them! I finally got around to making this owl card for a friend that had requested it quite some time ago. The final project I got done over my sick weekend!

I also used the Peachy Keen Sketch challenge - I know I took a bit of liberties with it, but hopefully it still works! I just loved that frame shape! I turned it sideways, and instead of using half the frame, I pulled it down and used the whole thing.


Anyway, I used Elegant Edges for the background frame and Straight from the Nest for the owl. Added some machine stitching around the outside edges, a Peachy Keen face to the owl, and a sentiment from My Pink Stamper. Oh, almost forgot...I also pop-dotted the owl from the background just for fun!


Tuesday, August 16, 2011

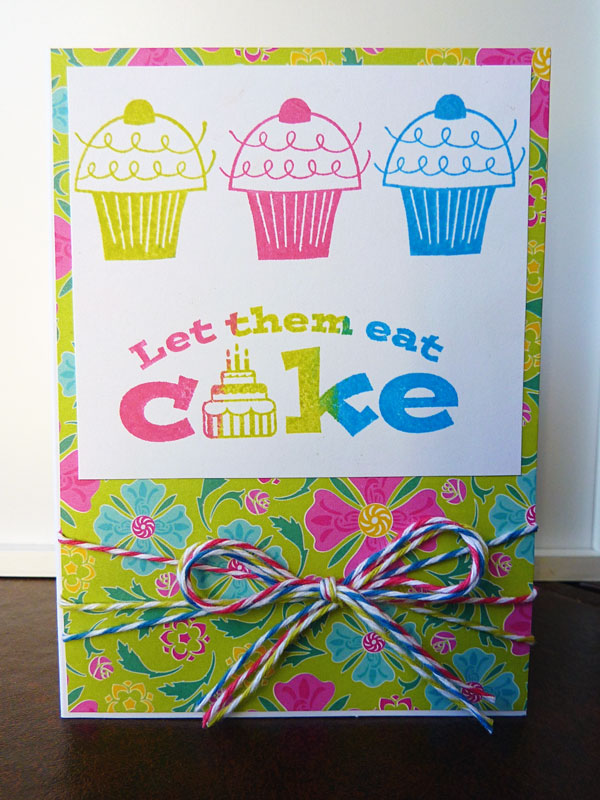
Let them eat CAKE!!!

Just wanted to quickly share the card I made for my nieces 5th birthday! These are some more of the Unity stamps I got from my 100 free stamps, and I hadn't inked these ones up yet. Thought they were pretty cute, and would work well for this!

Stamped the cupcake in 3 different colors, and then smeared the three colors onto the sentiment stamp. Added a bow with some Baker's Twine, and easy peasy card!


Monday, August 15, 2011

A Special Birthday Cake!

This weekend, I had a sick day at home, where I didn't feel like doing much, but fortunately didn't feel too sick to craft! Since our pastor's wife had a birthday next week, I thought it would be fun to make a super special project for her - to let her know how special she is to us all! My kids had fun shopping for fun goodies to fill it with too!

I am also entering this in the Throwback Thursdays Challenge over at My Creative Time to use a retired cartridge, and Wacky Wednesdays over at More than Favors - Friendship. Additionally, I think it fits perfect with this weeks Fantabulous Cricut Challenge - Piece of Cake, and My Craft Spot's Gifts, Bags, and Boxes! Finally, the challenge over at Getting Cricky with K Andrews: treat containers or party theme items.


I used Tags, Bags, and Boxes to cut out the cake boxes. I wasn't sure how many it would take - when I started I was guessing about 6 - it ended up taking 9!


I added some lace around the outside edges with zip dry glue, and then a bit of Stickles for sparkle.


I stamped a tag I had in my stash with a couple of sentiments from My Creative Time stamps - including that cute musical note! Tied it one with some Baker's Twine, and some sheer blue ribbon.


The flowers and leaves were all cut from Mother's Day Bouquet. I coated the flowers with Glossy Accents and added some Martha Stewart coarse glitter. After they dried, I curled the edges, stacked and glued them, and added a button and some jute cort. The leaves I scored down the center, curled them a little, and outlined them a bit with a green copic marker.


It was such a fun project to make! I don't know if I will ever make one again, but I LOVE how this came out - so who knows? Hope you enjoyed!

Saturday, August 13, 2011

Mojo Monday Sketch challenge - My Heart Sings!

I used to really struggle with sketch challenges - for some reason it was just hard for me. I don't know if I tried too hard to exactly follow the sketch, and just felt really hemmed in by them or what. But now, I LOVE doing sketches! I feel like it gets me out of my rut, and inspires me rather than limits me! So I was excited to try this weeks Mojo Monday sketch:


Here is my take on it:


I used Elegant edges for the frame cut-out, and for the border edges, which I welded with my Gypsy onto a rectangle from Plantin Schoolbook. The circle in the very middle of the frame is also from Plantin Schoolbook. I stamped part of an image from the Unity May KOTM onto that circle. Added some different pattern paper to cover the rectangle that my borders were welded too, and a little extra strip - just because the colors matched and it made me happy! Added some machine stitching around the edges, and a bow with some Baker's Twine, jute cord, and a button from my stash.


I also used a My Minds Eye 6x6 paper stack - I LOVE those for cardmaking! Somehow it is a lot easier to cut into a small piece of paper, and it makes coordinating papers together a snap!

Friday, August 12, 2011

My Pink Stamper - Pinkalicious Challenge

I just had fun hopping along the My Pink Stamper's Pinkalicious Blog Hop, and when I saw the challenge - to use one of your favorite things to make a project - I knew just what I wanted to enter! I am also entering this in the Frosted Designs Challenge to incorporate animals.


I used several of my favorite things on this card! I cut the crab with my Cricut (one of my favorite things!) using Smiley Cards (a free download on my Gypsy - one of my other favorite things).


Added a Peachy Face and put him on an Action Wobble - two more of my favorites! Here are a couple of pictures showing the Action Wobble's motion:


And some more favorites: added a sentiment from My Pink Stamper's Biggie Punnies, and the "snap" to the background behind the crab. Tied some Baker's Twine around it and finished with some doodling.


Moxie Fab World - Luminous layers

Hello! If you are looking for my Cricut 360 post, please scroll down or click HERE. Unity FWF can be found HERE.

I made this for this weeks Moxie Fab world Tuesday Trigger - I fell in LOVE with the trigger this week! Something about it just spoke to me...and I actually struggled to make something that I felt was worthy of how much I loved it! The first card I made is below...before I deconstructed it because I just wasn't happy with it! Here is the actual final product:


And here is the trigger - isn't it fabulous?


I tore, inked, and taped the layered strips of patterned cardstock onto plain cardstock. Then I printed off the dress from the trigger picture above, traced it onto vellum, cut it out, and used it as my template. I cut it in half, tilted it a bit to the side, and cut the dress out of my layered paper. Added a bit behind for the back of the dress, and ribbon for the straps. Attached it with pop-dots to my plain card, and added a sentiment from Unity Stamp Co.


And here is where I started. I cut this dress out with my Cricut, put my layered paper behind the cutout, added some machine stitching, a sentiment, and some stick on pearls. The dress just didn't seem right though - too princessy! And the kraft paper wasn't quite right either. And the pearls weren't quite the right color...and the sentiment just didn't fit where I wanted it to, so it was floating in a kind of random place. Anyway - I am SOOOO much more happy with the finished project! What do you think? Was it worth the redo?


I also think this fits well with the Papercrafts August Gallery 2011 celebrating girlfriends! I love the friends that I know I can trust to tell me if the dress REALLY looks good on me, and that they won't say it if it isn't true!!!