Showing posts with label Birthday Bash. Show all posts

Monday, October 17, 2011

Peachy Keen Guest Design Week - Day 1

Good Monday morning!!! If you're visiting from the Peachy Keen Blog - WELCOME!!! (If not - click HERE to head over there and leave a comment there for another chance to win something fun!) 

I'm so excited this week to get to share with you my love of Peachy Keen stamps. They have so many fun things to offer, and I used some things newer to me that I will be sharing with you this week, but my first love is definately their face stamps! It is amazing how much fun and character you can add to a project with them! So this week I thought I would share with you some of my favorite sets. I started today with the Laffy Taffy Face Assortment.


I used my Cricut and the Birthday Bash cartridge to cut out the candles, and after doing a bit of inking, added the faces. I use an eye make-up applicator and a pink stamp pad to add the "blush" on the cheeks, a white gel pen to color in the mouth and eyes, and a red copic for the lips. I ran the white behind the candles through my Cuttlebug, then pop-dotted the candles, as well as the sentiment from the background. This picture shows the dimension a little bit better:


All the pattern papers are from the Echo Park Happy Days 6x6 paper pad - my favorite for cardmaking. I used some Tim Holtz distress ink on the edges of everything - my new favorite for inking! The sentiment is from Emma over at My Creative Time - her stamps are also manufactured by Peachy Keen! Finished off with some Baker's Twine behind the sentiment. 


Here is the set I used for my card today:


And...of course what you have been waiting for!


 Peachy Keen has been kind enough to allow me to select something to giveaway this week to a lucky commenter!!! So...I thought I would let the winner choose what they would like! So, one lucky person this week will win a $25 gift certificate so you can shop for whatever you would like!!!

Thanks for stopping by to visit - look forward to seeing you back here tomorrow!!!

Here are links to some past posts where I used the same set:

Click HERE to see this post.

Click HERE to see this post.

Click HERE to see this post.

Tuesday, September 27, 2011

My daughter's 7th birthday card!!!

Wow...it is hard to believe how the time flies! Yesterday we celebrated my baby's 7th birthday! I still feel like a new mom in so many ways, but she is growing up so fast!!! I asked her yesterday how she got so grown up, and she said: "It took years and years!" Hmmm..."How many years?" I asked. "About 20" she replied! Made me laugh! She figured it out after a few seconds though, and then laughed hysterically - she has the BEST belly laugh ever! Always has! Love her bunches! Here is a picture of her with her birthday flowers from Daddy - isn't she the cutest?


Anyway, here is the card I made for her:


Her current favorite color is orange (it changes every few days!), so I had to use some orange, and some of her other recent favorite colors! I used Birthday Bash for the bear and wagon, and Create a Critter for the sunshine. Added some Peachy Keen faces, and faux stitching. The grass along the bottom I just hand cut with my scissors - a little tedious, but worth it! I love the effect!


And...I had to put the sunshine on an action wobble! They are just so much fun!


You can also see a little better in this picture, I pop-dotted the bear from the background as well.


I am also entering this in two challenges: Peachy Keen's LFIF Sunshine challenge, and the interactive element weekly challenge over on the Cricut Circle Blog.

Thanks for stopping by! And Happy Birthday to my sweet Amy!!! 


Friday, July 8, 2011

Cricut 360 Challenge #2 - Circle Thank you card

Hello - and welcome to week two and another great challege over at Cricut 360! Thank you to everyone who participated along with us and joined us for our first challenge - we hope you will join us again! I had so much fun browsing through all the entries - so much great talent and inspiration!!! This week, your challenge is to make a circle shaped thank you card. Here is what I made:


Because my Gypsy is on it's way to Provocraft to get replaced (insert sad face...) I was trying to figure out how to make a circle card. Kind of funny, but I forgot that there were cartridges that already had circle cards on them - and I didn't need my Gypsy to weld them together! (Hahaha...funny how easy it is to get stuck in a rut!) Anyway, one of those cartridges is Birthday Bash...and I happened to glance at my Scrappy Mom's stamps and saw the "Tons of thanks" sentiment...and just like that, I knew the elephant from Birthday Bash was PERFECT!!! I added lots of faux stitching on him, pop-dotted his ear for fun, and then couldn't resist, I put him on an Action Wobble! It was hard to get an action shot with the wobble, since the card kept wanting to roll away! So...I borrowed my daughters hand to hold it steady:


Finished off with a bit more doodling around the edges, and a bit of Baker's Twine on the side.


TONS of THANKS to you for stopping by today!!! Now...I want to see what you make - so go link up your circle thank you card at Cricut 360 for a chance to win this weeks prize:


Saturday, May 28, 2011

Hoppy Birthday!

Good morning! Today I have a card for Peachy Keen's LFIF Challenge: Make whatever you want with your favorite Peachy Keen Faces!!! Well...I don't think I could pick just ONE favorite!

All the cuts for this card are from Birthday Bash. Sentiment is Pink by Design. The bunny has a Peachy face from the Critter faces in medium, and a tiny bow out of Baker's Twine. Added LOTS of faux stitching, and some stick on pearls for the corners.  


Thursday, May 5, 2011

Thanks Mom Blog Hop!!!


Welcome to the THANKS MOM BLOG HOP. Thanks for joining us to enjoy all the wonderful crafty inspiration in honor of mother's everywhere from the talented designers in this hop.

You should have arrived here from Robin. If you missed the beginning of the hop, please go back to the start of the hop at 
Debbie to start so you don't miss any of the projects. There is a Grand Prize Blog Candy offered so you want to start at the beginning and read how to participate to win. I have listed the entire line-up for you at the end in case you get lost!

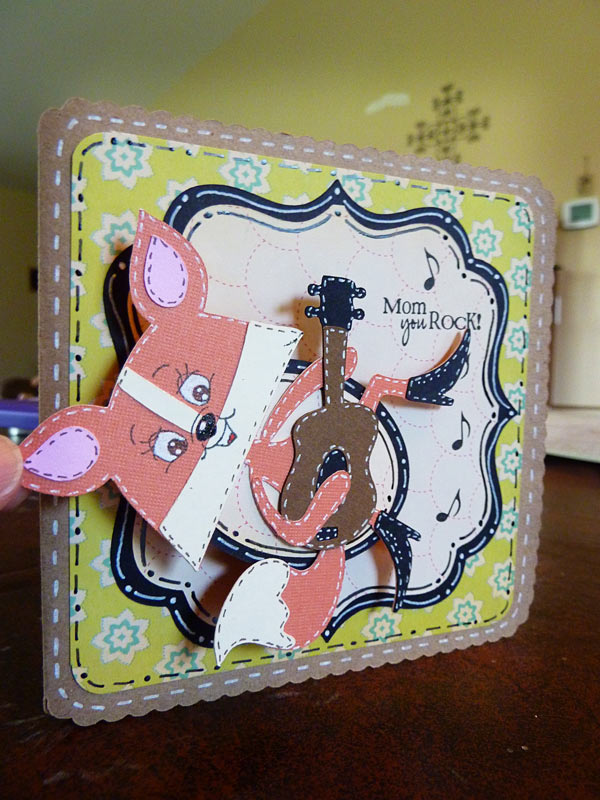
For my project, I made a Mother's Day card. I used Lacey Labels for the shaped card, welded on my Gypsy, and all the other background shapes. The cute critter is from Birthday Bash with a Peachy Keen Face from the Wide Eyed and Bushy-tailed assortment. I put him on an Action Wobble - just LOVE those things! I had to add an oval shape on the back of him to have a large enough shape to attach the Wobble without it showing. Did lots and lots of doodling, and finished off with a sentiment from Emma's stamp set called Mom You Rock. The music note is also from Emma's stamps, but came from Wow! So Many Candles.


So to thank you for stopping by, I thought I would giveaway a little bundle of some of my favorite things. There is an assortment of all 11 colors of twine from The Twinery (either 2 or 3 yards...can't remmber exactly how much I cut off!), a bottle of Glossy Accents, 3 Action Wobbles, some stick on pearls, and a clear stamp border set. Just leave me a comment with a way to reach you, and I will draw a winner on Tuesday May 10th!!!


Debbie – START OF HOP
Brenda
Dawn
Chrissie
Cindy
Suzanne
Paula
Maria
Robin
Heather - You are HERE!!! 
Jami
Dana
Claire
Jenny
Lauren
Cassie
Stefani
Heather
Darcy
Kelly- END OF HOP
Thanks for hopping along with us. Remember, if you leave a comment on every designers blog hop post, your name will go into the drawing for the Blog Candy that our THANK MOM BLOG HOP hostess, Debbie, is offering as a Grand Prize.

Next up on the hop , is the talented Jami - click on her name to go visit her next!

Wednesday, March 9, 2011

Rock On! Birthday card for my nephew!

I can't believe that tomorrow is my nephew's birthday! He was only about 2 weeks old at my wedding, and is now turning 11!!! Which means in 2 short weeks, I will be celebrating my 11th anniversary. My, how the time flies! Anyway, as usual, boy/guy cards are a bit of a challenge for me, but I think I pulled one off! I am also entering this in the color challenge at More Than Favors - Wacky Wednesday's to use green, yellow, and purple, as well as the Cricut Circle Blog's weekly challenge - this week to make a guy card incorporating at least 3 different elements. I chose twine, distressed edges, buttons, and stars - so I guess I did 4 things!

I used Birthday Bash for the card base, star, and sentiment. Ran the star through the Cuttlebug, added doodling, inking, and used my Tim Holtz distress tool on the edge of the star. Also put a little Glossy Accents on the sentiment, and finished with a little Baker's Twine and a button.

Tuesday, March 8, 2011

It's all about ewe!!! (Birthday card for my mom!!!)

So...don't look at this today Mom!!! Tomorrow is her birthday, so I needed to get this done for sure! I am also entering this in two different challenges: Peachy Keen's Sketch Challenge to use the sketch they provided - and add some bling - and More Than Favors Wacky Wednesday - zoo theme (they have sheep at our zoo...in the petting farm area! So hopefully that counts!).

The card shape is once again from A Child's Year - I am loving all the shapes on there that are great for cards! This is one of the tags resized on my Gypsy and welded - it was originally a rectangle, and I wanted a 5x5 card - love how I can change it on my Gypsy! The circles on the background were also cut from a tag on that same cartridge - the outer one was cut from glitter paper. Found the sheep on Birthday bash, and cut off the extra so it was just a sheep, ran the wool through the Cuttlebug and added a Peachy face from the Wide-Eyed and Bushy Tailed Assortment. Couldn't resist a little more bling, so I added that with my Jolee's heat set tool, and added a bow and some faux stitching. Also pop-dotted the sheep from the background, and added a sentiment from Pink by Design (or actually part of two different sentiments, put together to say what I wanted!). Can't wait to give it to my mom (she loves sheep, by the way!).

Monday, February 21, 2011

Peachy Keen Sketch Challenge - Cherish today

Can't believe how the time has flown, and realized I hadn't had a chance to make something for the Peachy Keen Sketch Challenge 45, so I had to take a few minutes tonight to get that done!

Used Birthday Bash for all the cuts, and some of the new release Peachy Faces (LOVE THEM!). Ran the circle background through the Cuttlebug, added some Baker's Twine, a sentiment from Pink by Design, and lots of faux stitching. Finished off with a sweet pink bow along the side. Thanks for looking - have to be short and sweet...gonna go watch a movie with my hubby!


Tuesday, February 15, 2011

Glitter and thanks!

Just wanted to share a quick fun card that I have been working on a little here and there over the last couple of days. I discovered that my local Ross store has scrapbooking stuff - dangerous information! But I found this paper that was so yummy...and the price was great, so how could I resist?

The card base is cut from Birthday Bash cartridge. It was actually intended for something else that didn't work out, but it was perfect for this! Did LOTS of stitching with my white gel pen as I went around it. The stamps are, of course, from Unity Stamps. Added some glitter with zip dry glue to one of the grab bag stamps (that I used yesterday in a different way), as well as a sentiment from a set I got on sale from them. Added some dew drops, a Prima flower with a button and some Baker's Twine for a bow.


Thursday, February 3, 2011

I (heart) you banner

There were a few different challenges I wanted to enter all at once, so last night I made this cute little banner to surprise my daughters with when they wake up this morning. I'm going to let them hang it up in their room. I'm sure they will be SOO excited, and I can't wait to see their faces!

The first challenge was over at Made by Momo, and it was to use the colors hot pink, black, and white and use at least 1 heart. If that wasn't obvious already!

The second challenge was at Crafting with Cristina, and it was to make a Valentines themed project - but NOT a card! That made it a little tougher for me, since cards are definately my favorite thing to make!

The last challenge was over on the Cricut Circle blog, and it was to make a banner, with at least 3 Cricut cuts.

So I cut the banner from Birthday Bash, as well as the scalloped circles and the letters. The heart came from Simply Charmed, just without the face showing, and I cut the top white layer by welding together two different size hearts. The little cupids are from the Sweethearts cartridge. I added Glossy Accents to all the black parts of the cuts, icicle Stickles to the center of the heart, and black Stickle dots to the edges of the white scallops and the white part of the heart. Did some doodling, and then strung it together with Baker's Twine. Oh yeah...almost forgot...also pop dotted the I (heart) U part as well!


Thursday, January 27, 2011

Sending love your way...

I love using both stamps and my Cricut on the same card! This one I especially had fun with! Also entered this in the Cooking with Cricut birthday challenge!

I started off with the little present from Unity Stamps, and after I colored it in with my Prismacolor colored pencils and cut it out, I suddenly pictured it needing someone (or something) holding it! So...I pulled out Birthday Bash, found a shaped card base, and the cute little critter! He was supposed to be holding the number one, but I skipped that part, as well as his party hat, and hid the face with my Gypsy. Added a Peachy Keen Face, a sentiment which is also from Unity Stamps, some faux stitching with my white gel pen, and a little bit of Baker's Twine on the side for a bow. Fun, fun, fun!!!


Monday, January 17, 2011

My Pink Stamper Blog Hop Challenge!!!

Made this for the challenge at My Pink Stampers Blog Hop! For some reason this just popped into my head! (Almost forgot that I also wanted to enter it in the Scrappy Moms Terrific Tuesday Challenge! The challenge was to use Birthday Bash - which I did!) 

All cuts, including the shaped card, are from Birthday Bash. Added a Peachy Keen Face, a Prima flower with a stick on pearl for the center, and then pop-dotted the bird from the background. The sentiment is from My Pink Stampers Tweety Hoo Puns stamp set. Also added some pink pearls to the corners, and some doodlin', as well as LOTS of inking on everything! 


Tuesday, December 28, 2010

Little ballerina...

Didn't plan on making a card today...it just kinda happened! I was looking at the weekly challenge on the Cricut Circle blog, and started to think about this set ofstamps by Crafty Secrets I have had in my stash for a bit that I ordered from JoAnns. Hadn't had a chance to use them, and this morning I sat down for a second, because I suddenly wondered what it would look like stamped on patterned paper. Next thing I knew I was coloring it in...just to see what it looked like...then I grabbed the blue from in front of me to mat it...before I knew it, I had my Cricut Birthday Bash cartridge out to cut the shaped card out!!! Added a little doodling, and some stick on pearls, and whether I planned it or not - I had a card!!! I am really happy with it too - double bonus!!!


Sunday, December 19, 2010

Party til the cows come home!

Needed to make a birthday card for my brother-in-law yesterday, so I broke out my trusty Birthday Bash cartridge! Guy cards are SOOO hard to make, but I think this one came out pretty good! I had just gotten my new set of Pink by Design stamps in the mail too, Take the Cake, so I used that for the sentiment. All cuts came from Birthday Bash. I added a little Cuttlebug to the background, a bit of ribbon, some doodling, and pop-dotted the cow from the background.


Thursday, November 25, 2010

Thanksgiving Place Cards...

My sister is hosting Thanksgiving this year, and she asked me if I would make some placecards for the table. Well, live has been busy enough, that last night was the first chance I got to sit down and do them. I decided to make them as simple as possible, since I needed to make about 24 of them! However, I learned...that what looks simple when you try it on one of them, still ends up being a lot of work when you multiply it by 24!!! But it's okay, it was still fun!

I hope these match her colors alright, since all I had to go on was that she was decorating with green and silver! I started off with a card from Birthday Bash cartridge, and added another shape from Birthday Bash for the name plate. Used my hole punch to put holes in the side, thread some ribbon through, and tie in a simple knot. The leaves on the bottom came from the cartridge Give a Hoot, using the border feature. Doodled with a Sakura Gelly Roll pen called Silver Star - love how glittery it is! Finished by adding some Glossy Accents over the leaves.

Hope you all have a wonderful Thanksgiving!!! I am so thankful for all the ways God has blessed me - this year, and always! I praise Him for more things than I can possibly list here! Blessings to you and your family!!!


Friday, November 19, 2010

Yummy!

Only got one card done last night - I think I was kind of tired! I struggled a little on this one, but I like the end results. Used Birthday Bash again for all the cuts, Cuttlebug on the background shape, some more Glossy Accents, and some bling with my Jolee's heat set tool. Added some ribbon, a little inking, and a stamped sentiment. Thanks for looking!


Thursday, November 18, 2010

Birthday Bash is in the house!!!

I had been wanting this cartridge, pretty much since the day it came out. However, I like to wait until they have been out for a bit and the price comes down some. So...I set myself a price limit on what I would pay for it, and have been watching on ebay, and FINALLY got it for the price I wanted! It came yesterday, so without a doubt, I knew what I would be working on last night! Here is the results (all cuts are from Birthday Bash):

The first one is COVERED in Glossy Accents and Stickles! I also pop-dotted the candles from the background.


This second picture shows a little better the way the candles are popped off the background. 


This next one also has some Glossy Accents, and I ran part of the critter through my Cuttlebug, then popped both him and the sentiment from the background. Added some bling with my Jolee's heat set tool.