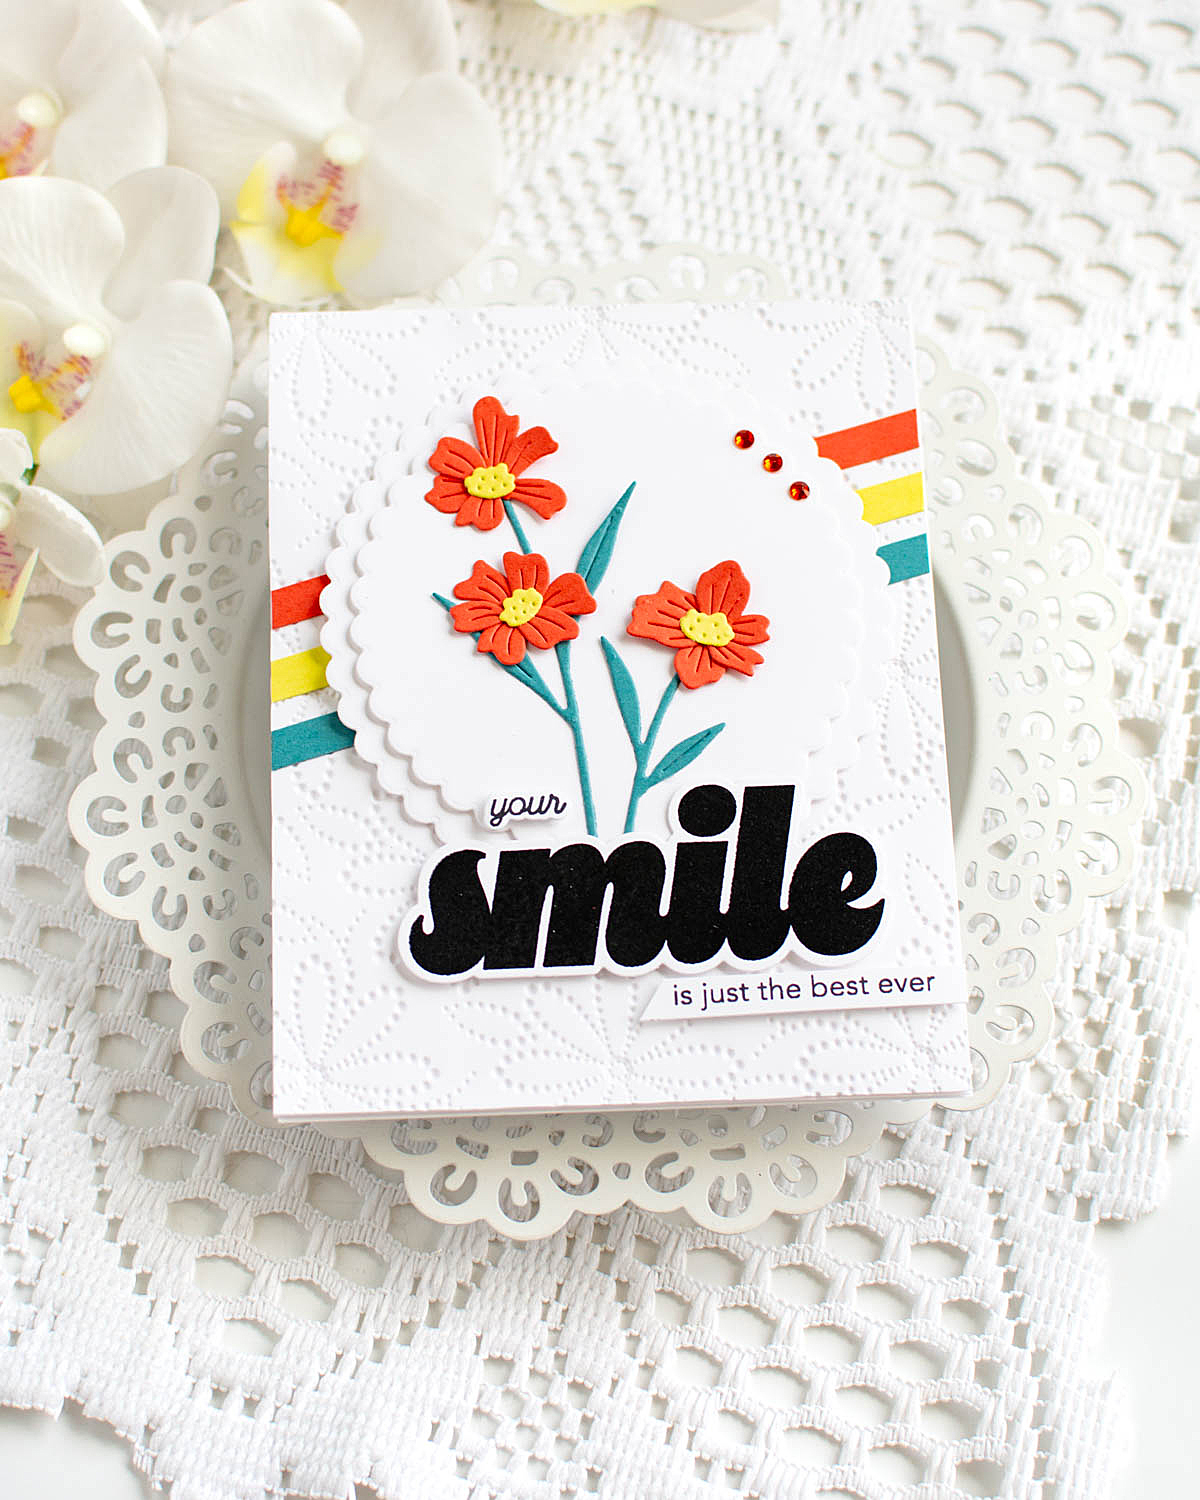
Saturday, January 25, 2025

Embossing Folder Fun - Simon Says Stamp

Good morning! Yesterday I did my first YouTube live on my own personal YouTube channel, using some supplies from Simon Says Stamp. It was fun to add something fresh to my long neglected channel, and flex those live muscles that were feeling a bit rusty after a long break! As a bonus, I used 3 different embossing folders, which happen to be 20% off right now at Simon Says Stamp using code EMBSF - you can check them all out here if you are interested in building your embossing folder stash! I share my favorite tips for using these embossing folders, and great ways to get a fabulous impression when using them!


Here is the live video if you want to see these cards come together, or you can watch it directly on YouTube HERE:


I used 3 different embossing folders - Kaleidoscope, Criss Cross Floral, and Floating Flowers. I used 3 colors of newer Simon Says Stamp colored cardstock from the DieCember release - Steel, Sage, and Honey. Each one had a circle cut in it using Nested Circles die, and then sentiments were added with an older release - Hello You - which is such a fun and classy set that I enjoyed pulling out again! I created an ombre shiny sentiment (watch the live video if you want to see how to create it!), and tucked in a few die cut greenery pieces from Winsome Branch and Privet Branch from Champagne glitter cardstock on two of the cards. To each card I added a bit of metallic thread - Vivant Silver, Vivant Rose Gold, and May Arts gold cord. Finished off with some Dazzling Gems in Rainbow for the yellow card, and Prism for the other two cards! Here are more photos of these finished cards:


Product links are all below - including affiliate links where possible, which simply means if you use one of the links below that I receive a small commission at no additional cost to you. Thanks so much for stopping by! Have a wonderful day!!!


Friday, January 24, 2025

Floral I'm Sorry Card - Simon Says Stamp

Good morning! Remember the cards I shared yesterday using some fun supplies from Simon Says Stamp? Well, I mentioned that I had extra die cut florals that I saved to use on another project - this is what I ended up using those additional flowers on!


For this card, I used all those extra assembled florals from yesterdays card that were die cut with the Exotic Blooms wafer die from LavenderLemon Chiffon, and Cornflower cardstocks for the flowers, and with Green Apple and Green Leaf cardstocks for the leaves. I used Nested Circles to create a window in an A2 panel, and stamped my small sentiment from Moments of Grace stamp set so that it curved around the circle at the top left, as well as the secondary sentiment at the bottom. I popped it up with foam on my cardfront, then tucked all those flowers in, popping the bloom up with foam adhesive. I then layered over the larger sentiment die cut using I'm Sorry wafer die from satin gold cardstock and vellum for the shadow layer. Finishing touch was a few Dazzling Gems in Gold tucked around the frame! Here is a closer look at this card:


Product links are all below - including affiliate links where possible, which simply means if you use one of the links below that I receive a small commission at no additional cost to you. Thanks so much for stopping by! Have a wonderful day!!!


Thursday, January 23, 2025

Framed Die Cut Florals - Simon Says Stamp

 Good morning! Today I'm jumping from plaid to die cut florals, and lots of die cutting on these cards using supplies from Simon Says Stamp - some simple stamping for just the sentiments lets the die cutting shine!


For these cards I started off by die cutting lots of pieces with the Exotic Blooms wafer die - a current favorite floral die! I cut the flower portion twice each with cardstock in Lavender, Lemon Chiffon, and Cornflower, then the leaves twice each with Green Apple and Green Leaf. I assembled all the flowers with liquid glue, and ended up using about half of them on these cards, and the other half I'll be sharing on another card soon. I added some dainty frames using Thin Frames die, cut from Satin Gold cardstock. Before adhering all those down, I added some texture to the cardbases with Picket Fence Studios Paper Splatter in Opaque Black. Once that dried a bit, I glued the frames and flowers down, tucking just a bit of foam adhesive behind only the flowers at the top to let them pop up for some simple dimension. I tied some May Arts Metallic Gold String across the top, and then added some trios of the smallest Dazzling Gems in clear to each frame/floral combo. Finished off by stamping dainty scripted sentiments from Sunflower Fields stamp set in Nocturne Versafine Clair ink. Here is a closer look at these two cards:


Product links are all below - including affiliate links where possible, which simply means if you use one of the links below that I receive a small commission at no additional cost to you. Thanks so much for stopping by! Have a wonderful day!!!


Wednesday, January 22, 2025

Bright and Airy Shaker Cards - Simon Says Stamp

 Good morning! I'm back today with a twist on yesterday's cards, and also using some of the leftover pieces from those cards. I love when I can get additional cards by using something that is not used on the original project! I'm once again using some supplies from Simon Says Stamp. And bonus - they are shaker cards too!


The outer frame was actually a negative piece from the cards I shared yesterday, die cut using Chunky A2 Scalloped Rectangles dies. Fun fact: I always try to die cut larger pieces from an A2 panel, and center them well, that way I can use the negative space to create another card, like today! I added some different Memory Box 6x6 Nutmeg plaid pattern papers to the cardbase, and then die cut the smallest of the scallop rectangles for the center. I stamped a smaller floral from the same Vintage Garden stamp set using Nocturne black ink like yesterday on the side of that piece, and added sentiments from Tiny Words Faith stamp set. I tied some Vivant Silver Metallic Cord around that piece, and then mounted it with more of that Big Momma foam tape roll on the acetate window I created. I filled the shaker with Pretty Pink Posh 3mm sequins, which are a perfect size for shaker cards. And I added foam behind the small scallop panel, that way the shaker mainly goes around the edges of the frame. A fun touch that makes the shaker more solid and stable, and it also was more frugal with the sequin filling! Here is a closer look at these cards:


Product links are all below - including affiliate links where possible, which simply means if you use one of the links below that I receive a small commission at no additional cost to you. Thanks so much for stopping by! Have a wonderful day!!!


Tuesday, January 21, 2025

Elegant Plaid Card Duo - Simon Says Stamp

 Good morning! I've got a pair of elegant cards to share today, using some supplies from Simon Says Stamp. I absolutely adore plaid, and gold, and simple floral silhouettes...not to mention layered cards!


For these cards, I started off with some Memory Box 6x6 Nutmeg pattern papers that had some gold foiling on them. I then cut a layer of white cardstock using Chunky A2 Scalloped Rectangles dies, then trimmed some Cream cardstock to fit inside the scallops and leave a nice border around. On that panel, I stamped some intricate florals from Vintage Garden stamp set using Nocturne black ink, which is amazing for a nice, crisp, detailed image like this! I added dainty sentiments from Sketched Flowers stamp set, and used my Tim Holtz distresser tool to add a bit of texture around those pieces. Then I layered them on the white scallop pieces with Big Momma foam tape roll - I love that it is thinner, so I could use it on two layers, and not end up with an overly thick card. I wrapped some May Arts Gold Metallic string around those panels and tied in a bow, then mounted those panels on my plaid bases. Finished off with a few Dazzling Gems in gold on the flower centers for a touch of extra sparkle! Here are more photos of these cards:


Product links are all below - including affiliate links where possible, which simply means if you use one of the links below that I receive a small commission at no additional cost to you. Thanks so much for stopping by! Have a wonderful day!!!


Monday, January 20, 2025

Ombre Glitter Leaf Cards - Simon Says Stamp

  Good morning! This past week I received a package with a few fun new supplies that I ordered from Simon Says Stamp - I couldn't wait to put some of these new (to me!) finds to use, and created these two cards!


So, first new find on these cards is that DELICIOUS Tonic Mermaid Shimmer Ombre Glitter Cardstock - I mean, seriously, so pretty!!! Because the sheets are 8 1/2" x 11", you mostly get either the top or bottom ombre on a standard cardfront. But, I wanted all of it, so I cut one A2 panel from the top and bottom, then trimmed them in half and fit them together. This made a perfect place to settle the Whirl Fancy Leaf die from the DieCember Release that I hadn't had a chance to use yet either. Then, this brings me to the next new find, that these photos just DO NOT do justice too. Dazzling Gems in Rainbow - and they are MAGICAL! I don't know why I hadn't seen them before. As you tilt them around, they have all the colors of the rainbow hiding in them. So fun! I used those for one card, then used a tried and true favorite - Prism - for the other card. Just for variety. :) Finally, I added sentiments from Everyday EZ strips sentiments, and a little bow with a recent favorite find - Vivante Silver Metallic Cord. Here is a closer look at these cards:


Product links are all below - including affiliate links where possible, which simply means if you use one of the links below that I receive a small commission at no additional cost to you. Thanks so much for stopping by! Have a wonderful day!!!