Showing posts with label Create a Critter. Show all posts

Thursday, September 27, 2012

Teddy Bear Balloons - Birthday Card for my youngest daughter


Good morning! I'm excited to be sharing over at My Craft Spot today!

Yesterday was my sweet daughter's EIGHTH birthday! She is my baby...and I can't believe how fast the past 8 years have flown by! I also was super excited to finally unpack my Cricut - just in time to make her a special birthday card! She has always LOVED bears, so it was super fun to make a special bear card for her!
I used the original Create a Critter cartridge to cut out the bear balloons, and omitted the string so I could make my own using Baker's Twine.
For the balloon strings, I used traditional black Baker's Twine - you can find it at My Craft Spot HERE. I also used the Tiny Tag Dies and matching Tiny Tags stamp set to add to my bow holding the balloon strings together (you can find both those items HERE). I added a tiny pink pearl on top of my bow, and glued the bow down, and also used a tiny dab of quick drying glue to hold the very bottom of the strings to the card - that way I could keep the strings laying the way I wanted them too. Another quick tip is to put a piece of foam adhesive behind the tag to hold it in place, but allow it to still look dimensional.
I added some Peachy Keen faces to my bears, using an assortment of face part kits (the 3 kits I used are HEREHERE, and HERE) I added some sweet cheeks with a Copic marker, some gel pen dots, and added Glossy Accents to the eyes and noses. I added the eyelashes to the top bear, because I didn't realize until after I had finished stamping the faces, that she would be offended if it didn't look like a girl (and not surprisingly, she did ask me if they were all girls!)
All my papers are from Echo Park 6x6 paper pads from the Eclectic and the Sweet Day line.  
I inked the edges of everything - including the balloons - using Tim Holtz distress ink in Antique Linen. I love the subtle dimension that it gives to finish off a card, without being overwhelming! Definitely my favorite color!
I used foam adhesive dots to attach the balloons - also for a bit of dimension, and added some teeny tiny pearls to the ears to give them "earrings."
I'm so grateful that she LOVED it!!! It was our first family birthday party in our new home - and I'm so grateful that it was fun and special for her! 
Thanks for stopping by today! 

I'm definitely looking forward to getting back in the groove of crafting. I feel like I keep saying that, then keep finding myself needing to put it off for one reason or another! We started our homeschool this week, and I also canned 21 quarts of applesauce, and 14 quarts of pears! That all happened in 3 days, together with homeschool, unpacking, and baking a birthday cake and making a special birthday dinner! No wonder I'm so exhausted! But I know we will soon be in the groove of things again, then my crafty stuff won't be feeling so neglected! 

Wednesday, February 15, 2012

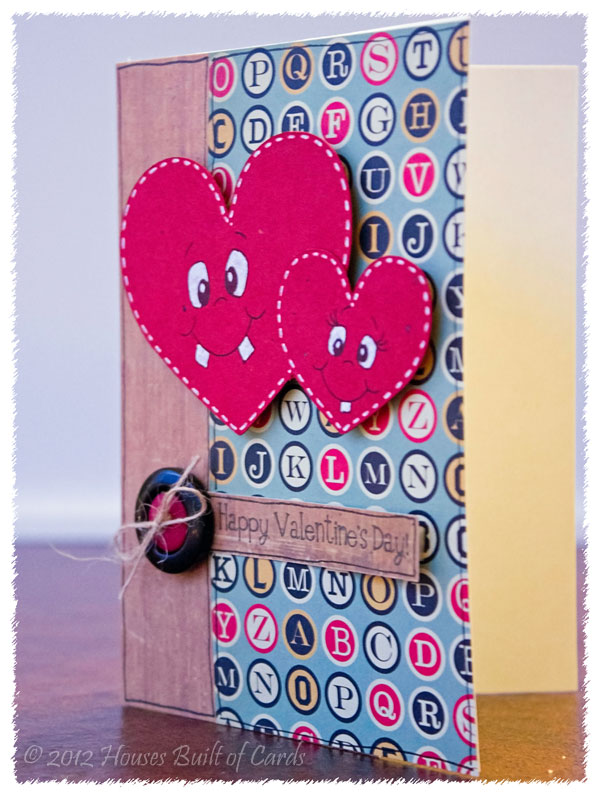
A day late - but another Valentine's Card!


I know Valentine's Day was yesterday - really I do know! But I didn't want to miss sharing this card with you! I think it would work well as a masculine Valentine's card - or with a different sentiment, an anniversary card.
I used some Cosmo Cricut paper, combined with some Crate Paper for the wood grain. 
The hearts were cut from Create a Critter - with a Peachy Keen Face and some white stitching added to them! 
The sentiment piece was hand trimmed, and pop-dotted on one side, then tucked under a button with some PTI twine on the other side. 
Also pop-dotted the hearts. Finished off with some doodling around the edges, and easy card - DONE!!! 
Hope you had a happy and special Valentine's Day!!!


Monday, February 13, 2012

Market Street Stamps Paint the Town Color Challenge


Good afternoon! I'm quickly popping in to share my card for the Market Street Stamps Paint the Town Color Challenge. Here is my card:
And here is the color Combo:


I was amazed to find out that these colors were really fun to use together! I was a little curious if I would have trouble with it, but it came together pretty easily! I used some of my favorite 6x6 paper pads: Basic Grey's Picadilly, and Crate Paper's Paper Heart. 
I am especially pleased with how the sentiment came out - LOVE the dimension! 
I hand-cut a strip of pattern paper, stamped the sentiment, then tucked one end behind a heart I cut with my Cricut and Create a Critter cartridge. The other side, I stuck foam dots under, then kind of scrunched it over before sticking it down. 
I did the same thing with the top peaks of the heart, putting  a foam dot under each of them, then sticking the bottom directly on the card. Added a Papertrey Ink button with some button twine tied through the center. 
I stamped the compass on pattern paper, and did a little coloring with Copic markers. Matted it with some more pattern paper, and used a Fiskar's embossing edge punch along the bottom edge.  
Wrapped a little more button twine around it, then used pop-dots to attach it to the card. 
Oh yes - almost forgot! I also inked the edges of everything with Tim Holtz distress ink in Tea Dye. 
There it is! I'm off to see if I can get a couple more card entries done!

Tuesday, September 27, 2011

My daughter's 7th birthday card!!!

Wow...it is hard to believe how the time flies! Yesterday we celebrated my baby's 7th birthday! I still feel like a new mom in so many ways, but she is growing up so fast!!! I asked her yesterday how she got so grown up, and she said: "It took years and years!" Hmmm..."How many years?" I asked. "About 20" she replied! Made me laugh! She figured it out after a few seconds though, and then laughed hysterically - she has the BEST belly laugh ever! Always has! Love her bunches! Here is a picture of her with her birthday flowers from Daddy - isn't she the cutest?


Anyway, here is the card I made for her:


Her current favorite color is orange (it changes every few days!), so I had to use some orange, and some of her other recent favorite colors! I used Birthday Bash for the bear and wagon, and Create a Critter for the sunshine. Added some Peachy Keen faces, and faux stitching. The grass along the bottom I just hand cut with my scissors - a little tedious, but worth it! I love the effect!


And...I had to put the sunshine on an action wobble! They are just so much fun!


You can also see a little better in this picture, I pop-dotted the bear from the background as well.


I am also entering this in two challenges: Peachy Keen's LFIF Sunshine challenge, and the interactive element weekly challenge over on the Cricut Circle Blog.

Thanks for stopping by! And Happy Birthday to my sweet Amy!!! 


Monday, August 22, 2011

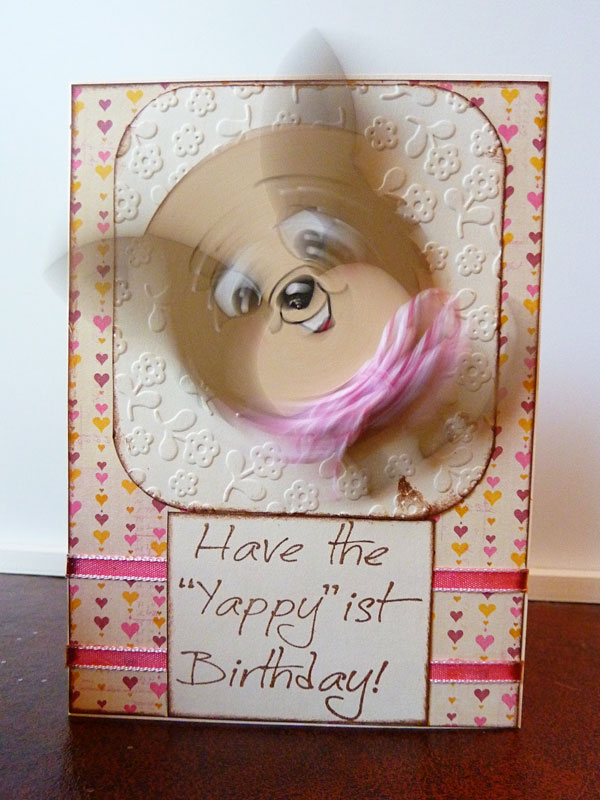
Action Wobble Puppy Card!!!

Good morning! I had a blast creating this card! It was made for one of my daughter's best friends who is celebrating her 8th birthday! I am also entering this in the Peachy Keen LFIF challenge - Our Furry Friends, and the Fantabulous Cricut - Birthday Bash Challenge.

I cut that cut puppy from Create a Critter, inked the edges a bit, added a Peachy Keen face and a Baker's Twine bow - then put him on an Action Wobble!!! (Which, by the way, are back in stock at Peachy Keen - I'm SOOOO happy to see that they have them again - I was starting to get scared I would run out!)


Here is a couple pictures of how the Action Wobble works:


The background is just a rectangle that I rounded the corners on then ran through my Cuttlebug. Added a bit off ribbon, some inking, and a sentiment from My Pink Stamper.


Thanks for stopping by - hope you have a fabulous week!!!

Wednesday, February 23, 2011

sMOOches!!!

This card was SOO much fun! And I am really proud of myself - I am able to enter it in FOUR challenges!!! That is a record for me...and something I have been working on - because there are so many fun challenges I want to enter, and I have a really hard time mixing them.

So, the first challenge is over at Scrappy Mom's Stamps to use Create a Critter. The second challenge is over at More than Favors Wacky Wednesdays to use a farm theme. The third challenge is a sketch challenge over at Peachy Keen Stamps Challenge Blog. The fourth and final challenge is on the Cricut Circle Blog, to use an animal cut.

 The cow is from Create a Critter, with a Peachy Keen face from the Princess faces added to it, and some doodling, inking, and little Baker's Twine bow. The yellow and green background is from Preserves, stretched and lengthened with my Gypsy. The banner is from Winter Frolic, with a sentiment from Pink by Design. Cut the white square behind the cow, used a corner punch on it, added some doodling, and ran it through the Cuttlebug. Finished by pop-dotting the cow and the center of the banner.


Thursday, January 13, 2011

Hang in there! Peachy Keen Sketch Challenge

I had so much fun with this one! This is for a sketch challenge over at Peachy Keen Stamps (see HERE for more info). I wanted to do something other than flowers or balloons for the 3 items on the circle - so I suddenly pictured kites with cute Peachy faces! Couldn't wait to make it!

I found the kites on Create a Critter cartridge, and added the Peachy keen faces from Basic Paper Doll Face Assortment. Those were pop-dotted from the background, both of which were cut from Preserves, and inked. The top layer was run through the Cuttlebug. I pop-dotted that whole thing from the background, added some bakers twine, and buttons, as well as a sentiment from my Pink by Design stamp set.

Suddenly, I'm not in the mood for snow, I'm in the mood for summer!


Monday, January 3, 2011

Little boy cards!

Last night I realized that I needed to make a birthday card for my nephew, who is turning 1 today!!! Couldn't make up my mind which of the 2 cards in my head I wanted to make, so I made both of them! Now I just need to pick which one he is going to get!

Both the dog and the lion came from Create a Critter, with a Peachy Keen Face on both of them, and a Pink by Design sentiment. The hardest thing about boy cards for me, is to keep them clean and simple, and not crowd them with ribbon or flowers and such. Little boys are a LOT easier than grown men though!!! Anyway, I was able to restrain myself this time and keep them simple!


Saturday, November 6, 2010

First Easel Cards!!!

I can't believe that I put off making an Easel Card for SOOO long! For some reason, they just looked difficult, and I was intimidated by them. This afternoon, I saw a tutorial for them, and thought I would give it a try on one of them. I ended up making THREE - they were so easy, and look so neat when they are finished! Here they are:

This first one, I used the cartridge From My Kitchen for the toaster, stuck all the parts together, then coated it with Glossy Accents! Makes it look even more cool and retro! Added a button, some ribbon, and some fake stitching with my Sakura glaze pen...


The next one is a great "guy" card! Those are usually SOOO hard, so I was really excited about this one! Used Just Because Cards for the car, and like the toaster, stuck it all together, and topped it with Glossy Accents. Punched the "button" with the Martha Stewart button punch, and also applied Glossy Accents. A little scribbling, ribbon, and a stamp sentiment finished it off.


The last one, used Create a Critter for the bee, a Peachy Keen stamp for the face, Walk in My Garden for the daisy, Martha Stewart branch punch, some ribbon, and a stamped sentiment. (I couldn't believe that with all my stamps, I didn't have a single "Hap-bee birthday" stamp! So I had to settle for this...)

Tuesday, November 2, 2010

Ladybug hugs

From the first moment I saw this paper, I knew it had to make something with a ladybug on it! Maybe it is the red and white polka dots on the reverse side of it. So...I used the ladybug on Create a Critter, as well as a Peachy Keen Stamp. The oval in the center was originally going to be the reverse of the paper, but when it was all done, this is what I ended up liking better! Added a little ribbon and bling to finish it off.


Sunday, October 31, 2010

A cut above the rest

Just another Create a Critter card using a Peachy Keen face stamp. Pink by Design stamp for the sentiment, and the grass was from Zoobaloo cartridge.

Monday, October 25, 2010

Love my Peachy Keen Stamps!!!

Just gotta say...I sure love those stamps! Can't believe how much cuter it makes some of my Cricut cuts! Here are a couple of cards I made last night - both cuts are from Create a Critter cartridge. The background scallop oval on the first card is from A Child's Year. Used cuttlebug folders, ribbon, and a little bit of bling with my Jolee's heat setter. "Just chick'n in" is a Clear Dollar Stamp, and "Nutttin' Better than a true friend" is from Papertrey Ink.


Friday, October 22, 2010

Chocolate Survival Kits

I made this first Chocolate Survival Kit several months ago for a friends baby shower: she was having a boy - which would give her a house full of four boys!!! I figured she could use a little chocolate!!! The last 2 were ones I made for my Mom and Mother-in-law for Mother's Day this past year.


Used SCAL for the lettering on all of them, and the silhoettes on the first one. The sheep came from Create a Critter cartridge. The teapot and chair were from the Heritage cartridge. Lots of Cuttlebug, Prima Flowers, buttons, ribbon, the Martha Stewart branch punch (absolutely LOVE that punch!), and inking and doodling.

Thursday, October 21, 2010

A long neck, and 8 arms!!!

Good morning! Just a couple of quick cards today.

The first one was a special request by a friend. She wanted a thank you card for her chiropractor who had been super great when her neck went out a couple weeks ago. So...what has a longer neck than a giraffe? I also cut out a little bandaid from the Everyday Paper Dolls cartridge, to put on the neck of the giraffe, but when I took the picture of the card, I still had wet stickles on the neck, so I couldn't put it on.


The second card was a birthday card for a little girl, who when asked what she wanted for her birthday, said only one thing: an octopus! This octopus is from Zoobaloo, with a Peachy Keen face stamp.