Friday, July 20, 2012

Peachy Keen Post Day - Peachy Raspberries!


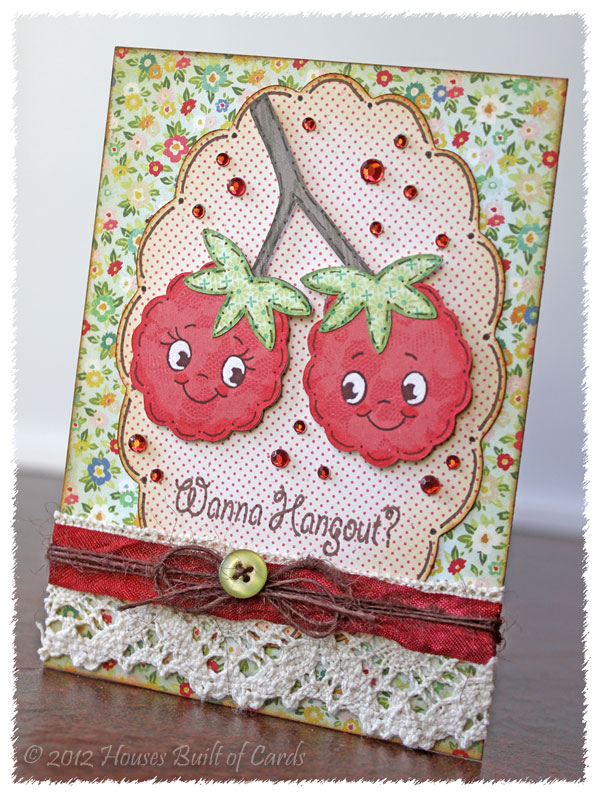
Yum...now I'm hungry! I love Peaches and Raspberries together - they make an awesome fruit crisp! Especially with vanilla ice cream...Mmmm! Oops! Sorry for wandering for a minute there - back to the point! So if they go together in real life, then what could be cuter than raspberries with a cute Peachy face?!??! It's my day to post over on the Peachy Keen blog, so here is the card I have to share today:
Here is the set I used for the faces and sentiments - it is the brand new July Kit of the Month - I say this every month - but I really think this is the cutest one EVER!!!


All my papers are from a brand new paper pad I just got - Crate Paper Pretty Party, and I am in LOVE with them! They are so feminine and girly, which I love, since I have two little girls!  
I cut the raspberries using my Cricut and the older cartridge, Preserves. I used my Copic markers to highlight and add some shadows, then stamped on the cute Peachy faces. I just LOVE how much character you get when you add a Peachy face to something!
The background frame is cut using Elegant Edges, and I inked the edges of that and my background paper using Tim Holtz distress ink. Did some doodling on the frame, and also on the parts of the raspberry.
Attached the raspberries with foam adhesive, and added some bling - something I have noticed myself being addicted to lately! 
Finished off with some lace and jute twine from Ribbon Carousel, and a bit of crinkle ribbon that I had in my stash for a while. Added a Papertrey Ink button for the perfect finishing touch!
Thanks for popping in to see me today! Hope you have a wonderful day!!!


Tuesday, July 17, 2012

MFT Getting Sketchy #80 - I've got UR back


Good morning! I'm once again coming in at the last minute with my entry for this weeks My Favorite Things Getting Sketchy #80. Here is what I made this time around:
And here is the sketch: 

Okay...I don't know if I've said it already - but I just LOVE the Simple Stories Summer Fresh collection! Some of my favorite papers for sure - and once again I am being good and using them instead of hoarding them! I used one of the MFT Ala'modes stamps and put her on some pattern paper. I colored her with Copics, and paper pieced the "U" and "R" with my favorite paper from this paper pad. 
Used the mini tab Die-namics on kraft paper, then stamped my sentiment on each of them. 
All of the edges were distressed with my Tim Holtz distress tool - these papers fit particularly well with this effect I think!
 
And that's it! A pretty simple card - but I'm pretty happy with it. Sometimes simple is best! 
I am also linking this up with this weeks Simon Says Stamp and Show - No Rules! Challenge.

Thanks for visiting me today! Hope you are having a wonderful week! Blessings to you!


Monday, July 16, 2012

My Craft Spot Release Hop WINNER!!!


I almost forgot that I was supposed to pick a winner for the My Craft Spot new release hop! I used  Random.org to pick a winner...and there were 65 comments to choose from - number 9 is the number that came up:
Which means the winner is... 
CONGRATULATIONS Tonya!!! You won this set:


Send me an email at housesbuiltofcards@gmail.com with your mailing info, and I will forward it to Kimberly so she can mail out your prize! Congrats again - and thanks for all the sweet comments! All the new release stamps can be found at My Craft Spot now - so make sure and go check those out!!!


Saturday, July 14, 2012

My Craft Spot - Stamp Release Party BLOG HOP!!!


YAY!!! So excited to be able to share the full release from My Craft Spot with you today! I also get to giveaway one set - so make sure and leave me a comment to be entered! If you just happened along, make sure and head back to Kimberly's Blog to follow along and see all of the wonderful creations the Design Team has made with the new sets - as well as to enter in all of the fun giveaways! Here is what I created with the new sets:
I used a bunch of the brand new "Tiny Tag Dies", as well as the stamp set "Tiny Tags 2" and "Thank You" to create my card. I die cut the tags in several different pattern papers from Basic Grey's PB&J 6x6 paper pad, inked the edges, then arranged them on my paper.
I randomly stamped several sentiments from Tiny Tags 2 on certain ones, and then used pop dots to attach some of them, and glued the others down flat - that way I had some fun dimension to work with! 
I added brads to the centers of the flat ones, and some black Traditional Baker's Twine from My Craft Spot (click HERE to see it in the store) 
Aren't all these dies and sentiments FUN?!?!? I also inked the edges of the two background layers, and attached the layer with the tags on it with foam adhesive as well.
That's it for me! Now hop on over to the ever so talenteGwen to see what she has created for you! But before you go - here are all the new sets!!! I get to giveaway Bundle of Joy to one lucky person who leaves me a comment today! All winners will be announced Monday, so make sure and check back then to see if you won! 


Here are the new stamp sets!

This set was designed by our very own Robin!  

Robin also designed a set of metal dies to go with both the Tiny Tags 1 and the new Tiny Tags 2 stamp sets! 


Here is the entire blog hop line-up in case you get lost along the way!

Kimberly

GiGi
Robin
Kate
Amber
Heather {you are here!}
Gwen
Ally
Marlene


Thanks again for stopping by! Have a great weekend!

Thursday, July 12, 2012

Peachy Keen Challenge - Gift Bags!


If you're looking for my Day 5 My Craft Spot Release Party post, click HERE or just scroll down.

Hello! This week the challenge at Peachy Keen Stamps is to decorate a gift bag! Since that is something I have never tackled before - it was a great challenge for me! Here is what I came up with:
I grabbed some plain kraft paper gift bags from Michaels that came in a pack, so I will probably be trying to do these more - because this one was so much fun!!! Here are the sets I used on this bag:


All my papers are from October Afternoon's new Cakewalk line - LOVE LOVE LOVE them! I wanted so badly to hoard them, but I am trying to break that habit, so since these came the day I brought home the gift bag - I forced myself to use them. I'm so glad I did! LOVE them...and if I use them up too quickly, I can always get more (hee hee hee!)
I paper-pieced the cute girl from the July kit, and stamped the banner several times on different pattern paper, then fussy cut them out. 
Used some of the miscellaneous stickers and flower sack die cuts from the line to decorate the banner up a bit, and added some Twinery Baker's Twine along the top of it. 
Used one of the banners to stamp the sentiment from the little add on kit, then glued it to a toothpick to make a little flag! My Copic coloring on the hair got a little wonky...but I'm still learning! 
Tucked a doily in the bottom corner, and added a couple of October afternoon buttons, and tied them with some jute twine from Ribbon Carousel. 
Thanks so much for stopping by today! Make sure and head on over to the Peachy Keen blog to join in on the challenge, and see who last weeks Top Peach was!!!

There is also a sale going on at Peachy Keen! Click HERE to head over to the store and check out all the details! 

I am also linking this up with this weeks Ribbon Carousel Challenge - Buttons and Bows Oh My!


My Craft Spot Release Party - Day 5 - New Arrival


Good morning again for the last and final day of sneak peeks from the new My Craft Spot stamp release! Tomorrow is the big release hop and reveal! Can't wait for you to see them all! Today we are sneaking the set called New Arrival - another great baby set! Here is what I made:
I feel like this is really simple...but life has been one constant spiral of busyness in our house - and this was the best I could put together! I used another silhouette from A Child's Year for this one, and added a pretty crown from the Theresa Collins cartridge called Sophisticated. The background frame is also from the same cartridge.
All the pattern papers are from October Afternoon, and the red cardstock is from Bazzil. I inked the edges of everything with Tim Holtz distress ink in Antique Linen, and added some faux stitching. 
Used some traditional red baker's twine from My Craft Spot (you can find it HERE) - and attached the silhouette, and then the entire frame to the card base with foam adhesive - so lots of fun dimension! 
Finished off with a bit of bling, and the sentiment stamped with some Papertrey ink red dye ink. 
Thanks so much for stopping by to visit! Make sure and come back tomorrow for the full reveal, and I will have a stamp set to give away to someone!


Unity FWF - Falling for You


Good morning! As this was a bit of a busy week, I didn't have a chance to get something made for this weeks Unity Friends with Flair, but I had this little one that I haven't had the opportunity to share yet! This is one I made for a Paper Crafts Magazine publication call that wasn't picked up - that's why it is a Fall theme card! I'm really in no rush to end summer - I promise! 
This was for one of the sketches. I punched a bunch of maple leaves with a Martha Stewart punch, and layered them on Papertrey Ink buttons, punched holes in the leaves to match the buttons, and tied some Papertrey Ink twine through. I rolled the ends of the twine between my fingers to fray the edges a bit so it looked softer. 
The sentiment is from the Ippity set called Moonbeams and Heartstrings. One of my absolute FAV's!  
My pattern paper is from My Minds Eye and Basic Grey...not sure now which ones. I also rounded the bottom two corners.  
Added a heart cut with the My Creative Time stitched heart die - another one of my favorite things! 
Added another leaf, some more twine, some stick on pearls, and more buttons on the bottom. The only downside to this card? It is REALLY heavy!!! I'm sure there would be some serious extra postage charges on this one! 
Thanks again for stopping by - make sure and head on over to the Unity Blog to join in the fun!!!