Showing posts with label Nestabilities. Show all posts

Thursday, September 6, 2012

Getting back in the groove - with a new Peachy Keen Challenge!

Hello, long lost friends! I finally got my craft room unpacked enough to start getting caught up again on Design Team stuff a bit! So it was my turn to provide some inspiration for this weeks Peachy Keen Challenge - and this week it is a color challenge. Here is my card:
And here is the color inspiration - I promise in real life my card matches the colors a bit better. New house, new state, new weather patterns - and that means I need to do some tweaking to perfect the lighting for taking pictures. This was my first attempt, so I'm sure it will get better!


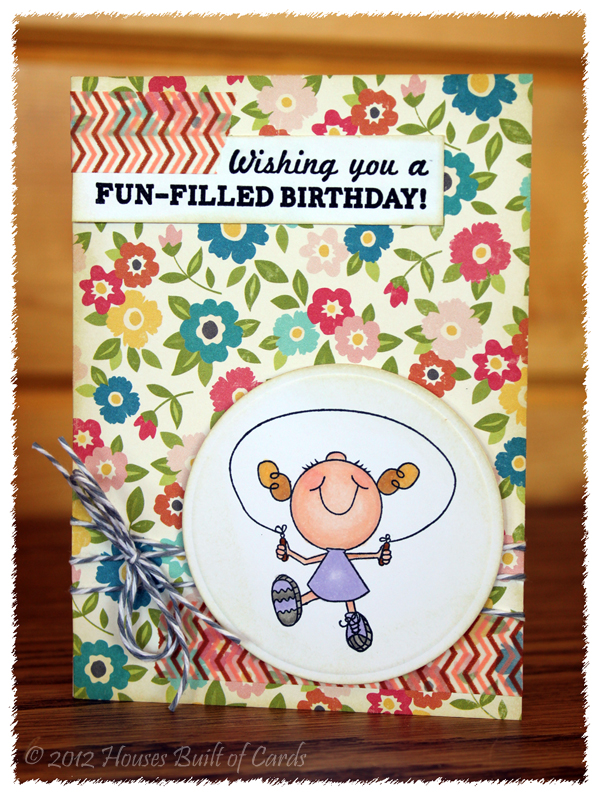
I used some new October Afternoon Woodland Park paper that I bought while my craft stuff was packed, and couldn't wait to use! My crafty skills are a bit rusty, so please excuse me! 
I used this cute image and sentiment set:


She is colored with Copic markers on a circle I cut and embossed with a Spellbinder's Nestabilities Die. Inked the edges of everything with Tim Holtz distress ink in Antique Linen, then added a bit of Baker's Twine to bring the gray color in and a bit of Washi Tape from the OA Woodland park collection as well to pull everything together.
Thanks so much for stopping by today! It's good to be back - and hopefully we will be able to finish settling in quickly so I can actually find all my craft stuff! :-)

Make sure and head over to Peachy Keen to join in on the challenge! I'm looking forward to visiting around and checking our everyone's creations again! See you soon!

Monday, August 6, 2012

MFT Getting Sketchy #83 - Connected


Hi there! This is for this weeks MFT Getting Sketchy Challenge #83. I've missed a couple of weeks lately, but managed to get this made the other day! It took me all day, a few minutes here and there, but I got it done! Here is what I made:
And here is this weeks sketch: 

I pulled out some Echo Park papers I hadn't used yet - the 6x6 Sweet Day paper pad.
Colored the little girl with Copics on a circle cut with my Spellbinders Nestabilities, and set it on top  of a doily I tinted with some Tim Holtz distress ink. 
Used a MFT Die-namic for the paper doll cuts, and curled the sentiment on my clear block before stamping to make it fit the circle. 
Added some Baker's Twine, and a tiny pearl, and called it simple and good enough! 
Just a reminder - if there is anything you wanted to pick up from my Moving Sale, click HERE or on the tab above titled CRAFTY STUFF FOR SALE - I will be drawing a winner from orders placed for the paper pad at about 8 AM Pacific time - and I will check my email before I choose, so there is still time at a chance to win some brand new October Afternoon paper! 

Tuesday, July 24, 2012

Growing In Unity - Day 2 - Have a Groovy Day!


Hello! Welcome to my second day of Growing in Unity! Today I'm sharing a card that I started off planning on giving my husband for his birthday...but as you can see, it ended up being a "bit" too girlie for me to do that to him! I did show it to him, and he liked it, but I don't think he would have been thrilled to get it for himself! Heeheehee! Anyway, here it is:
I just LOVE this groovy little van image from the Unity Ippity line of stamps! I vaguely remember having one of these vans when I was a little girl...although I am pretty sure it was just white - or at least cream colored! Anyway, I stamped it on an oval cut with my Nestabilities, and colored it with Copic markers, then inked the edges with Tim Holtz distress ink.
Matted it on a cardstock scallop oval, also cut with a Nestabilities die. All my pattern papers are from My Minds Eye, and inked with Tim Holtz distress ink in Antique Linen. 
I used a Fiskars postage stamp border punch for one of the layers underneath the main image, and tied some black jute twine from Ribbon Carousel behind it, with a PTI button in the center of the bow.
I used a MFT Die-namic frame to stamp the sentiment on, then trimmed off the bottom, and mounted it on a little more of the red cardstock, with rounded off corners. Added a couple of stick on pearls to finish it off! 
I hope today's card made you smile! Make sure and leave a comment for a chance to win 2 Unity Itty Bitties of your choice (like this one for example!) And come back every day this week for even more chances! Hope to see you tomorrow - can't wait to share tomorrows card with you!!!

Monday, July 23, 2012

Last minute Market Street Stamps Paint the Town Color Challenge Entry


There's just no time like the last minute, huh? The time just slipped past me, and this morning I noticed that this month's Market Street Stamps Paint the Town Color Challenge ends tonight! So...I pulled out my Market Street Stamps and got busy - good thing it was a rainy day today! It was a perfect excuse to get inky! Here is what I came up with:
And here is the color inspiration for this month:


Such a striking color combo! I never would have put these together on my own - but that's what I love about challenges! They totally inspire me to try something new! And I now find I LOVE these colors together!


I stuck fairly close on the sketch, just pulled a couple of the elements either up or down to fit my design. 
I layered the pattern papers on the card - the orange and purple are from an older Basic Grey paper pad, and the blue is from a Theresa Collins paper pad. 
I cut a white circle with my Spellbinders Nestabilities, and stamped the bike image from the "Just Riding By" Market Street stamps set so that it was a little off the edge. Tucked some white twill ribbon from Ribbon Carousel behind the circle template, then added a black jute twine bow with a tiny purple button from my stash. 
Finished off with a couple of stick on pearls, and rounded off the top right corner. 
I'm glad you stopped by to visit today! Hope you're having a wonderful day!

Thursday, July 12, 2012

My Craft Spot Release Party Day 4 - Bundle of Joy


Good morning! I am so excited to share my sneak with you for the stamp set the My Craft Spot Design Team got to play with today! As soon as I saw this set, I zeroed in immediately on this sentiment! It is something my Mom used to say all the time, in fact I think she had a framed copy of it hanging by her kitchen sink. And it is something I repeated often to myself when my kids were little! Here is what I made with it:
I used my Nestabilities to cut out and emboss the frame shape, inking the edges with Tim Holtz distress ink in Antique Linen, then stamped the sentiment on it. 
Used some Milk Chocolate Crinkle Ribbon, and some Lemon Drop Twinery Twine (click HERE and HERE to purchase these at My Craft Spot) to make a bow behind the frame, then attached it with foam adhesive. Added a Kaisercraft resin flower to the center of it.
The pattern papers are both by October Afternoon - that yummy floral is from the new Cakewalk collection - which I got and am in LOVE with! I am trying to break my habit of hoarding stuff I love, so I cut right into it for this project! The yellow is from an older collection called Thrift Shop. 
I cut the baby silhouette using my Cricut and a A Child's Year cartridge, attached it with foam adhesive, and finished off with a couple of stick on gems from my stash. 
Thanks so much for stopping by to see me today! Hope you have a wonderful day - and take time to check out the rest of the peaks by the Design Team over at My Craft Spot


Saturday, July 7, 2012

Sometimes Life Just Sucks - MSS Block Party


It's Block Party Time again over at Market Street Stamps! So I pulled out this little cutie that I had been itching to ink up (get it? "itching?" - I know, I know...sorry!)
I stamped him on a circle cut with my Nestabilities, and colored him a bit with some Copic markers.  
Ran some white paper through my Cuttlebug using the Swiss Dots embossing folder, and added some Champagne chevron stripe ribbon from Ribbon Carousel. 
The background paper is from a Lily Bee Designs 6x6 paper pad - and I finished off with a couple of stick on red pearls.
Thanks for the visit! Always love to see you here!!!

Friday, July 6, 2012

Friends with Flair - and Tuesday Trigger - Pretty Poppies


Good morning! Whew...feels good to be getting back in the groove of life again! Our family just got back a couple of days ago from a house scouting trip in Wyoming, where we are moving. I had a couple of posts scheduled while I was gone - but was also way behind on getting stuff done! So I have been hitting things as hard as I can! I made this card using the months Unity Kit of the Month Sketch Challenge to link up for weeks Unity Friends with Flair, and also used the Moxie Fab World Tuesday Trigger for the week. Here is what I made:
Here is the trigger photo:


And here is the sketch:


I love this poppy stamp from the April 2012 KOTM - so pretty and versatile! I stamped it on an oval cut with my Spellbinders Nestabilities, colored it with Copics, and inked the edges with some Tim Holtz distress ink. 
The pattern papers are all from Crate Paper's Odds and Ends 6x6 paper pad - I even stamped the sentiment on a scrap of one of the papers that had a frame in it that fit perfectly with the sentiment - also from the same KOTM.
Added some lace from Ribbon Carousel, a border cut with a MFT border Die-namic, and a PTI button with a bit of jute twine. 
Thanks for stopping by! Make sure and head over to the Unity blog for more info on Friends with Flair and a chance to win some fun stamps! 

Sunday, June 3, 2012

Peachy Keen Sneak Peeks - June Kit of the Month


Good morning! I'm so excited today to share a couple of cards made with the brand new Peachy Keen Kit of the Month for June!!! I just LOVE this new release - they are so adorable!!! Make sure and head over to the Peachy Keen blog to see all the other sneaks from the rest of the design team - you are going to fall in love with them all too! Here is the first card I made:
Aren't those birds just the cutest?!?!?! I gave this card to my sis-in-law for her birthday - and had so much fun making it! I colored my cute birds with Copic markers, then cut them out by hand. 
 I also used one of the other new releases - the lattice background. I stamped it in blue ink on my blue pattern paper. I can tell this one is going to be lots of fun!
All my pattern papers are from Basic Grey's Picadilly 6x6 paper pad. Still one of my favorite papers! I inked all the edges with Tim Holtz distress ink. 
That yummy orange chevron ribbon is from Ribbon Carousel. The sentiment is stamped on a die cut using My Creative Time's stitched oval die. 
Pop-dotted the birds to the background, and then added a bunch of stick on gems that I got at my local Michael's store - just for fun! 
Now...for the next card! I used another one of the birds from this kit - and used the grumpy bird face! That face just makes me LAUGH!!! 
I stamped him on pattern paper - which is all from Echo Park - and colored him in with my Copics. I used a blue marker, but since I colored it on the yellow, it turned out green! 
I used my Spellbinders Nestabilities to cut out the scallop circle and center circle, and curved the sentiments on my stamp block to make them fit the circle. 
The white background was embossed with my Cuttlebug and the houndstooth embossing folder.  
Added some more of that chevron ribbon (just different color) from Ribbon Carousel, and some stick on bling as well. Also pop-dotted the image circle from the background. 
Thanks so much for stopping by today - hope you enjoy this release as much as I am! Make sure to stop by The Peachy Keen Connection on Tuesday evening at 6PM Central Standard Time for the Release Party! There will be lots of fun and prizes - and I get to host one of the challenges! 


Tuesday, May 8, 2012

Playing with the new Peachy Keen Releases!


YAY! I'm so glad I had a few minutes free today - and got to play with the some of the new add on kits from the May Peachy Keen release! Here is the first project I made:
I used this one of the new sets - this whole release has so many FUN sentiments! I love that! And the salt and pepper shaker - EEK! So cute!!!


I started out by cutting a shape with my Spellbinders Nestabilities. I stamped the salt and pepper shaker, added the faces, and the "P" and "S", then cut an extra set to use as a mask. I inked around the edges with some Tim Holtz distress ink in Antique Linen, then removed the mask and colored them a bit with some Copic Markers.
I stamped the sentiment on the top in two parts to make it fit my frame. 
And all the pattern paper is from My Mind's Eye - one of the older Stella Rose sets. About time I pulled these out of my old stash - I LOVE them!
Added some lace and a bit of jute twine on the bottom to finish it off.  
Well - I hope to be back soon with some more to share, but for now, I have a date with my hubby tonight! So I need to go spend some time getting ready! I will see you all later!