Showing posts with label American Crafts lace. Show all posts

Friday, March 8, 2013

Sweet Birthday Wishes...Unity FWF

(I have a BUNCH of stamps listed for sale HERE that want to find new homes! Prices are great - hope you'll check them out!)

Good morning - and happy Friday! Time for Unity Friends with Flair. Here is what I have to share this week:
I used the June 2011 Kit of the Month, and some Crate Paper Fourteen 6x6 papers.  
Cut and embossed a scallop oval from a Spellbinders die, left the die on and inked it with distress ink in Spun Sugar, then removed the die leaving a pretty outline. Stamped the cupcake image with gray Versafine ink, then added the sentiment over the top with PTI ink.  
Added some lace along the bottom, some jute twine, a Crate Paper button (I think from Farmhouse?) and attached the scallop oval with foam adhesive. Finally, attached the whole front panel with foam adhesive to a kraft paper card base. 
Thanks for stopping by today! Hope you are having a wonderful week!

Wednesday, August 22, 2012

Mother's Day Teacup #2


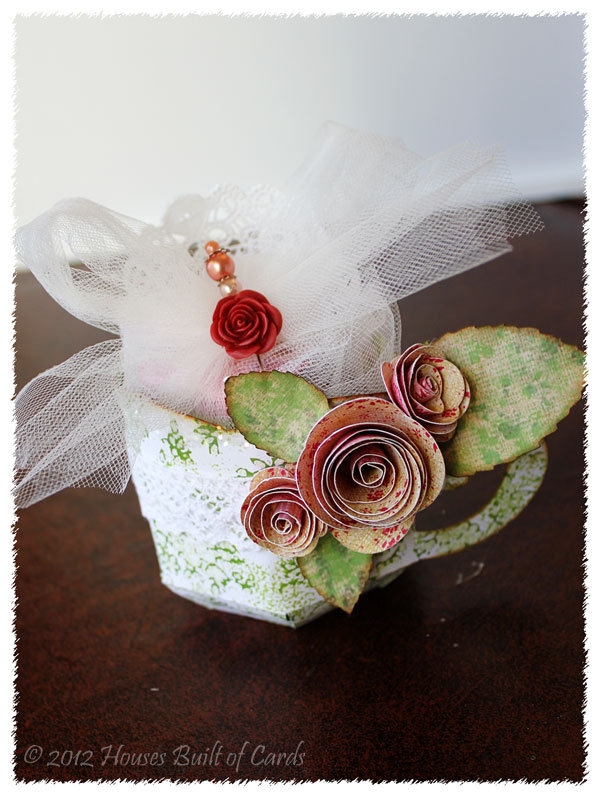
Hello and welcome back! Here is the second teacup I made for Mother's Day - this one was for my Mom:
Pretty similar information I guess - the teacup, flowers, and leaves were cut with my Silhouette Cameo, and cut files from the Silhouette store. 
Inked the edges of the leaves and teacup with Tim Holtz distress ink, then added Glossy Accents and Martha Stewart chunky glitter along the rim of the teacup for some sparkle and shine! 
Wrapped up chocolate in tulle, tucked it inside the teacup with a doily behind it, tied a big bow and added a stick pin and a resin flower to the center of the bow.
And I don't know if I added yesterday or not - but I also put some American Crafts white lace around the teacup - just because it felt like it needed it!

Anyway - thanks for stopping by again! 

Tuesday, August 21, 2012

Mother's Day Teacup #1 (A little past due in posting!)


I know...this is WELL past the time I should have posted it - but life happened and I never got around to it! But...it is nice to have this to share while we are moving and I don't have time to craft - so I guess it's okay anyway! This actually the one I made for my mom-in-law - I'll share the other one that I made for my mom tomorrow!
I used my Silhouette Cameo, and a cut file from the Silhouette store for the teacup, and for the flowers and leaves. 
Inked the edges of each leaf and the teacup with Tim Holtz distress ink, then used some Glossy Accents and Martha Stewart coarse glitter along the top edge to add a little glam and glitter!
Finished off by wrapping some chocolates in some tulle, tucking them inside the teacup with a doily behind them (you can barely see it in the picture above) and added a stick pin and resin flower in the center of the tulle bow. 
Okay - I'll see you back here tomorrow with the second one!

Thursday, March 22, 2012

March Sketch For You To Try - with Peachy Keen Stamps!


Good morning! This is another card I made for a recent Paper Crafts Magazine submission call in the paper-piecing category. I didn't really expect it to get picked...I think my colors were a bit too "springy" when they were looking for fall tones - but I decided to try anyway. Anyway - since it didn't get picked up, I can share it here! I also used this month's SFYTT over at i(heart)2stamp:
And here is the sketch:


This is definitely one of my favorite Peachy Keen sets! LOVE it! I cut out and embossed an oval with my Spellbinders Nestabilities, then inked the edges with Tim Holtz distress ink in Antique Linen. Used Copic markers for the skin tones and hair, then paper-pieced the rest. 
I stamped the image so that it extended off the edge of the oval, and then when I paper pieced the balloon, I cut the entire balloon out, so it extends past the edge of the oval. I then used pop-dots to adhere the oval, and the balloon to the card base. You can see it a bit better here: 
 All the papers were from a My Mind's Eye 6x6 paper pad. I rounded the bottom right corner, then did some machine stitching around the edges. Added the sentiment, some stick on pearls, and some lace along one side.
Finished off by attaching all of that to the card base with foam adhesive. 
Oh - I also inked the edges of the card with Tim Holtz distress ink as well as each layer of cardstock. 
Thanks so much for visiting today! Have a beautiful day!


Friday, March 9, 2012

Unity FWF - A Brandy and Emma window card


Good morning! It's another Friday - and therefore time for Unity Friends with Flair! You win prizes by joining in with your own card, and by posting comments on any of the linked blogs. One of the winners last week was a comment picked from my post! So make sure and head over HERE to check out all the details!

I have a window card to share that I made with some of the Brandy and Emma stamps from Unity. Here is my card - it was very difficult to photograph as it turns out! So I apologize for the pictures - it is WAY cuter in real life. 
This pictures show a little how I put a piece of acetate (actually part of the packaging from one of my Cricut cartridges that I am so thankful I saved!) over the opening. I wanted it to look like you were peaking in the window at them! 
I used my old Creative Memories shape cutter to cutout the circles. I started by cutting the circle out of the floral paper - then stamping and coloring my image before positioning it behind the opening. I cut another larger circle out of white paper, then cut out the center in the same size as the opening on the floral paper - essentially creating a "frame" of white around the circle. I stuck a square of the acetate behind the circle to create the window.  
Next, I added a white frame around it, then put the lace along the bottom, so I could tuck it behind that layer,. I then attached it with pop-dots to my card base, so the window was set out from the colored image.   
You can see here a little better how the pop-dots set it out from the card.  
Finally, I stamped the sentiment, framed it in more pattern paper, and attached it over the lace, adding a bit of Baker's Twine on the sides. Oh - and all of the paper is from Crate Paper's Paper Heart collection - LOVE it!
Thanks for stopping by to visit today! Have a great weekend!!!


Monday, February 6, 2012

You'll Be in My Heart


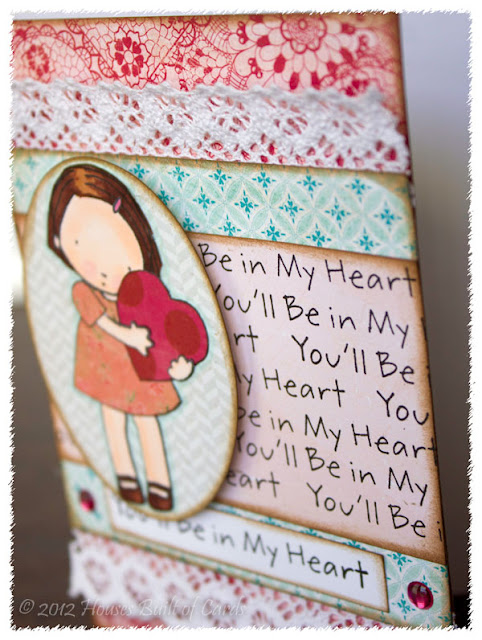
And...here is my second post for the afternoon! Sorry it took me a while - I decided to go play in the sunshine for a bit with my girls! It is such a BEAUTIFUL day - can't believe it is February. I think it is 60 degrees outside right now, pretty much unheard of usually around here. Anyway, this is for the February MFT Guest Designer Contest - Stamp Your Heart Out. Here is what I came up with:
I think I have said it a few times - and I'll say it again...I LOVE the Pure Innocence line of stamps from My Favorite Things! They are so simple, sweet, and, well, innocent! 
I used papers from Crate Paper's Paper Heart 6x6 paper pad, and paper pieced the image, using copics for the hair, skin, and shoes. The oval was cut with my Creative Memories Shape Cutter.
Made the background by stamping the sentiment multiple times on the pink paper. Inked the edges of everything with Tim Holtz distress ink in Vintage Photo. 
Snuck a tiny bit of lace from American Crafts behind the last layer, then placed it all on the main piece of pattern paper. 
Finished off by pop dotting the oval with the main image, and adding a couple of stick on gems from my stash. 
All right - I think that's all for me today! So glad you stopped by! Hope you are having a beautiful day!

Think Happy Thoughts!


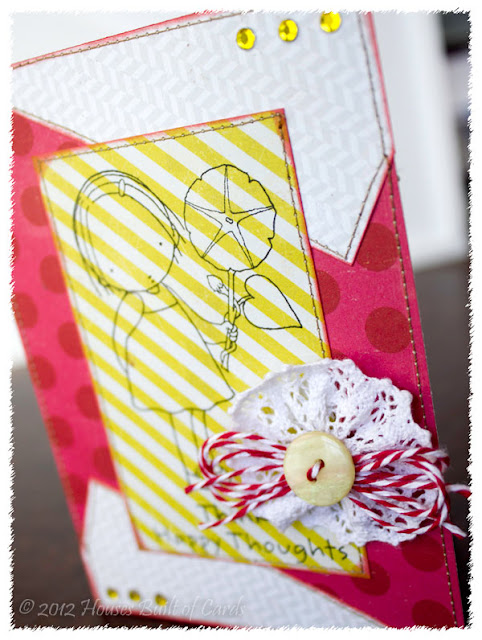
I made it! Got a couple of challenge done this afternoon! This is the first one, for the MFT Getting Sketchy #57 over on Splitcoast Stampers. Here is my take:
And here is the sketch:

I used one of my Pure Innocence stamps, and just did a simple outline on pattern paper.  
All the papers are from Crate Paper's Paper Heart 6x6 paper pad, and all the edges are inked with Tim Holtz distress ink in Barn Door. 
The little lace rosette I made with some American Crafts lace trim - sewed and gathered the center with a needle and thread. Added a Baker's Twine bow and a little Papertrey Ink button. 
Added some machine stitching around the edges! 
Finished off with a bit of bling using my Jolee's heat set tool. 
Thanks for stopping by! Stand by for another post in a few minutes hopefully!

I am also entering this in the Inspired By Challenge using this inspiration photo: