Showing posts with label White Paint. Show all posts

Wednesday, November 30, 2022

Birch Tree Backgrounds - Simon Says Stamp DieCember Release

Hello! It's time to kick off the fun month of DieCember at Simon Says Stamp - a month devoted to celebrating die cutting. It is kicking off with a fun big DieCember Release. And.. the irony isn't lost on me that the first two cards I'm sharing tonight have NO die cutting on them! They do, however, use some of the BRAND NEW release, so there is that!

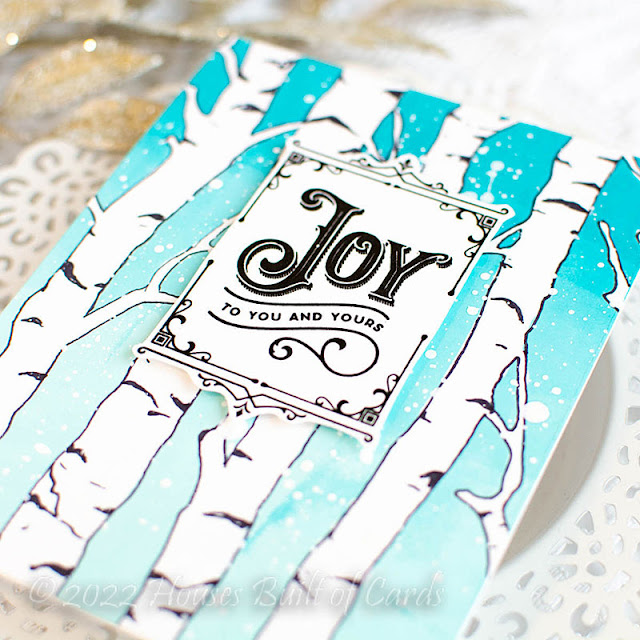
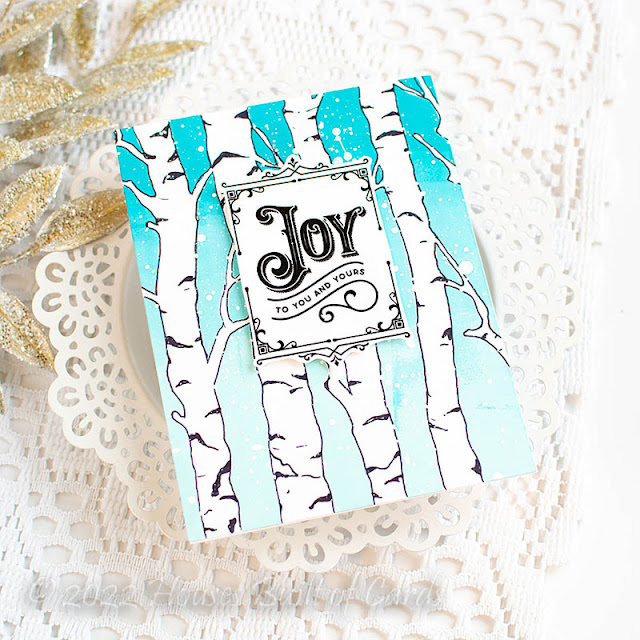
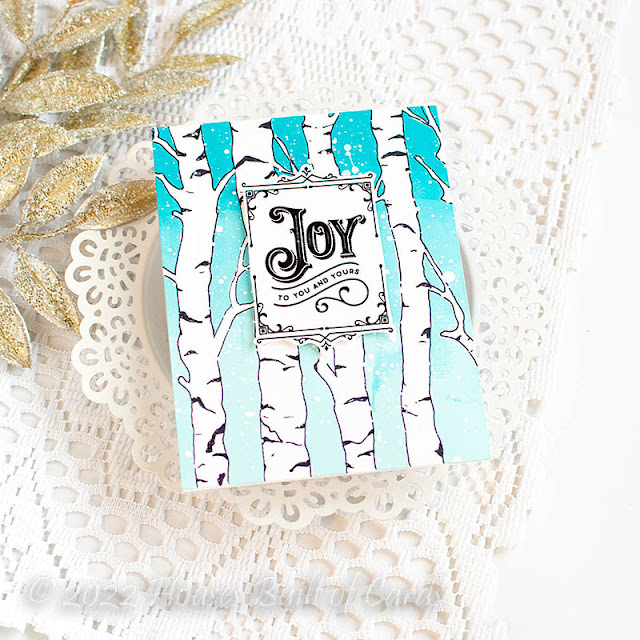
This first card I owe credit to my artistic daughter for the doodling added on the birch trees!


I'm sharing two cards today using the fun Birch Tree cling background stamp. This card is actually the second card I created, once I figured out how it worked - haha! I mixed up the part that stamped, thinking it was the trees that stamped, not the background. On this one, I clearly figured it out.


I lined the stamp up in my MISTI, then stamped it multiple times. I started by inking it up with Seafoam Pawsitively Saturated inks, then moved on to the next darkest color - Surf. I finished off with Ocean at the top. I just kept adding ink and stamping to get a bit of a gradiated image.


At that point, the birch trees looked a bit boring to me, so I used a fine line Sharpie to outline the trees. It still felt like it needed a little something - but my artistic skills are sorely lacking! So my daughter did the honors - and I think she did fabulous! I actually think I could look at this and re-create it with hers as a guide.


Of course we needed a snowy background - so I added some white splatters to mimic snow, and set that aside to dry.


While that dried, I worked on a sentiment. I used Joy to You and Yours - the stamp set from the December Card Kit. I stamped it with black Versafine ink, then heat embossed it with clear embossing powder. This is my favorite way to get a black heat embossed image - so much easier than messing with black embossing powder! And it gives great shine!


I fussy cut that image out, then mounted it on my background with foam adhesive for a touch of simple dimension!


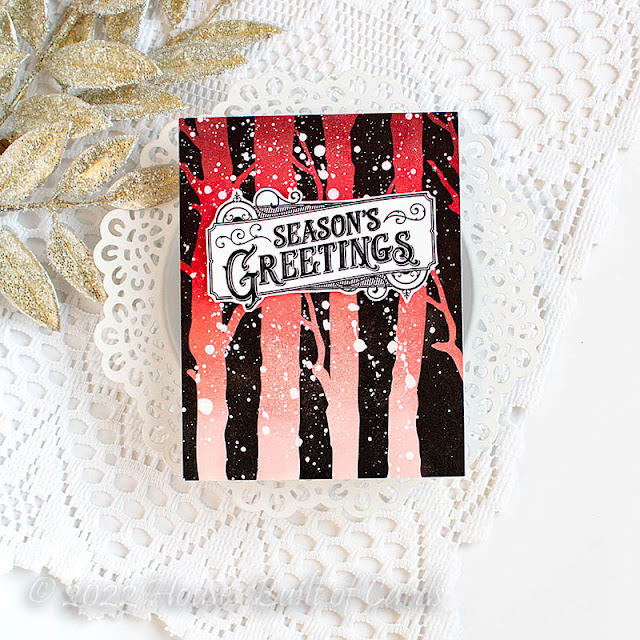
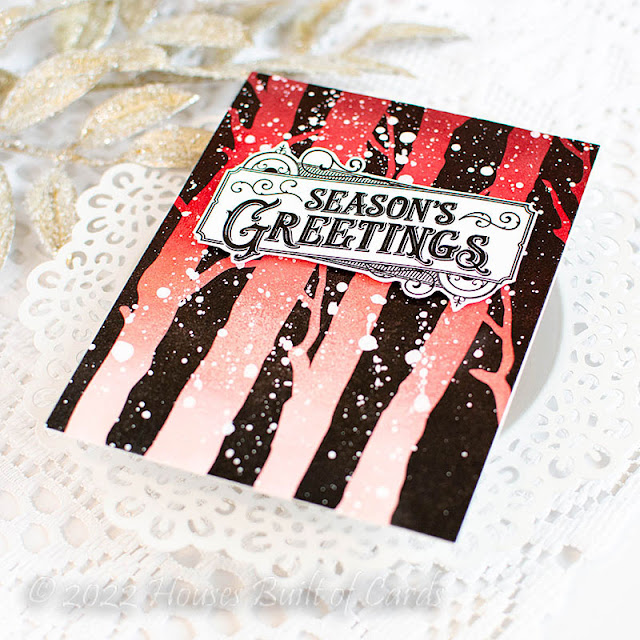
And...second card, which is actually the first one I made. My plan was to create a striking sunset sky, then stamp the trees over the front in black to create a silhouette. Once I stamped it - I quickly realized my mistake. I almost tossed it - but, I spent a long time creating the background, and couldn't bring myself to waste it! So I decided it could be a night sky, with red Christmas lights reflecting on crisp white and snowy birch trees. Right?!?


For this one, I used Distress ink in Tattered Rose, Abandoned Coral, Lumberjack Red, and Aged Mahogany.


I stamped over with Versafine black ink, then heat embossed it with clear embossing powder. Lots of the clear powder actually stuck to the distress ink, which gave some added texture on there for fun!


I added some white splatters for snow on this one, and then left it to dry overnight, since some of the splatters were over the shiny heat embossing, and I wanted to make sure they were nice and dry and wouldn't rub off before they were dry.


Sentiment was created with the same stamp set, and heat embossed the same way. I also fussy cut it out, and mounted with foam adhesive on the panel.


Hard to capture the texture and shine on this card - but here is a little closer look:


Product links are all below - including affiliate links where possible, which simply means if you use one of the links below that I receive a small commission at no additional cost to you. Thanks so much for stopping by! Have a wonderful day!!!


Wednesday, November 16, 2022

Holiday Joy - Simon Says Stamp Holiday Sparkle Release

 Hello! How about some more inspiration using the BRAND NEW Holiday Sparkle release from Simon Says Stamp! I shared one card already with this same 3D embossing folder and die combo, and acetate pre-printed sentiments - today I'm sharing another version of it in different colors and mixing up with a previously released sentiment die!

I started off by embossing some Surf Blue cardstock using the new Country Church 3D embossing folder. I trimmed the panel down ever so slightly to fit better on my white A2 cardbase and leave a small border around it. To add a bit of shadow and depth, I used whatever the last ink I had used on my blue blending brush to add a soft vignette around the edges.


And then, because I wanted to give it a winter feel, I added some white splatters with my Amsterdam Titanium White fluid acrylic paint. I set that aside to dry before finishing my card.


As before, I foiled the sentiment from the Bold Christmas Acetate Sentiment Strips - using Deco Foil, and my Pinkfresh Solid Hot Foil Plate. If you want to see how to do that, you can check out this video HERE that I created a while back showing this technique. These sheets are toner based, so normally you would use them with a laminator or Minc machine - I love that I can use my Solid Foil Plate and reduce one appliance in my limited craft area!


I added the die cut Large Joy sentiment die from white cardstock, adhering it with liquid glue and leaving some areas floating free for dimension. I added the foiled sentiment above that, also using dabs of liquid glue hiding behind the foiling.


And this simple card is finished! I would love to hear which version is your favorite - the elegant white one from a couple days ago (you can see it HERE) or this one!


Product links are all below - including affiliate links where possible, which simply means that if you use one of the links below, I receive a small commission at no additional cost to you. Thanks so much for supporting my blog, and stopping by! Have a wonderful day!!!


Thursday, March 24, 2022

Leaves and Hearts - Simon Says Stamp Hello Gorgeous Release Hop Day 2

Good morning! Excited today to be joining in on Day 2 of an incredible blog hop to celebrate the BRAND NEW Hello Gorgeous Release from Simon Says Stamp! Make sure and check out all the inspiration with this new release AND link up your creations as you receive your orders HERE in the Galleries created just for this release! And check out the graphic below to receive a FREE Birthday Wishes 3x4 stamp set with any purchase and the coupon code below through March 27, 2022 as well - while supplies last (code expires at 11:59 PM EDT)!!! 


Today I'm sharing a pair of cards using a new die, stencil, AND stamp set - paired up with a previously released die that is a favorite of mine!


I always love a 2-for-1 design as well - and using the positive and negative of the previously released Shimmer Heart die allowed me to create two different designs paired up with the same newly released sets!


For this first card, I used the negative of the heart, die cut from some Concord and 9th cardstock. I love the stitching detail on the negative! I stamped my sentiment from Garden Boots stamp set inside the window on my white cardbase, and heat embossed it with gold. I did a bit of tone on tone stenciling with the new Tin Tile stencil on the front of that card, added some white splatters with some Amsterdam ink, then mounted with foam adhesive before adding the new Olive Leaves die, cut from more Concord and 9th cardstock


For the second card, I used the heart cut out, only this time I stamped the sentiment on the heart - again heat embossing in gold. I did a bit of soft stenciling on the cardbase this time, in soft green to match the leaves, and then mounted the heart with foam adhesive, adding the same die cut leaves from Olive Leaves die set. Finally, I added some gold splatters over the entire thing using my Starry Colors palette.


One thing I love about these designs - they would be super easy to customize! Change up the colors or sentiments for an entirely different look!


Which version is your favorite? The negative heart, or die cut one? Or do you prefer the stenciling tone on tone, or green on white? White splatters or gold? Would love to hear your thoughts!


GIVEAWAY INFO:
Simon Says will be giving a $25 gift certificate to their online store at each stop along the hop - so make sure and leave a comment before you leave for a chance to win! Winners will be announced next Wednesday on the Simon Says Stamp Blog.


Product links are all below - including affiliate links where possible, which simply means that if you use one of the links below, I receive a small commission at no additional cost to you. Thanks so much for supporting my blog, and stopping by! Have a wonderful day!!!

Wednesday, July 28, 2021

Tropical Leaf Duo - Simon Says Stamp Make Magic Release

 Good morning! I'm back today to share two more cards using the FABULOUS NEW Make Magic release from Simon Says Stamp - today I'm sharing two cards that I created from one panel of the beautiful new Suzy's watercolor prints: Tropical Foliage!


For both cards, I used the one panel, and did a random series of ink smooshing with lots of mini distress ink cubes. I let all the colors mix and blend to get this beautiful background, added some white paint splatters, then die cut a rectangle out of the center, making sure to center it and save the frame for the second card below.


For this card, I popped that panel up with foam adhesive on a white cardbase, and added a sentiment from the fabulous Just Because Word Mix 2 stamp and die combo. I adhered it with a bit of liquid glue behind the top of the banner, allowing the lower portion to curl up for a touch of extra dimension.


Finished off with a few coordinating Pinkfresh Studio jewels in opposite corners - love the added sparkle that gives!


Now, onto that second card with the frame we saved! I trimmed down the outer edges a bit so it would leave a border around the outer edge to show off my colored cardstock.


In the center, I die cut the fun new Flipped Like You die, and backed it with gold glitter cardstock. I added a sentiment over the top from CZ Design Reverse Sentiment Strips: Happy - I foiled it with gold foil since it is printed with toner ink and will foil with toner-reactive foil. Fun!


I popped that extra sentiment up with foam adhesive, and the frame with more foam adhesive. Fun dimension, isn't it? And that finishes off these two simple cards!


Product links are all below - including affiliate links where possible, which simply means that if you use one of the links below, I receive a small commission at no additional cost to you. Thanks so much for supporting my blog, and stopping by! Have a wonderful day!!!


Monday, June 14, 2021

Miss You Hippo - Pretty Pink Posh June Release Blog Hop

 Good morning! I'm excited today to be hopping along for day 1 of a 3 day blog hop to celebrate the BRAND NEW June Release from Pretty Pink Posh (also available in a bundle HERE if you just want it all!)! There is such a fun mix of products in this release! Keep reading for more info, details on my card I'm sharing today, AND of course, some giveaway info at the bottom as well!


Here is a look at the entire JUNE release bundle - so many fun goodies! You can find it HERE:


I had fun playing with one of the adorable new stamp sets, a sentiment die, and a fun new border die to create this card!


I started off by ink blending the top background using Picked Raspberry and Carved Pumpkin distress inks. I used Post it Tape to mask and create the rays in the background and blended extra of the same Carved Pumpkin over itself to make it a shade darker. I also added some white paint splatters for texture.


Next, I die cut the waves with the new Stitched Waves die set in 3 shades of Spellbinders cardstock. I layered them up, placing the first one on foam tape on the cardbase, and just using adhesive tape for the other layers, but curling up the edges of the waves to enhance that texture.


I colored up that adorable hippo from the Summer Fun stamp set, and tucked him in between some of the waves, attaching him with foam adhesive so he looked like he really was floating on the waves!


Finished off with a sentiment die cut in white using the brand new Miss You Script Die - so nice and big, and perfect for this card. I glued it directly on the card, but tucked the bottom of the "y" over the top of the waves for fun.


GIVEAWAY INFO:
Now the fun part - there are a total of 3 $25 Gift Certificates up for grabs - 1 for each day of the hop!!! Winners will be picked randomly along the blog hop. Make sure and leave comments by 11:59 PM PDT on June 20, 2021 to qualify! Winners will be announced after that on the Pretty Pink Posh Blog!

Here is the entire Blog Hop line-up:

Heather Hoffman (you are here)

Product links are all below - including affiliate links where possible, which simply means that if you use one of the links below, I receive a small commission at no additional cost to you. Thanks so much for supporting my blog, and stopping by! Have a wonderful day!!!


Saturday, June 12, 2021

Sea You Soon - Simon Says Stamp Rainbows Release

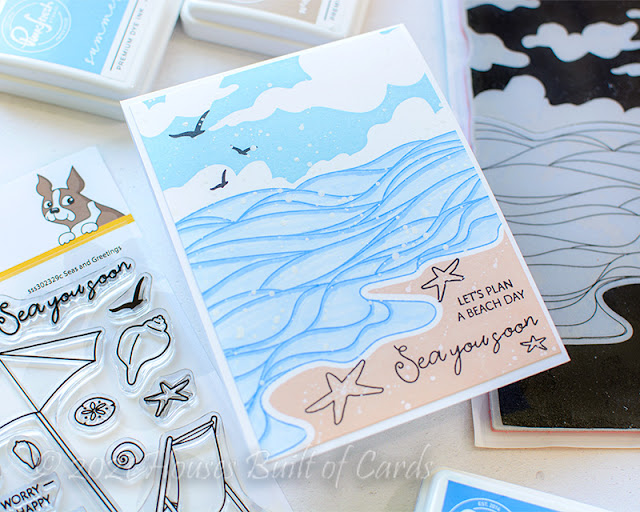
 Hello! Stopping by today with another card using a couple of stamp sets from the brand new Rainbows release from Simon Says Stamp - I used similar supplies for a couple of mini slimline cards for the release hop last week, so thought I'd share another version I made!


The fun Sea and Sky cling background separates into 3 pieces, so you can stamp in different colors of ink. It is a large stamp - which is why I used it for two mini slimline cards for last weeks cards. But I wanted to make a standard A2 size card as well, and it's easy to trim down to accomplish that.


I stamped with Pinkfresh Studio inks - Summer Shower for the sky portion, Seaside for the waves (then colored with Copic markers), and Warm Buff for the sand.


I added the sentiments, birds in the sky, and the starfish using the new Seas and Greetings stamp set. I also added some white paint splatters to the scene for some texture.


I trimmed that panel down to be slightly smaller than my white cardbase, then adhered it directly down - keeping it nice and flat to mail!


I also used a white gel pen to add a few more extra dots on the starfish - so hard to see them in the photos, but I promise it's there. Isn't this such a perfect simple and serene scene?


Product links are all below - including affiliate links where possible, which simply means that if you use one of the links below, I receive a small commission at no additional cost to you. Thanks so much for supporting my blog, and stopping by! Have a wonderful day!!!