Saturday, May 20, 2023

Oval Birds 2 Ways - Spellbinders Stylish Ovals Collection

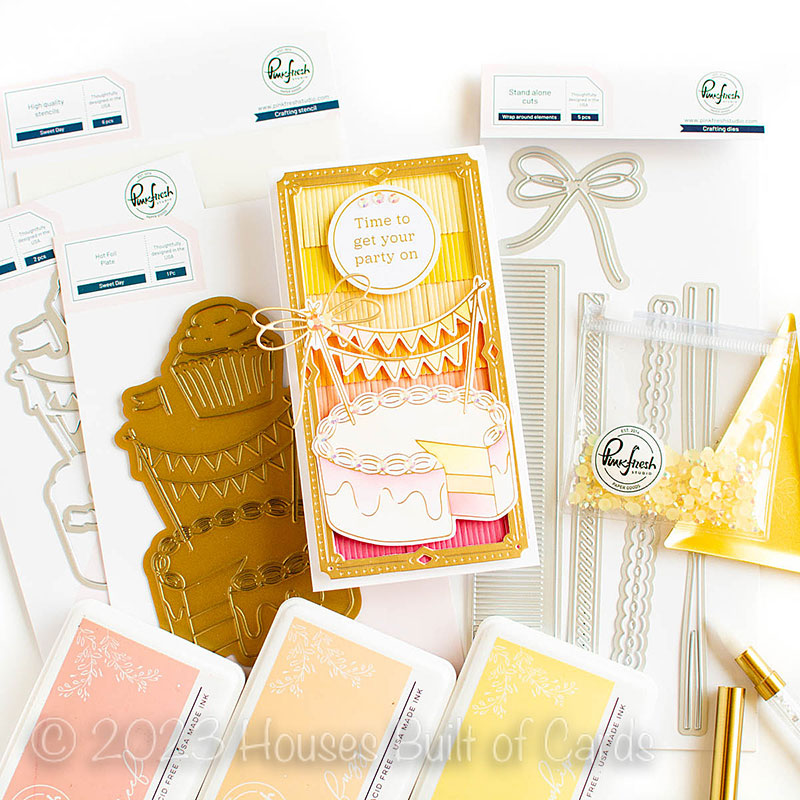
  Hello! I'm stopping by today to share a couple cards I created using a few not foil plates and stamps from the NEW(ish) Stylish Ovals collection from Spellbinders (my life got a bit crazy, so I didn't get these created and posted as early as I hoped). I recently had a chance to sit down and play, so I'm happy to be able to share these now. The soft colors on these cards goes perfectly with the simple hot foiling, which also use a bit of the new cardstock colors that I'm currently loving as well!

For this pair of cards, I foiled both the original and reverse image from Stylish Oval Floral Bird hot foil plate using the rose gold tone from the Satin Metallics hot foil set. For the first card, I foiled on cream colored cardstock, and then die cut with the coordinating Stylish Ovals dies. The leftover paper from that made a perfect window for the second card too - fun tip! :) I added sentiments from Fill My Heart Sentiments stamp set, trimmed into thin strips, and finished off with some coordinating Pinkfresh Butterscotch Glitter Drops. Here are some more photos of these cards:


Product links are all below - including affiliate links where possible, which simply means if you use one of the links below that I receive a small commission at no additional cost to you. Thanks so much for stopping by! Have a wonderful day!!!


Thursday, May 18, 2023

Hello There - Simon Says Stamp June Card Kit

Hello! I'm popping in to share my first card using the new June 2022 Simon Says Stamp Card Kit - Etched Greetings! This month's kit is full of lovely florals and images with a vintage feel. The included stamp set by the same name has some florals, and beautiful sentiments, there is a fabulous word die, ephemera...that's all not to mention the cardstock, envelopes, and more!


For my card, I mostly featured the the fun Tim Holtz Organic Layers ephemera, and then used one of the sentiments from the stamp set in the kit. I used a Neenah Desert Storm cardbase, and also added a die cut edge in my white mat using Scallop Stitches die. Here are some more photos of my card today:


Here is a closer look at the entire kit contents - you can see it all HERE:


Product links are all below - including affiliate links where possible, which simply means if you use one of the links below that I receive a small commission at no additional cost to you. Thanks so much for stopping by! Have a wonderful day!!!

Monday, May 8, 2023

Foiled Ocean Card Duo - Spellbinders Seahorse Kisses Collection

 Hello! I'm stopping by today to share a couple cards I created using a few not foil plates from the NEW(ish) Seahorse Kisses collection from Spellbinders (my life got a bit crazy, so I didn't get these created and posted as early as I hoped). This past weekend I finally had a chance to sit down and play, so I'm happy to be able to share these now. The soft colors on these cards goes perfectly with the ocean theme, which also use a couple of the new cardstock colors that I'm currently loving as well!


For these cards, I used the new Sage Color Essentials cardstock, and foiled with the gold color in the Satin Metallics variety pack. I used Seahorse Floral, Under the Sea, and Seahorse Kisses Sentiments hot foil plates to create all the hot foiled elements. The card on the left I die cut all the elements out with the coordinating dies, the one on the left, I die cut using one of the newer Stylish Ovals dies. I cut one slightly larger from white cardstock, and adhered them together for a shadow layer. For the card on the left, I die cut a window in white cardstock using one of  those same dies. I used the new Fog Color Essentials cardstock sheets to create the cardbases - I love the soft, neutral pop of color and contrast. Finished off with a twine bow for the card on the left, and a few Pinkfresh Iridescent Clear Drops for sparkle. Here are some more photos of these cards, including close up views.:


Product links are all below - including affiliate links where possible, which simply means if you use one of the links below that I receive a small commission at no additional cost to you. Thanks so much for stopping by! Have a wonderful day!!!


Friday, May 5, 2023

Party Mini Slimline Cards - Pinkfresh Studio YouTube Live

 Good morning! I'm stopping by today to share a card I created for Pinkfresh Studio's YouTube Live  earlier this week. I enjoyed mixing and matching some of the newest release to create a mini slimline card, and then after the live, I created a bonus card with some of the leftover pieces! You can watch the video replay HERE if you want to see more details and watch the first card come together. 


Here is a closer look at the one card we created live - isn't it so fun?!?


Here is the replay of the live video if you'd like to watch it here:


And here is the card I made live, and the extra card I was able to create quickly using the leftovers from the card we created live:

For the card created live, I used Wrap Around Elements die to die cut lots of those lovely fringe pieces from a Scrapbook dot com paper pad, then tucked them all behind a Mini Slimline Frame. I used Sweet Days hot foil, stencil, and die, to create the fun cake layer, and embellished it with the beautiful bow from Wrap Around Elements. I added a sentiment from the Foiled Sentiments 6 - which is birthday theme - and then added some sparkle with Peach Fuzz jewels.


For this second card, I took all the scrap pieces of the fringe from the first card (I did have to die cut just ONE additional to have the correct number) - and tucked those behind tiny heart windows created with the Shaker Heart die. I added the little cupcake leftover from the Sweet Day layer on the first card, added another bow (that I planned to use, and didn't on the first card), and another of those Foiled Sentiments. Just like the first card, I finished off with some Peach Fuzz jewels.


Here are some more close up photos of these cards:


Product links are all below - including affiliate links where possible, which simply means that if you use one of the links below, I receive a small commission at no additional cost to you. Thanks so much for supporting my blog, and stopping by! Have a wonderful day!!!

Sunday, April 30, 2023

Foliage Circle Note Cards - Simon Says Stamp

 Good morning! I'm popping in to share a trio of cards I created using a mix of supplies from Simon Says Stamp - I love how soft and bright these cards turned out!


These cards came together so quickly - and I love the soft pastel colors. I used the Foliage Circle die to die cut panels for the front of my cards, and then backed them with some of the gorgeous Pastel Color Blend cardstock - the glossy surface, and the pretty color blends were perfect for these cards! I then added simple sentiments from the Poppy Perfection stamp set in black, and embellished with a few Iridescent Color drops to finish off! Here are some more photos and close ups of these cards:


Product links are all below - including affiliate links where possible, which simply means if you use one of the links below that I receive a small commission at no additional cost to you. Thanks so much for stopping by! Have a wonderful day!!!


Friday, April 28, 2023

Fruitalicious Thank You Card - Pinkfresh Studio YouTube Live

Good morning! I'm stopping by today to share a card I created for Pinkfresh Studio's YouTube Live  a couple weeks ago. I had lots of fun with an older die, and some of the more recently released circle stamp sets, as well as the brand new (at the time!) washi tape! You can watch the video replay HERE if you want to see more details and watch this card come together. 


Here is the replay of the live video if you'd like to watch it here:


I started off by die cutting the Fancy Diagonal Stripes background from white cardstock - and tucked some Ivory Glitter paper behind it. I hot foiled a circle using Nested Circles Hot foil set, and one of the Satin Metallics foils. I die cut just the outer circle edges using the coordinating Nested Circles dies, and then stamped the sentiment from Around the Shape: Circles stamp set in Detail Black. I ended up trimming off a bit of the side of that circle, so I could offset it on my card. I used one panel of Fruitalicious washi tape, and die cut with the coordinating die, then tucked the smaller elements into some of the stripes, and around and over the circle. I finished off with a hefty dose of Ombre Glitter drops in TwilightGlittering Mountains, and Sparkle and Shine! Here are a few more photos and close ups of this card:


Product links are all below - including affiliate links where possible, which simply means that if you use one of the links below, I receive a small commission at no additional cost to you. Thanks so much for supporting my blog, and stopping by! Have a wonderful day!!!