Showing posts with label Fiskars corner punch. Show all posts

Saturday, March 14, 2015

Long Time No See

Good morning! Stopping by with a card I posted a sneak of the other night on Instagram...although my sister noticed that it looks like the giraffe is pooping - so now that is all I can see! Oopsie! Heehee - makes me laugh though!


I made this using the new My Favorite Things Sketch Challenge:

I used a Pure Innocence image that I think has been retired, since I can't find it on their website! Funny thing was, I hadn't even had a chance to use it yet! I feel like I keep learning more and more with practice with my Copics - I know I still have a long way to go, but it is fun playing and learning! I colored her in, and fussy cut her out, then layered some pattern papers from my random pile together to fit the sketch.


Thanks for stopping by today! Have a wonderful weekend!

Thursday, March 5, 2015

Horse Note Cards

Good morning! I know there has been quite a bit of buzz lately about the MISTI tool - and I have to say I have found many reasons to love mine! I was especially happy the other evening when I was able to put together a set of 10 of these cards in just a little over an hour! I had a friend request a set of cards for a 4-H fundraiser for her kids, something with horses preferably. So...I pulled out this sweet Phyllis Harris set from Unity called Easier with YOU by my side and set to work!


I also used the sketch from the Unity {be inspired} Challenge - a little loosely, since I mostly used the center portion:


And also linking up with this weeks Simon Says Wednesday Challenge - Special Lady/Girly:


I assembly line colored them - very simply! - with Copic markers, rounded a couple corners, and applied distress ink to soften the edges.


Next, I added a bit of washi tape to the top corner, a tiny Tim Holtz paperclip, and a tiny loop of jute twine - reminded me of a lasso!


Finally, I mounted them with foam adhesive on kraft card bases. I used clear boxes from Papertrey Ink to package them up. Because of the foam adhesive, I was only able to fit 5 cards in a box with matching envelopes, so I used two boxes. Don't they look pretty all packaged up?


Thanks for dropping by! I have another post that will be going up later today - see you soon for that one! :)

Monday, July 18, 2011

Tacky Tuesday Challenge - Cool Treats!

Well...I have been wanting to do this for a while, and always seem to miss the deadline! This time is close, but I made it in time! I made this for Challenge #8 Tacky Tuesday's. The challenge was to make a project with a cool summer treat, and include the word "sweet" somewhere in the sentiment. I am also entering this in the Fantabulous Cricut Challenge - I Scream for Ice Cream!!!

My ice cream came from the Cricut Cartridge Straight from the Nest. I used lots of patterned paper! The background shape came off of the same cartridge. I inked the edges of everything, added some doodles, and a bit of bling. The little tag I made by just using a Fiskar's corner punch on a scrap of paper and the sentiment is from Scrappy Mom's stamps. Finished off with a little ribbon bow.

Wednesday, April 6, 2011

Hope your day is sweet!

This card is for a sketch challenge over at My Creative Time's Throwback Thursdays Challenge, which needed to be Cricutless. Here is the sketch:


And here is my take on it! For this card I pulled out my March KOTM and used it for both the image and the sentiment. Used a Fiskars punch for the border, and for the corner punches. Inked everything, added the ribbon bow, and topped the ice cream and corner punches with Glossy Accents. The last picture shows the Glossy Accents on the ice cream a little better.

Thanks for looking - and I hope YOUR day is sweet!!!


Saturday, March 19, 2011

Glitter and a Unity Bird!

Okay...I think that I am REALLY in love with this card!!! I also was rather tickled to have time to work on a card! I finally learned the right technique to put glitter on my Cricut cuts - so look out! I am pretty sure I will be doing it a LOT in the future!!!

For this card, I cut the same flower out 6 different times from the Sweet Treats cartridge in varying sizes. Topped them with Glossy Accents and added my glitter. Let them dry, layered them together, added some Baker's Twine for the center, and a little pearl. Added a stamp, and sentiment, from Unity Stamps, some inking, and some corners from my Fiskars corner punch with a bit more Glossy Accents on them.

Hope you're having a great weekend! Thanks for looking!


Saturday, February 26, 2011

Snips & snails & puppy dog tails

I am SOOOO in LOVE with how this card came out!!! It is for the mom-to-be of a baby shower that a friend and I are hosting tomorrow after church. She is having a little boy (in case you didn't guess from the card!) This idea popped into my head tonight - and just in time, since I didn't have much time left to make it! Still need to cut some stuff out to decorate the diaper cake with, but that will be next! Also going to enter this in the A - Z project at Getting Cricky with K Andrews.

So...all the cuts are from Nate's ABC's...one of my all time FAVORITE cartridges!!! (I can't wait to get Kate's ABC's!!!) I welded the letters on my Gypsy using the font on Nate's ABC's, and covered them with Glossy Accents. The snail and the dog have some dots on them, and then I pop-dotted them from the background. Added some corners cut from my Fiskars corner punch, with a bit of Glossy Accents on them as well, and finished by using zip dry glue to attach some Baker's Twine around the edges.


Thursday, February 24, 2011

Smile - it's your birthday!

Just thought I would quickly share the birthday card I made last weekend for my big brother! It was super simple, mostly because it was a guy card - still think those are some of the hardest to make!

Anyway, the frame stamp is from Unity Stamps, I added a Peachy Keen Face from the Wide-Eyed Kids Assortment, a sentiment from Pink by Design, and a Baker's Twine bow. Finished with some doodlin' and some corners punched from a Fiskar's border punch.


Friday, January 28, 2011

Women can do everything better...in heels!

Just a quick card to share today that I managed to sneak in between homeschooling my dear daughters the other day! Used my Unity stamps from the January Kit of the month, a sentiment from Pink by Design, some ribbon and Prima flowers with stick on pearls, corners punched from my Fiskars corner punch and covered with Glossy Accents, and some faux stitching to finish it off. (I think I also love pink and brown!)


Wednesday, January 26, 2011

Moon and Stars...

Since I received my Unity Kit of the month for January yesterday, and my husband had to head into work extra early, I decided to sit down and play with them. These are two of the cards that I came up with - very different than anything else I have made before, but I love how elegant looking they came out!

The stamp and sentiment for both of them are, of course, Unity Stamps. The backgrounds are both metalic paper than I ran through my Cuttlebug. Added ribbon and corners punched from a Fiskars corner punch to both of them, as well as a little faux stitching with some glittery gel pens. Added some buttons and string to the first one, and some bling with my Jolee's heat set tool to the second one.


Saturday, January 22, 2011

Black, white, and silver...

Well...the thing I love about doing challenges is that it stretches me beyond what I would normally do! This card is definately proof of that! This is for a challenge over at Crafting with Cristina. The challenge was to use ONLY the colors black, white, and gray (or silver). I was determined to accomplish it - although I must admit it took me a little time to come up with an idea! So...here is what I came up with!

Pretty simple! Just used the silhouette option from the Shall we Dance cartridge, added a WHOLE bunch of matting, a sentiment from Pink by Design stamps, some white corners punched with a Fiskars corner punch, and finished off with a bit of bling with my Jolee's heat set tool.


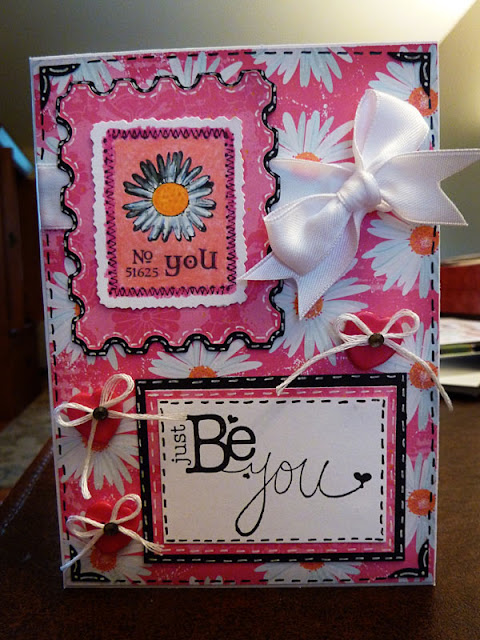
Just be you!

There is something about pink and black that I just love - so this card was super fun for me!

The postage stamp is from Unity Stamps, and I colored it in with my Prismacolor pencils. Cut the postage stamp for behind if from Sentimentals cartridge on my Cricut. The sentiment is from the same Unity Stamp set, and I matted it in the same black and pink. Added a white bow, some buttons with a bit of string for bows and some bling centers with my Jolee's heat set tool, some corners from my Fiskars corner punch, and so much faux stitching that my hand was cramping when I finished!!! But it was worth it - I am really happy with how this turned out!


Friday, January 21, 2011

Peachy Keen LFIF - XOXO!!!

When I saw the challenge for this weeks Let's Face it Friday on the Peachy Keen Challenge Blog - I couldn't wait to do it!!! The project had to have X's and O's somewhere on it, and of course, Peachy Keen Faces. So...I thought, why not just make the Card's focus X's and O's? Here is what I came up with!

The X's, O's, and hearts came from the Sweethearts cartridge. I added some Peachy Keen faces from the Basic Paper Doll Face Assortment, some punched black corners, some of my new twine from the Twinery (I am in LOVE with it!), a button, and lots and lots and lots of stitching and doodling and dots.

Thanks for looking! Have a great day!


Tuesday, December 21, 2010

Christmas cards for our neighbors

Well...I was pretty bad this year, and didn't get my Christmas cards done, but today my two daughters and I made cookies for our 3 neighbors (they have been begging for weeks to do that for them!) and they all had to have a card to go with them. So Katie, my oldest daugher (age 7) sat down with me and helped me make cards. Boy is she picky!!! When she has an idea in her head of what they should look like, she knows what she wants, and there is no talking her out of it! But that's okay - because she usually has pretty good ideas! I definately see a future cardmaker in the future!

The cuts for all 3 cards were from Winter Frolic. The gingerbread man and snowman got a Peachy Keen face added to them, and some pearl buttons as well. The sentiments were all from my Pink by Design stamps. Just added a little doodling, ribbon, and/or inking to finish them off! Not to bad - 3 cards in under an hour! Love it when they are simple and just fly out like that!


Saturday, December 18, 2010

Unity Stamp Birthday Card

Just a quick card that I made the other day with my Unity Stamps.

Punched the corners with a Fiskars corner embossing punch, added some ribbon, a Prima Flower with a button center, a bit of string, and some doodling around the edges. Thanks for looking!