Showing posts with label Shimmer Powder. Show all posts

Friday, February 17, 2023

Mini Slimline Birthday Balloon Duo - Simon Says Stamp Be Creative Release

 Good morning! I'm dropping by to share my first couple of cards using the Be Creative Release from Simon Says Stamp! Lots of fun items in this release - particularly exciting for me were a few birthday sets, and since that is the card I use and am asked for the most, I was so happy to be able to create some cards to build my stash!

I'm starting off by sharing a pair of mini slimline cards. I love using one background panel to create two cards like this!


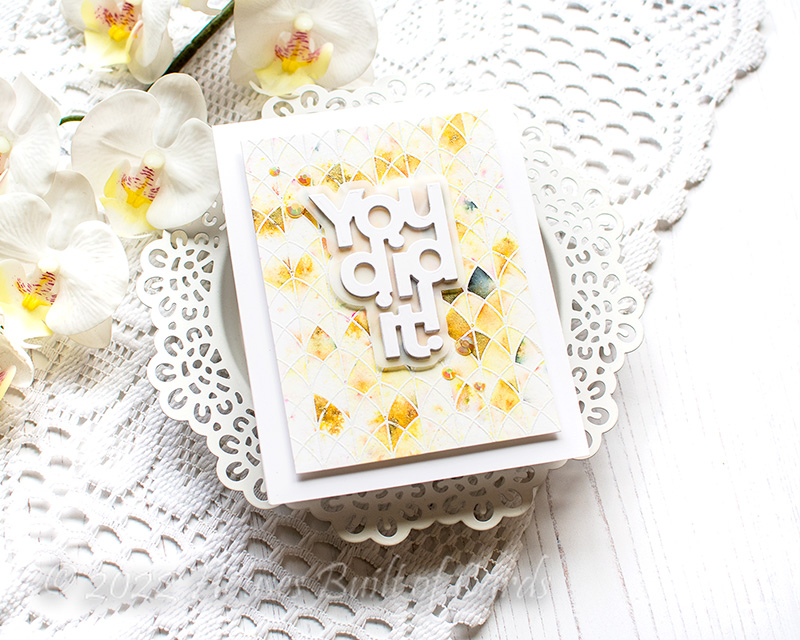
I started off by heat embossing the new Bunch of Balloons background stamp in gold on watercolor cardstock. I then taped it down to a board, misted it well with water, and sprinkled on 3 different colors of Shimmer Powders: Atlantis Burst, Falling Leaf, and Blue Blitz.


I let them sit and mix - pooling in the different areas of the embossing powder. I tried a bit to aim inside the balloons, then mix the colors where the balloons overlapped. It wasn't perfect, but I love the effect, and these colors are so fun!


Once those dried thoroughly, I trimmed the panels in half, and matted them with white cardstock to help give them a border to set them off from the cardbases.


I heat embossed a sentiment from the new Big Old Birthday stamp set in gold on strips of vellum, then attached those at the top with my Tiny Attacher. I did them in cross patterns for fun. I added a tiny drop of glue behind one of the letters on the bottom word - this attached them so they stayed down, but left the illusion of them floating free.


Finally, I popped them up with foam adhesive on some Green Apple cardbases - to help that lovely green pop, and add some fun dimension!


I feel like these colors are more masculine, but wouldn't they be fun in pinks and reds and oranges?!? I may have to try that sometime!


Product links are all below - including affiliate links where possible, which simply means if you use one of the links below that I receive a small commission at no additional cost to you. Thanks so much for stopping by! Have a wonderful day!!!


Friday, May 13, 2022

You Did It - Simon Says Stamp Yay You Release Blog Hop Day 2

Good morning! Excited today to be joining in on Day 2 of an incredible blog hop to celebrate the BRAND NEW Yay You Release from Simon Says Stamp! Make sure and check out all the inspiration with this new release AND link up your creations as you receive your orders HERE in the Galleries created just for this release! And check out the graphic below to receive a FREE Beautiful die set with any purchase and the coupon code below through May 25, 2022 as well - while supplies last (code expires at 11:59 PM EDT)!!! 


I have two cards to share today using Nuvo Shimmer powders with this fabulous new cling background stamp from the release. 

(NOTE: I had to laugh when Jennifer McGuire posted her video earlier this week with something similar for backgrounds - I made these backgrounds about a week before that video posted! It's funny how different designers can randomly think of the same products at the same time like this...)


My first card is all light, bright, and airy - makes my little white-space-loving-heart so happy! For both cards I'm sharing today, I used the same technique. I heat embossed the Arches Background in white on watercolor paper, taped the panel to a board, then sprinkled on different colors of Shimmer Powder, and finally misted well with water. The shimmer powders pool into different areas of the heat embossing, and you get these marvelous different color effects that are simply magical!


This first card uses Golden Sparkler Nuvo Shimmer Powder - it is one of my favorites, since I feel it works really well for masculine designs, not to mention celebrations such as weddings or anniversaries!


Sentiment was created with the new You Did It wafer die, cut 3 times from white cardstock and stacked together, then with a vellum shadow layer before popping up with foam adhesive on the background. I finished off with a few coordinating sparkly jewels tucked around the sentiment.


My second card was created in the exact same way, just a switching up of the color combos!


For this one I used Blue Blitz Nuvo Shimmer Powder for the background. I have tried adding water first, then sprinkling the powder on, but I've found I like them best when I add the powder first, then mist with water. If you decide to try - see what you end up loving best!


For both cards, once the panels dried, I die cut a rectangle out of it using Basic Rectangle dies. You could also trim the panels down with a paper trimmer, I just loved being able to select my favorite part of the background to die cut, as well as having those nice finished edges.


For the sentiment on this one, I also stacked 3 of the white word layers, and then for this one used black cardstock for the shadow layer, and also popped it up with foam adhesive. A few more coordinating jewels finish this card off as well!


GIVEAWAY INFO:
Simon Says will be giving a $25 gift certificate to their online store at each stop along the hop - so make sure and leave a comment before you leave for a chance to win! Winners will be announced next Wednesday on the Simon Says Stamp Blog.


Product links are all below - including affiliate links where possible, which simply means that if you use one of the links below, I receive a small commission at no additional cost to you. Thanks so much for supporting my blog, and stopping by! Have a wonderful day!!!


Saturday, April 25, 2020

Tulip Background 2 Ways - Simon Says Stamp Sunny Days Ahead Blog Hop


Good morning! I'm thrilled this morning to be part of Day 2 of a 2 day Blog Hop to celebrate the Fabulous NEW Sunny Days Ahead from Simon Says Stamp!!! Not only is a new release exciting - but Simon Says Stamp is finally able to begin shipping again after being part of a state wide stay at home order. Yesterday I received a couple orders I had placed with new item pre-orders in February - and it was so fun to receive some of the goodies I had totally forgotten about! Make sure and check out all the inspiration with this new release AND link up your creations as you receive your orders HERE in the Gallery created just for this release! And check out the graphic below to receive the versatile Intense Black Ink Pad for FREE with any order using coupon code SSSINK through Sunday, January 12, 2019 as well - while supplies last (code expires at 11:59 PM EST)!!!


Today I'm sharing two cards using the same background and sentiment stamp sets - but in two different ways! I love being able to use  my supplies in different ways to get more uses out of them!


For this first card, I decided to watercolor in the image in some of my favorite tulip tones with the lovely new Tulip Background Stamp!


I started off by heat embossing it it in gold on Arches watercolor paper. I used my MISTI to stamp a couple times for a clear impression - it'snot perfect on the texture of the watercolor paper, but I am okay with imperfection! I then used some bright and bold Pinkfresh Liquid Watercolors to color in the image. These colors are so fun to mix and blend together!


I added a sentiment from the new Lucky and Hugs stamp set. I stamped the larger portion in black on white cardstock and carefully cut it out close to the image, then heat embossed the second part, trimmed it into a banner shape, and added it underneath - both on foam adhesive.


Finished off with a few sparkly clear Pretty Pink Posh sequins for fun. Can you see the lovely shine from the gold heat embossing on this?


For the next one, I went with a far more abstract approach!


For this, I stamped and heat embossed as above, but this time I used clear embossing powder. I taped it down on a board, sprinkled some Nuvo Shimmer Powder in Violet Brocade over the entire panel, and then misted it generously with water. The best effect from this come from letting it sit and slowly dry - the shimmer powders pool up within the heat embossed areas and look so pretty when they finish drying. Hard to be patient, but so worth it!


Once it dried (for a very long time! Or overnight I suppose...) I added the sentiments and sequins the same way as the above card.


Can you see how shimmery and pretty this technique is?!?!? I love the fine glitter in the shimmer mist!


Which technique do you like best? One takes very little time, but lots of patience, the other more time to color, but when you are done it is finished pretty quickly!


GIVEAWAY INFO:
Simon Says will be giving a $25 gift certificate to their online store at each stop along the hop - so make sure and leave a comment before you leave for a chance to win! Winners will be announced next Wednesday on the Simon Says Stamp Blog.

Here is the entire blog hop line up in case you get lost along the way:

Heather Hoffman (you are here)

These ladies are also part of the hop, but are featuring previously released products - so make sure and hop along to them as well:


Product links are all below - including affiliate links where possible, which simply means that if you use one of the links below, I receive a small commission at no additional cost to you. Thanks so much for supporting my blog, and stopping by! Have a wonderful day!!!


Monday, March 30, 2020

You Are My Soulmate - Simon Says Stamp Anniversary Card

Good morning! I don't know if you happened to see the anniversary card I posted day before yesterday (click HERE to view), but this was one I created with some of the leftovers of yesterday's card! I used the same Simon Says Stamp supplies - and the negative from yesterday's card to put together this window frame for my sentiment!


I used the background I created with the Triangle Blast stencil and my Green Parade Shimmer Powder - I love using shimmer powders with stencils! I used watercolor cardstock. layed my stencil over the top, dusted a bit of the shimmer powder over the stencil, then misted with water before removing the stencils.


Once that had time to dry nice and thoroughly, I chose a favorite part of the design and die cut the medium size of the Wonky Hearts dies from that panel (and used it on yesterday's card), but as I looked at this part that I had set aside, I thought it would be fun to create a card with this piece as well! I stamped a sentiments from the Love Always stamp set in the window the heart created on some Cream cardstock - just a bit softer than stark white cardstock, and felt like it fit the colors better. I mounted the watercolor panel with foam adhesive over the panel with the stamped sentiment.


I mounted that onto a cardbase created from Fog cardstock, and then added a small supporting sentiment, heat embossed on a thin strip of black cardstock, and trimmed at a slight angle.


Finished off with a few clear Pretty Pink Posh droplets! This one might be my favorite of all the 3 anniversary cards I made this past week!


Product links are all below - including affiliate links where possible, which simply means that if you use one of the links below, I receive a small commission at no additional cost to you. Thanks so much for supporting my blog, and stopping by! Have a wonderful day!!!


Saturday, March 28, 2020

I Still Love You - Simon Says Stamp Anniversary Card

Good morning! I don't know if you happened to see the anniversary card I posted yesterday (click HERE to view), but this was the second of the 3 I created! I used a similar layout, but some different colors, sentiments, and embellishments for a slightly different look - but mostly using the same Simon Says Stamp supplies!


I started off by creating the pattern on the background with a the Triangle Blast stencil and my Green Parade Shimmer Powder - I love using shimmer powders with stencils! I used watercolor cardstock. layed my stencil over the top, dusted a bit of the shimmer powder over the stencil, then misted with water before removing the stencils.


Once that had time to dry nice and thoroughly, I chose a favorite part of the design and die cut the medium size of the Wonky Hearts dies from that panel, and then stamped a couple sentiments from both the Love Always stamp set and I Still Do stamp set by CZ Design on it. Love how perfectly they work together!


I created a card base from Fog cardstock, then die cut a Wonky Rectangle from Cream cardstock - just a bit softer than stark white cardstock, and felt like it fit the colors better.


I created a black banner for this one using a strip of black cardstock, and trimming the edges with a small die from Sentiment Labels Wafer Die, then layered everything together, adding the heart with some foam adhesive. I finished off with some enamel dots from the Pinkfresh Super Cool collection. Can you see the bit of sparkle from the shimmer powders? And yet it definitely feels like a masculine card still!


Product links are all below - including affiliate links where possible, which simply means that if you use one of the links below, I receive a small commission at no additional cost to you. Thanks so much for supporting my blog, and stopping by! Have a wonderful day!!!


Friday, March 27, 2020

Another Year Looks Good on Us - Simon Says Stamp Anniversary Card

Hello! You may have seen that a couple days ago I celebrated my 20th anniversary with my hubby! Well...even though our plans involved staying home and making a special dinner instead of anything more extravagant this particular year, you know I had to make a special card, right? So...I pulled out some of my favorite Simon Says Stamp supplies, and went to work! I actually made 3 cards...then chose this one as my favorite to give him.


I started off by creating the pattern on the background with a the Faceted Stripes stencil and my Gold Sparkler shimmer powder - I love using shimmer powders with stencils! I used watercolor cardstock. layed my stencil over the top, dusted a bit of the shimmer powder over the stencil, then misted with water before removing the stencils.


Once that had time to dry nice and thoroughly, I chose a favorite part of the design and die cut the medium size of the Wonky Hearts dies from that panel, and then stamped several sentiments from the fabulous I Still Do stamp set by CZ Design on it. Love how perfectly they all fit together!


I created a card base from kraft cardstock, then die cut a Wonky Rectangle from Cream cardstock - just a bit softer than stark white cardstock, and felt like it fit the colors better.


Layered everything together, adding the heart with some foam adhesive, then finished off with some Nuvo Dream Drops in Gold Luxe, and Crystal Drops in Dark Walnut. Can you see the bit of sparkle from the shimmer powders? And yet it definitely feels like a masculine card still!


Product links are all below - including affiliate links where possible, which simply means that if you use one of the links below, I receive a small commission at no additional cost to you. Thanks so much for supporting my blog, and stopping by! Have a wonderful day!!!


Thursday, October 17, 2019

Christmas Greetings and Joy - Pretty Pink Posh October Release Blog Hop

Good morning! So excited this morning to be hopping for Day 2 of the blog hop to celebrate the FABULOUS BRAND NEW holiday release from Pretty Pink Posh - full of adorable winter, Christmas, Hanukkah, and New Year stamps, dies, Confetti mixes, and stencils!!! Keep reading for more info, details on my card I'm sharing today, AND of course, some giveaway info at the bottom as well!


I have a total of 3 cards to share with you today using this beautiful new release - shall we get started?!?!?


I'm so thrilled with how this card came out! I love the beautiful new Stitched Poinsettia Die, and thought it would be super fun to use with Shimmer Powders - and it worked just like I was hoping!


I die cut all the layers of the die from watercolor cardstock, then sprinkled on some shimmer powders in the proper colors, then misted with water and set aside to dry nice and thoroughly. Once all the layers dried, I layered them up with a bit of liquid glue to hold all the layers together.


I finished off with a bit of soft stenciling on a white cardbase using the new Christmas Background Stencil with Antique Linen Distress Oxide Ink, then adhered the flower in place. Finished off with a simple sentiment from the new Winter Wreath stamp set. Don't you just love all the dimension and texture on this gorgeous bloom?


Next up, sticking with a fairly similar color scheme, but shaking things up this time!


The new Winter Frame Die is so intricate and gorgeous - I love it so much! Perfect to create a shaker card filled with the lovely new Merry Confetti Mix!


I added the large "JOY" word using the Joy Coordinating Dies. I die cut them from white cardstock, did some ink blending on the bottom of them with Candied Apple Distress Oxide ink, then went over it with a sparkly Nuvo Aqua Glitter Pen - it reacts with the ink to give a sparkly watercolor effect!


Finished off with some more ink blending just around the outer edges of the frame using Shabby Shutters Distress Oxide ink, then heat embossing a sentiment from Joy stamp set on a strip of white cardstock and blending the same ink over it to make a perfectly coordinated custom sentiment.


And finally, I couldn't throw away that negative from the previous card, so I changed up the color scheme and put it to good use on another card!


For this card, I started off by creating a background to go behind the window created from the Joy Coordinating Die. I used blue cardstock with the new Snowflakes Stencil - first adding a bit of Hero Arts Unicorn white ink, then leaving the stencil in place and blending over some sparkle with my Nuvo Glimmer Paste - love the sparkly but opaque look I ended up with!


While that dried, I colored up one of the little cuties from Holiday Signs. I added a sentiment to his sign from Joy stamp set, heat embossed on a bit of the same blue cardstock as my snowflake background, then trimmed into a thin strip and cut the words apart to fit on the sign.


Finished off with a thin mat of deep gray cardstock, a light blue cardbase, and popped the little penguin up on foam adhesive to finish!


GIVEAWAY INFO:
Now the fun part - there are a total of 4 $25 Gift Certificates up for grabs - 2 for each day of the hop!!! Winners will be picked randomly along the blog hop. Make sure and leave comments by 11:59 PM PDT on October 22, 2019 to qualify! Winners will be announced after that on the Pretty Pink Posh Blog!

Here is the entire Blog Hop line-up:

Heather Hoffman (you are here)

Product links are all below - including affiliate links where possible, which simply means that if you use one of the links below, I receive a small commission at no additional cost to you. Thanks so much for supporting my blog, and stopping by! Have a wonderful day!!!