Showing posts with label Sophisticated. Show all posts

Monday, August 6, 2012

My Craft Spot Monday Challenge - Invitations and Announcements


Hello! First off I wanted to give a quick reminder to check out my Moving Sale if you want to do a bit of shopping! Today is the last day to make a purchase and have a chance to win a little something extra...so click HERE or on the tab above called CRAFTY STUFF FOR SALE.

 It's that time of the week again - time for a new challenge over at My Craft Spot! This weeks challenge is Invitations and Announcements. I know this might be a bit of a stretch - but I thought this might make a really cute birthday party invitation! Here is what I made:
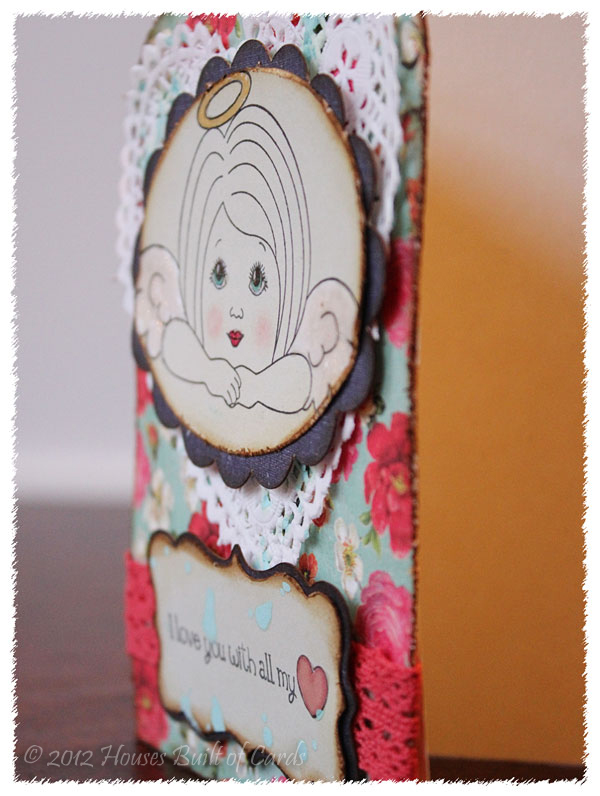
I started off this card with my color scheme in mind! As I was tucking my daughters into bed the other night, she had picked a tank top in that lovely apricot orange color, and turquoise knit shorts. I fell in LOVE with the color combo right there, and determined to make a card with it! She was pretty happy to see the finished project, and know she helped inspire me!
I used papers from Studio Calico, and Echo Park to find my color combo. The oval and scallop frame were cut on my Cricut using Lacey Labels. The silhouette is from A Child's Year. 
I cut the sentiment banner from the Theresa Collins cartridge, Sophisticated. I then stamped the sentiment using Tim Holtz distress ink, and the My Craft Spot stamp set called Birthday Wishes. (Click HERE to see all of the available stamp sets) I curled the banner a bit before attaching it to my card with two pieces of foam adhesive - so it gave it a bit of the look of a flag.

Even though this is for an announcement/invitation challenge, I will probably use this as a birthday card (shhhh...don't tell!) - so I added this sentiment to the inside:
Before I attached the silhouette and frame, I tied some Crinkle ribbon from My Craft Spot in Caribbean underneath, and added a bow on each side, topped with a stick on pearl. (Click HERE to check out all the crinkle ribbon available at My Craft Spot - it is all so beautiful!)  
Then...I used foam adhesive for the silhouette, and also the frame - so lots of dimension! 
I'm so glad to see you again this morning! Make sure and head over to My Craft Spot to see what the rest of the Design Team created for this challenge (and there are some adorable projects this time around!) - and to make sure and link up your own creation for a chance to win this weeks prize!!! Can't wait to see what you come up with!


Thursday, July 12, 2012

My Craft Spot Release Party - Day 5 - New Arrival


Good morning again for the last and final day of sneak peeks from the new My Craft Spot stamp release! Tomorrow is the big release hop and reveal! Can't wait for you to see them all! Today we are sneaking the set called New Arrival - another great baby set! Here is what I made:
I feel like this is really simple...but life has been one constant spiral of busyness in our house - and this was the best I could put together! I used another silhouette from A Child's Year for this one, and added a pretty crown from the Theresa Collins cartridge called Sophisticated. The background frame is also from the same cartridge.
All the pattern papers are from October Afternoon, and the red cardstock is from Bazzil. I inked the edges of everything with Tim Holtz distress ink in Antique Linen, and added some faux stitching. 
Used some traditional red baker's twine from My Craft Spot (you can find it HERE) - and attached the silhouette, and then the entire frame to the card base with foam adhesive - so lots of fun dimension! 
Finished off with a bit of bling, and the sentiment stamped with some Papertrey ink red dye ink. 
Thanks so much for stopping by to visit! Make sure and come back tomorrow for the full reveal, and I will have a stamp set to give away to someone!


Wednesday, February 8, 2012

I love you more than CHOCOLATE!!!! (And that MUST be a LOT!!!)


I did it! Managed to get another few challenges together - and dusted off my Cricut for the first time in quite a while! I've been doing a lot of stamping lately, and just hadn't been using the Cricut that much - but I definitely need to pull it out a little more often again! I think it is getting lonely! 

Here is the inspiration photo from Moxie Fab World:


And the challenge over at My Creative Time was to make a Valentine's card using any cartridge. So, I used my Everyday Pop-up Cards cartridge, and some of Emma's stamps! 
All the paper's are from Crate Paper's Paper Heart 6x6 paper pad - I think this is my favorite Valentine's line of papers right now! They are so pretty!
I cut out the box of chocolates, inked the edges of everything with Tim Holtz distress ink in Tea Dye, and assembled all the layers, adding a doily behind for fun, and pop-dotting the chocolate box above that. 
The tag for the sentiment was cut from Sophisticated cartridge, and I glued some Baker's Twine in the new Cantaloupe color around the edge.
This picture shows the dimension a little bit better: 
The card is 5x5 - don't know why, but I've been loving the square cards lately! 
Oh yes, I also used some crinkle ribbon to tie the sentiment on, after attaching it with pop-dots! 
And the final touch was a bit of doodling around the edges.  
.
Well...off to see what else I can create today! See you again soon!


Friday, January 13, 2012

Peachy Keen Link-Up Party!!!

Good morning!!! It's linky party time at Peachy Keen Stamps! They are easing back into the challenge routine by starting off with the opportunity for you to link up whatever you have recently been working on with your Peachy stamps! Today I am sharing some inspiration from the new Peachy Kit of the Month for January! LOVE it! Here is what I made:
(And I just have to point out the wonderful watermark that my sweet husband made for me! I'm so excited!) Anyway, I stamped the sweet little cherub from the kit on some light gray paper from Crate Paper's "Random" 6x6 paper pad. Used some Copics to color in just the eyes, lips, cheeks, and halo, and a white gel pen to color the wings. Then topped the halo and wings with Glossy Accents. The oval and background was cut on my Cricut using Elegant Edges,
The sentiment is also from this kit, and the frame shape on that was cut from Theresa Collins Sophisticated cartridge. I also colored the heart with Copics, and covered it with Glossy Accents. The trim behind it is from the October Afternoon trim pack with the Holiday Style Collection. 
The edges of everything were distressed with my Tim Holtz distress tool, and inked heavily with Time Holtz distress ink. I found the cute little heart-shaped doily at Michaels the other day and just HAD to get a pack of those! I splashed a little October Afternoon Sprinklers on the doily, and on the sentiment frame to make it look a little more vintage.
The framed image, and sentiment frame, are both pop-dotted from the card for some dimension. You can see it a little better here: 
And there you go! My little vintage cherub Valentine card!!! I LOVE how it came out!!! 

So here is the Kit I used - you can check it out by clicking the link under it to go to the Peachy Keen website:


Now make sure and head over to the Peachy Keen Challenge Blog to link-up your creation! Can't wait to see what you come up with!!!!


Thursday, November 10, 2011

Black, Orange, and White - and Pay it Forward Challenge

This is my first time playing along with the Play Date Cafe Color Challenge. I just loved the color combo, and couldn't wait to play with it! I am also going to enter this in the Pay It Forward Challenge on the Moxie Fab World. Here is what I came up with:


And here is the color combo from their website:


I used Everyday Pop-up Cards to cut out the butterfly, then stamped Market Street Stamps Pretty Perfect Grid over it in with orange ink. Added some cute antenae with some Baker's twine from the Twinery, and pop-dotted him from the background.


The background shape is from Sophisticated, and I ran some Baker's twine around the edge of the white piece, tied a bow at the top, and added an orange button from my stash.


The sentiment is from Hero Arts, and the background of the card is another Market Street background stamp - Punched Tin.

Thanks for stopping by - that's all for me for now! 3 posts in a row - I was BUSY!!! Now I'm gonna go make some more to post soon! See you again soon!


Monday, October 10, 2011

Another Scrapbook Layout for Basic Grey Blog challenge

Hello! Here is another scrapbook layout for the Basic Grey Blog - this time the challenge is to use Pattern Paper. I used the Out of Print collection - so pretty! Did a little matting in black, added a title cut with my Cricut and the Theresa Collins Sophisticated cartridge, and a little machine stitching around the edges. I'm still struggling with the best way to photograph layouts - cards I can do, but scrapbook pages are more of a challenge for me! So I took 2 pictures, so hopefully you can see them well enough!


Saturday, October 8, 2011

More Scrappy Mom's Sneak Peaks!

Good morning! I have a couple more cards I made with the NEW sets of Scrappy Moms stamps! Remember - they are offering {FREE shipping} through October 16th - so it's a great time to pick up any new sets you might have been eyeing for a while!!!

Here is my first card:


I used the new set A Holiday to Remember.


The house was cut from Joys of the Season. I added some gray Bakers Twine for smoke from the chimney, lots of stitching and doodling with my white gel pen, and pop-dotted it from the background.


The sentiment tag is cut from Sophisticated, and I found the little hearts on Birthday Cakes cartridge - they are also pop-dotted from the background! Finished off with some more faux stitching around the edges of everything else. 


My second card is so simple - but I love how it came out! I just used my Martha Stewart Score Board to add an embossed double square, then took some pink ribbon, twisted it, and glued it down with Zip Dry glue where I wanted it to stick.


Finished off with the sentiment from this set - Believe in Miracles! Remember - $2 of from the sale of each of this set goes toward research and support for families and victims of cancer. I am also linking this card up to the Link up for Pink linking party over at Gaby Creates! And...adding it to the Hand Stamped Sentiments Think Pink Challenge


That's it for today! I will have some more sneaks up for you tomorrow!!! Thanks for stopping by!

Friday, October 7, 2011

Scrappy Mom's Stamps - October Release - Guest Designer post!

Good morning! I am SOOO excited to be a guest designer this month for Scrappy Moms Stamps, because it meants I get to help show off the newest stamp sets for the month of October!!! And as an added bonus, Scrappy Moms Stamps is offering free shipping on any purchase made today (October 7th) until October 16th!!! 

So, without further ado, here they are, with a card I made to go with each of them! The first one is called Believe in Miracles - and this set is unique, because $2 from the sale of every set will be donated to a national cancer group that funds research and support for patients and their families!


For my card, I cut the ribbon from Stand and Salute, inked the edges, then covered it with Glossy Accents and Martha Stewart chunky glitter. Added some tulle behind it which I also inked a bit on the edges, and put it all on a doily, again with inked edges. I cut a plain circle for the center of the doily, and inked it as well (can you tell I inked a LOT on this card?) Stamped the sentiment from the new set, and added some crinkle ribbon and a flower that I cut from Mother's Day Bouquet and layered with a button and some jute cord.


This second set is called A Holiday to Remember and is LOADED with great holiday sentiments all the way from Thanksgiving to New Years!


I decided to start off with a Christmas card! I used the Christmas Solutions cartridge - it is retired, but a great cartridge if you have it or can get your hands on it! I cut the bell out with the shadow layers, inked the edges with black ink, and covered it with Glossy Accents and Martha Stewart chunky glitter. The bow I cut out and covered with flocking - LOVE how fuzzy and cozy it came out! The frame for the sentiment is cut out from Sophisticated, and also inked before stamping the sentiment. Finished off with some crinkle ribbon, a button, and some jute cord on the bow, and then added some corners that were punched with a Fiskars corner punch.


I am also linking this up to the newest challenge in the Moxie Fab World - Textured to Perfection. That flocked ribbon just has the softest texture! It just makes me want to touch it!

Thanks for stopping by! Have a great weekend - and don't forget free shipping from today until the October 16th on any purchase from Scrappy Moms Stamps! Great time to shop if you have been waiting!

Tuesday, October 4, 2011

Pink, black, and white card

So, here is one more that I got accomplished for the WCMD challenges over at Inking Pink - this one is for the Pink, Black, and White color challenge.

I used my newest cartridge - the Theresa Collins Sophisticated. (LOVE it, by the way!) Added some self adhesive bling, some black ribbon, a sentiment from Unity Stamps, and some faux stitching around the edges. Off to post one more!