Monday, October 30, 2023

Happy Christmas from the Woods - Simon Says Stamp Season of Wonder Release

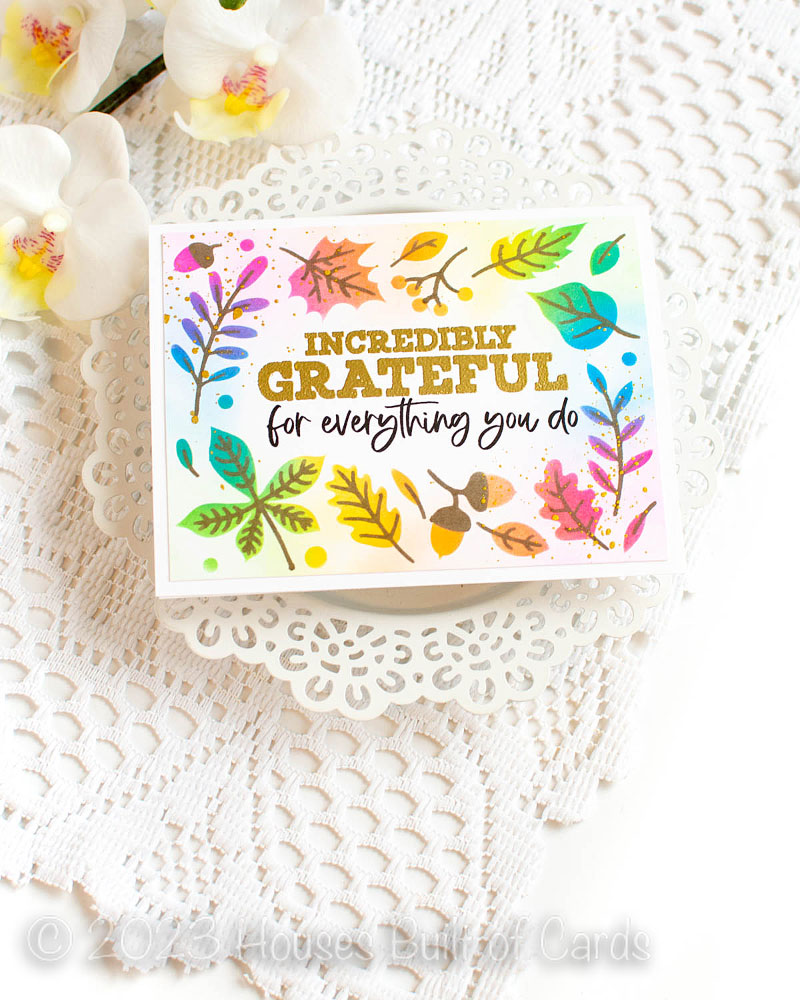
 Good morning! I'm here with a couple more cards using some of the NEW Season of Wonder Release from Simon Says Stamp. For these cards I used a new 3D Embossing Folder, and a new word die!


I started off by embossing the new Textured Pine Trees folder on two different panels of colored cardstock - Soft Navy, and Lavender. I then brushed directly over the surface the new Calico White ink pad from Pinkfresh Studio - this highlighted the raised areas, and in some spots smooshed down a bit more to add a bit of white even on the background. I love the perfect snowy effect! I trimmed a bit off the side of each panel, then mounted on white cardbases, leaving a small white border along each side. I die cut the Happy Christmas die, using vellum for the shadow layer, and white cardstock for the main words. Those were layered together and onto the card with liquid glue. Finally, a few Ombre Glitter drops from Pinkfresh Studio add a touch of needed sparkle - and provide an alternate dot on the "i" in Christmas! Here are some more photos of the finished cards:


Product links are all below - including affiliate links where possible, which simply means if you use one of the links below that I receive a small commission at no additional cost to you. Thanks so much for stopping by! Have a wonderful day!!!


Wednesday, October 18, 2023

Nearly 1 Layer Fall Cards - Simon Says Stamp November Card Kit

Hello! I'm popping in to share a couple more cards using the new November 2023 Simon Says Stamp Card Kit -  Cozy Autumn Hugs! This month's kit has a great autumn feel, and lots of fun cozy elements! The included stamp set by the same name has some fun images to stamp as well as some great sentiments, there is a fun embossing folder, a versatile label tag die, a fun layering stencilpretty pattern paper...that's all not to mention the cardstock, embellishments, and more!


I have not one - but TWO cards to share today! First up - who can resist a stenciled fall border in rainbow colors?!? I moved around the layer of stencil one, changing colors, and blending and overlapping colors. I cycled through the same colors twice, which gave a great balanced look to the finished card. For the second layer, I stenciled with a Mocha ink, instead of black, to keep that fall feel. I heat embossed the one larger sentiment, then stamped the secondary one in black. To soften the edges, I used the leftover ink on my brushes around the edges, to just give a soft glow of the same color tones on the leaves. Then I masked off the sentiments, and added a few splatters of gold with my Starry Colors palette. Finished off by adhering this panel directly on my cardbase - nearly one layer, and nice and easy to mail! Here are more photos of this card:


Next up - a little more bold and traditional fall colors! For this I used the stamp set, and randomly stamped different elements, layering up the top layer in black ink this time. For the sentiment, I stamped the larger word in one of the coordinating colors, then added the other sentiments in black. This one is also nearly one layer, and nice and flat and easy to mail! Here are more photos of this card:


Here is a closer look at the entire kit contents - you can see it all HERE:


Product links are all below - including affiliate links where possible, which simply means if you use one of the links below that I receive a small commission at no additional cost to you. Thanks so much for stopping by! Have a wonderful day!!!


Saturday, October 14, 2023

Fall Label Notecards - Simon Says Stamp November Card Kit

 Hello! I'm popping in to share my first cards using the new November 2023 Simon Says Stamp Card Kit -  Cozy Autumn Hugs! This month's kit has a great autumn feel, and lots of fun cozy elements! The included stamp set by the same name has some fun images to stamp as well as some great sentiments, there is a fun embossing folder, a versatile label tag die, a fun layering stencil, pretty pattern paper...that's all not to mention the cardstock, tools, and more!


Not surprisingly, I love the pattern paper in the kit - and it paired up so well with the Label Tag die in the kit with stamped sentiments from the stamp set. I mixed heat embossing and black stamping for the sentiments - and love the look it gave! I trimmed down some of the Burnt Orange cardstock in the kit into strips, and arranged those diagonally across each of the pattern paper panels, before mounting the tags over the top. I also tied a fluffy white bow on each one, and then embellished with some Matte Gold Pearls from Pinkfresh to finish them off! Here are more photos of these finished cards:


Here is a closer look at the entire kit contents - you can see it all HERE:


Product links are all below - including affiliate links where possible, which simply means if you use one of the links below that I receive a small commission at no additional cost to you. Thanks so much for stopping by! Have a wonderful day!!!


Thursday, October 12, 2023

Christmas To-Do List - Simon Says Stamp Season of Wonder Instagram Hop

 Good morning! Today I'm joining a fun Instagram hop to celebrate the Season of Wonder Release from Simon Says Stamp! Lots of inspiration to be found, and some great prizes as well! Head over to my Instagram HERE to check it out! But as always with an Insta hop, there are only so many details you can get in that tiny caption, so I always like to do a full blog post with ALL the details!


I had lots of fun creating this card with a fun, bright, and fairly traditional Christmas color palette! I used the new Noted Holiday stamp set for all these cards. On two of the cards, I also used the little notebook page from the previously released Noted stamp set, and stamped everything out, then trimmed out the panel. For the background on those, I swiped the same ink pads directly across a panel of white cardstock to add a kind of sketchy background design that coordinated perfectly with the stamped images. I trimmed that down, mounted with foam on my white cardbase, then added the notecards over the top with more foam adhesive. For the second more simple cards, I used a sentiment from the Noted Holiday stamp set, and stamped it in repeating red and green, in alternating rows. I actually originally planned to use that to mount my notecards over, but I didn't like it when I got to that point. I didn't want to waste them - so they became their own cards! I stamped the tiny star image between each of the words, and while it doesn't show up in the photos very well, I also added 3 rows of scoring above and below each of the stamped sentiments for some texture and interest. Finished off with some Pinkfresh Gold Glitter drops for a touch of sparkle! Here is a closer look at this card set:


Product links are all below - including affiliate links where possible, which simply means if you use one of the links below that I receive a small commission at no additional cost to you. Thanks so much for stopping by! Have a wonderful day!!!


Tuesday, October 10, 2023

Tropical Birthday Wishes - Pinkfresh Studio YouTube Live

 Good morning! I'm stopping by today to share a card I created recently for a Pinkfresh Studio's YouTube Live. This was a second sneak peek of the new ink colors, a couple days before they released! You can watch the video replay HERE if you want to see more details and watch this card come together.


Here is the replay of the live video if you'd like to watch it here:


This particular YouTube live was on my daughter's birthday, so I used the opportunity to create a birthday card for her! We are looking forward to a Hawaii trip soon, so I figured the tropical vibe would be perfect. She did end up loving it. :) I heat embossed the Hibiscus stamp set, and then used the new ink colors to blend on it. I used Spiral Circle on a panel die cut with Blanket Stitched Slimline Rectangles die to add some texture and peak a boo holes through to my aqua cardbase. Sentiment is from Celebrate Washi stamp set, cut with the coordinating dies, and I finished off with a few Iridescent Clear Drops after the live finished. Here are more photos of the finished card:


Product links are all below - including affiliate links where possible, which simply means that if you use one of the links below, I receive a small commission at no additional cost to you. Thanks so much for supporting my blog, and stopping by! Have a wonderful day!!!