Showing posts with label vellum. Show all posts

Monday, August 25, 2025

You are Loved Elegant Birthday Floral Cards - Simon Says Stamp

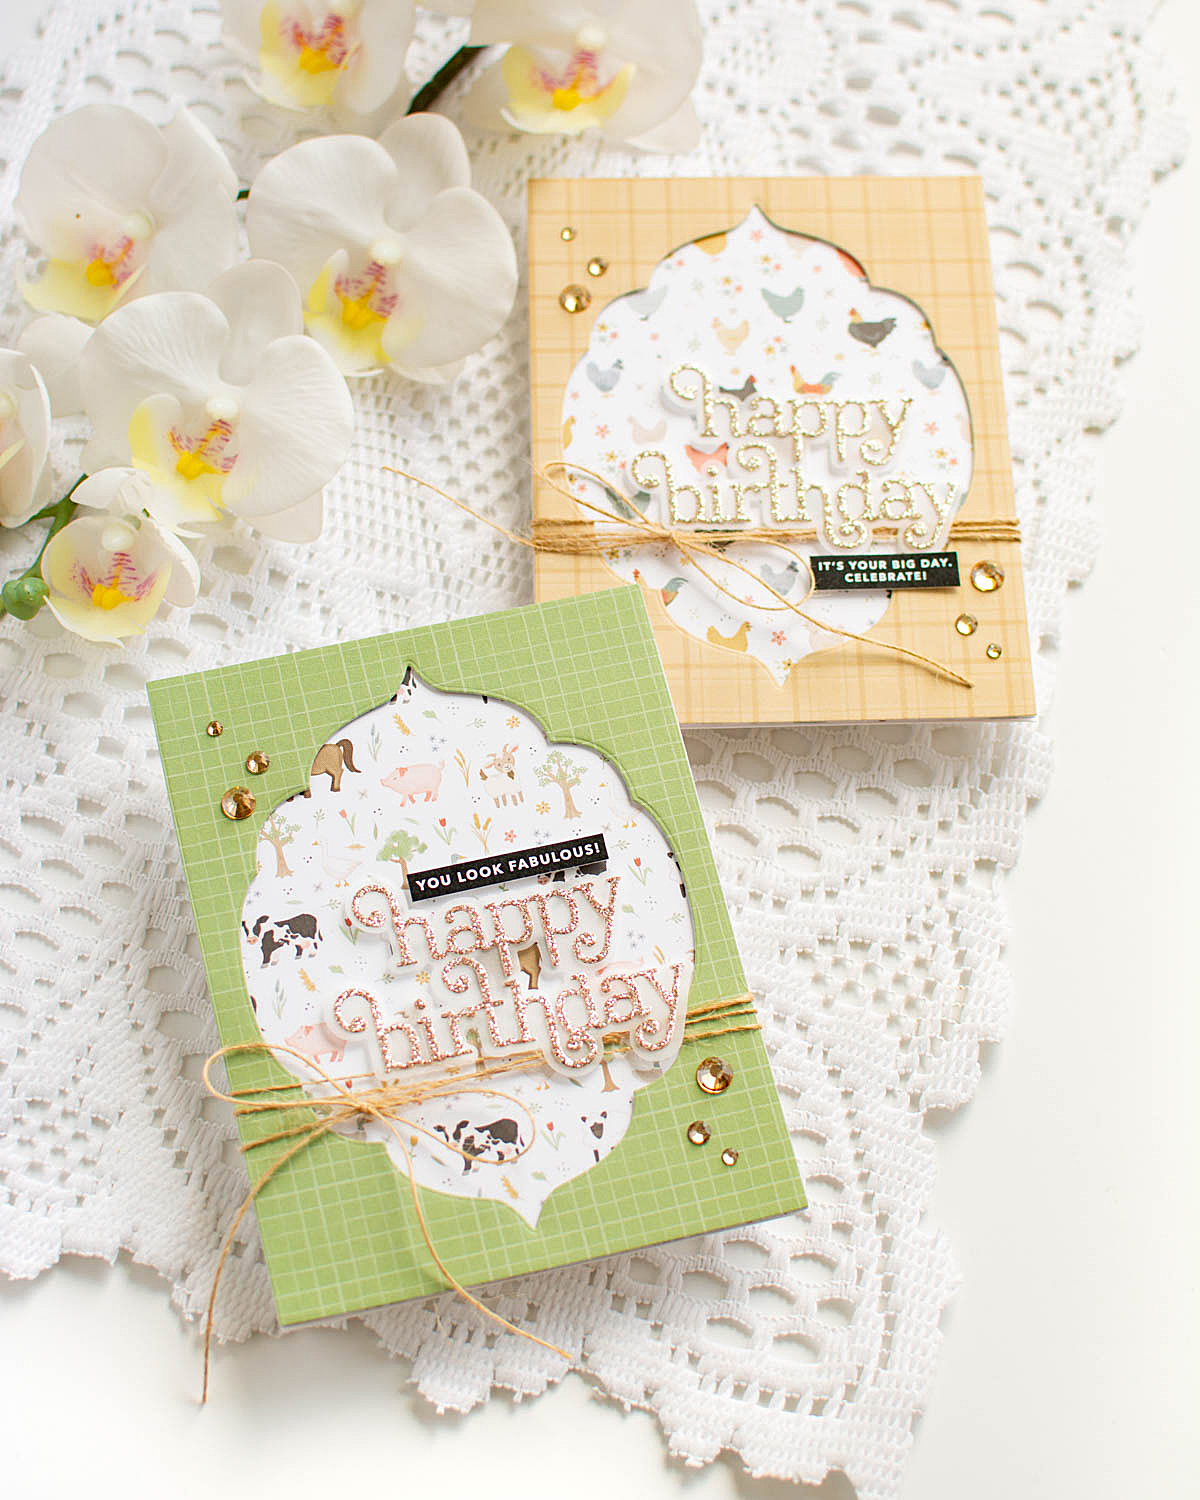
Good morning! I've got a couple of sparkly floral cards to share with you today! I used some lovely stamps and dies from Simon Says Stamp that worked together so beautifully on these. My favorite part is the layered sentiments - they are just so unique and fun!


I started off by stamping the lovely Delicate Blossoms floral background on white cardstock, and heat embossing with WOW Gold Pearl Sparkle embossing powder - and it was stunning! I added some soft ink blending to each one around the edges with Cheeky and Cantaloupe inks. I also blended some extra of each of those inks on some scraps of cardstock, and die cut the Giggle Happy birthday sentiment. It's hard to see, but layered together both vellum and white cardstock for the shadow layer - it just helped to slightly soften the white. Trimmed some strips of Tonic Gold Dust glitter cardstock in varying widths, and created some fun patterns on the background for interest. Added the larger sentiments with foam adhesive, then stamped and die cut the secondary sentiments from Delicate Blossoms to layer over the top. Finished off with some coordinating Dazzling Gems in Bubblegum and Peachy for extra sparkle! Here is a closer look at these cards: 


Product links are all below - including affiliate links where possible, which simply means if you use one of the links below that I receive a small commission at no additional cost to you. Thanks so much for stopping by! Have a wonderful day!!!


Friday, August 8, 2025

Pink Bus Shaped Card - Simon Says Stamp

 Good morning! Today I have something a bit unexpected - using a fun new die from Simon Says Stamp. My kids are now in college, and since they homeschooled anyway, school buses weren't really part of their childhood. But when I saw the Big Bus die, I wanted to find a way to put it to use - and what could be more fun than a pink bus? And...it's a shaped card too to make it even more magical! I mean - I want to ride this bus! Haha!

As I mentioned already, I used the Big Bus die to create my card. I die cut the main layer 2 times from pink cardstock, once from white cardstock, and once from vellum. Then on one of the pink layers, I die cut the windows - the front window I just made sure to line up with the edge of the main piece. I backed the panel with vellum, then adhered it with Big Momma foam adhesive to the white bus layer. I scored the back pink layer across the top, then adhered them together, so that the back piece bends to allow the shaped card to open. Then, I die cut all the other layers from Pinkfresh Glacier glitter cardstock and Smoke and Slate SSS cardstock, adhering all to the front layer of the bus. I die cut Giggle Hello from white and glitter cardstock, and popped that up with foam, then added a secondary sentiment from For the Birds stamp set, trimmed into a thin strip with diagonal edges. Finished off with a few Clear Dazzling Gems for extra sparkle! Here are more photos of this fun card:


Product links are all below - including affiliate links where possible, which simply means if you use one of the links below that I receive a small commission at no additional cost to you. Thanks so much for stopping by! Have a wonderful day!!!


Sunday, July 27, 2025

Floral Dragonfly Cards - Simon Says Stamp

 Hello! Today I'm sharing a couple of cards with fun floral backgrounds, and a beautiful die cut dragonfly that I love! I'm using lots of supplies from Simon Says Stamp!


I started off by creating the stamped backgrounds. I stamped the pretty Dahlia Background on white cardstock in two tones of colored ink - Pucker and Dusk, and then added clear heat embossing over top. Then I grabbed a lighter shade in each of those ink families - Blush and Sky - and did some soft ink blending around the outer edges, fading in softer towards the center. Perfect for pretty monochromatic backgrounds! Next, I grabbed Bright Dragonfly die to add to these. I die cut the body from some dark gray Luxe Glitter cardstock, then the wings from white cardstock and vellum to layer together - that way I got the soft look of the vellum, but the white cardstock behind to make sure it stood out from the background. Finally, added sentiments from the Reverse I See You printed sentiments, popped up with foam adhesive.


Product links are all below - including affiliate links where possible, which simply means if you use one of the links below that I receive a small commission at no additional cost to you. Thanks so much for stopping by! Have a wonderful day!!!


Sunday, June 29, 2025

Sunset Lighthouse - Simon Says Stamp Friend Like You Release

 Hello! I'm stopping by with a larger size card today, using more of the Simon Says Stamp Friend Like You Release! This card is sized 5"x7" - also considered an A7 card size. So it's perfect if you want something larger, want more space to put a message on the inside, or want to be able to have a larger group sign it!


I started off with the new Contemporary Lighthouse embossing folder on white cardstock. I blended a mix of Honey and Pucker inks to give it a nice warm sunset feel, then die cut the panel with one of the new A7 Rectangle dies. I added some white splatters with Spellbinders White Opaque Watercolor splatter, and let that dry before moving on. Next, I cut gradiating sizes of the same rectangle dies in black and white, and adhered those all together. I created a diagonal beam of light with vellum to add the feeling of a warm glow from the lighthouses, and cut tiny slits next to the window on the lighthouse to tuck the tip inside and adhere in place, and a tiny line of liquid glue at the outside edge to hold it in place. A bit of Glitter Drops on the window for sparkle, and a few Trinity Bubble Blow Out embellishments complete the effect! I added a soft bit of color in opposite corners to my 5"x7" white cardbase, and then popped that entire panel on my card with foam adhesive. Finished off with sentiments from the Smile stamp and die set! Here is a closer look at all the details on this card:


Product links are all below - including affiliate links where possible, which simply means if you use one of the links below that I receive a small commission at no additional cost to you. Thanks so much for stopping by! Have a wonderful day!!!


Tuesday, June 24, 2025

Farm Critter Happy Birthday Cards - Simon Says Stamp

 Hello! Today I'm breaking out the pattern paper, and building up my birthday card stash a bit - using lots of supplies from Simon Says Stamp


These cards actually started off with some darling pattern paper - the Carta Bella On The Farm 6x6 paper pad. I die cut two different coordinating patterns using the largest A2 rectangle die (could be trimmed down as well, but this was the easiest way for me to get the panels perfectly sized easily!). I die cut a window through the front of the more plain paper using Petal Tipped Labels - perfect for letting the busier pattern paper pop through. I adhered those together with Big Momma foam adhesive for slight dimension. Sentiment is using the newer Giggle Happy Birthday sentiment die, cut from Champagne and Rose Gold glitter cardstock, and vellum for the shadow layer. Secondary sentiments are from Reverse Bold Birthday sentiments. I also added some May Arts natural twine, and a few Dazzling Gems in Gold to finish off! Here are more photos of each of these cards:


Product links are all below - including affiliate links where possible, which simply means if you use one of the links below that I receive a small commission at no additional cost to you. Thanks so much for stopping by! Have a wonderful day!!!


Wednesday, June 18, 2025

Encouraging City Windows - Simon Says Stamp July Card Kit

Hello! I'm popping in to share a couple more cards using the newest July 2025 Simon Says Stamp Card Kit - Through the Window (and a few additional items from my stash to mix in!)! This month's kit is so cute with lots of windows and fun scenes! The included stamp set features a fun window, lots of scenes to fill the window, and another set of window dies that open! There are some fun cityscape pattern papers, sweet embellishment mix...that's all not to mention the cardstock, glue, distress ink, and more! 

The monthly card kit has even more perks now when you sign up for the Subscription service! There is a video HERE you can watch to learn more!  


For these cards I wanted to use some bigger panels of the pretty pattern papers, and since I can't get enough of those window dies, I wanted to incorporate them as well! I trimmed panels of the pattern paper to fit on my white cardbases and leave a white border down each side. Next, I die cut each of the 3 Window Trio wafer dies from Honey Gold cardstock, and then backed each one with vellum to help separate them from the background. I used sentiments from the EZ Strips Reverse I See You sentiment strips, and finished off with a few Dazzling Gold gems! Here is a closer look at these cards:


Product links are all below - including affiliate links where possible, which simply means if you use one of the links below that I receive a small commission at no additional cost to you. Thanks so much for stopping by! Have a wonderful day!!!