Showing posts with label Glimmer Mist. Show all posts

Thursday, December 10, 2015

Unity Hip Hop - Crazy, Magic, Beautiful Life

Good evening!!! Time for the Thursday evening hop with Unity Stamps


I really should have done a video on this card - and will probably try to do one soon! Life has been crazy though, and I just couldn't get it done! So...I will do my best to explain! :) I started with watercolor cardstock, blended on distress inks, then misted with some shimmer mist and let the colors run together. The whole thing is SUPER shimmery and pretty in real life! Always hard to photograph though! I then added some flicks of the same distress ink by mushing it on a nonstick mat and adding a bit of water, then dipping and flicking my brush. The feathers I fussy cut out, then mounted with foam adhesive over the top of that background. I also added some stickles on the feathers - again, hard to see in the photos. Finished off with a Pretty Pink Posh scallop frame (LOVE this frame die!) and a few clear droplets. I roughed up the edges of a couple of the scallops for extra texture as well. Finished off with a blue cardbase and a orange paper bow, also cut with a Pretty Pink Posh die. All supplies are linked below if you are curious about anything! 


Here is the rest of the links for the Design Team - make sure and visit everyone to see the new stamps in action - and leave some love for a chance to win this weeks giveaway! Then, go link up and play along with us! :)


Sunday, August 4, 2013

PS SPARKS challenge - Sheer and Clear

Hello! It's time for this weeks new Paper Smooches SPARKS challenge - here is what I made this week:


It is the first week of the month, so that means it is a Trend Watch Challenge:


And here is the inspiration piece:


My eyes were drawn to many elements, and I tried to incorporate as many as possible! I made the background using some PTI cardstock and stamping the little paisley designs from Buckaroo on it in white ink (this was drawn from the design on her jeans). I created the cardbase by using Avery Elle kraft cardstock and adding a layer of vellum to get the soft and simple background from the photo. The frame - cut with Duo Die 1 - is a combination of the color of her shirt, and the scallop edge on the sleeves and bottom edge.


I hand trimmed a vellum banner and stamped my sentiment from Salutations on it with Staz-on ink to capture the sheer part of her outfit, and the swirls on the sentiment were pulled from the waves in her dark hair. Finally, I added a misting of my own gold glitter mist, and attached the vellum banner with gold brads, drawn from the gold jewelry that she is wearing in the photo!


There you go! The long winded version of where I pulled my inspiration from the photo to make this card!

Thanks so much for stopping by to visit! Looking forward to seeing your creations this week as well! Please stop by and see what the rest of the SPARKS team put together:

Friday, August 2, 2013

Growing in Unity Day 5 and FWF

Good morning! Today is the last day of my week of Growing in Unity for Unity Stamp Company!  In case you don't know how it works, make sure and leave a comment everyday for a chance to win 2 Unity Itty Bitty stamps of your choice at the end of the week. I will draw a winner from comments left throughout the entire week. 

I am also linking these cards up to this weeks Unity Friends with Flair.

Now...onto the projects! I decided it would be fun to take some of the fun Sassy Sentiments by Erin Schreiner and focus on those for the week! I have been using one sentiment two different ways for each day of this week, paired up with die cuts or other Unity stamp images. One card more classy or vintage inspired, and one more CAS, retro, or modern. Something like that anyway! So, for today I chose the sentiment "call me, maybe?" from the set called Sassy Pants. Here is the first card I made with it:


I made this one really classy and elegant! The phone booth is from the February 2013 Kit of the Month, stamped and heat embossed with gold glitter Zing embossing powder on some pattern paper by Crate Paper.


I also embossed the sentiment on a scrap of pattern paper, added some strips of May Arts ribbon, and a few sequins to finish it off.


Now the cute and fun retro card! 


I also used the color combo for this month's Unity Be Inspired Challenge:


For this one I used some pattern paper from October Afternoon, trimmed out two of the images, then attached the fun telephone brads from Eyelet Outlet (you can find them HERE). 


Used some Glimmer Mist and Mister Huey's mists on my kraft cardbase, added the image panels with foam adhesive, stamped the sentiment with MFT ink, then added a strip of washi on the bottom, and one more telephone brad.


That's it for today! I'll see you again tomorrow for two more cards using another sentiment! Have a great day!!!

Tuesday, July 30, 2013

Growing in Unity Day 2

Good morning! Today is the 2nd day of my week of Growing in Unity for Unity Stamp Company! In case you don't know how it works, make sure and leave a comment everyday for a chance to win 2 Unity Itty Bitty stamps of your choice at the end of the week. I will draw a winner from comments left throughout the entire week. 

Now...onto the projects! I decided it would be fun to take some of the fun Sassy Sentiments by Erin Schreiner and focus on those for the week! I will be using one sentiment two different ways for each day of this week, paired up with die cuts or other Unity stamp images. One more classy or vintage inspired, and one more CAS, retro, or modern. Something like that anyway! So, for today I chose the sentiment "SHINE BRIGHT like a diamond" from the set called Sassy Pants. Here is the first card I made with it:


I went bold and strong for this one by cutting the city skyline out of black paper with a MFT Die-namics Die. I layered it on some MME paper, and spritzed it well with Gold glimmer mist, and then heat embossed the sentiment on the bottom with Gold Zing embossing powder.


Added some black sheer ribbon, a stick pin, and a bunch of Studio Calico wood veneer stars.


The next one is all soft and pretty and girlie: 


I started off by embossing a piece of vellum with my Cuttlebug, adhering it to some Avery Elle Cardstock, and then spritzing with some Silver glimmer mist. I made the edges curl up a little, but I love the pretty effect it gave!


Once that dried, I added my sentiment stamped on a hand trimmed banner, some more wood veneer, and a few sequins to finish it off.


That's it for today! I'll see you again tomorrow for two more cards using another sentiment! Have a great day!!!

Thursday, September 13, 2012

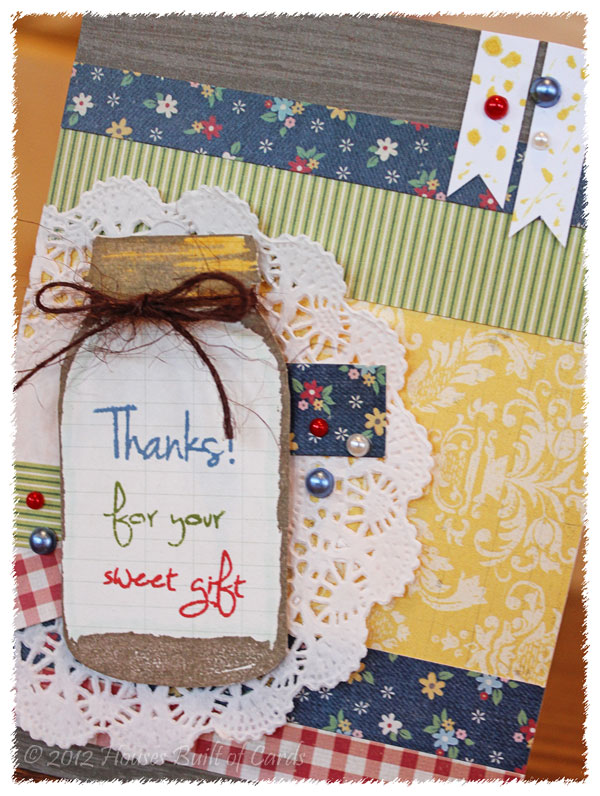
Moxie Fab Asymmetric Jar Friends with Flair! (Say that 3 times fast!)


Good morning - and happy Friday, which also means Unity Friends with Flair time! I have a fun card to share with you today that has one of my favorite things on it! Mason jars!!! I was so excited to see the new Jars of Joy Challenge over at Moxie Fab World this week, and decided to also tackle the Card Design Week Asymmetry Challenge at the same time! 

We just moved into our new house, and the day we were moving in, our new neighbors came over to introduce themselves, and brought a plate of brownies over. I'm telling you - nothing has ever tasted so good! We were sore, dusty, tired, hungry - and those were such a blessing! So...I wanted to make a thank you card to let them know how much they were appreciated! 
The other thing I did on this card, is use entirely scrap paper! This was all laying on my table, and I decided I was going to use it all up - so I just started trimming, and layering the pieces until I liked how they looked, then stuck them down. There is a variety of paper there - Simple Stories, Crate Paper, Cosmo Cricket, Echo Park, and Lilly Bee Designs. 
I added a doily, then some more scraps of paper, before adding the Mason jar. It is a Unity Stamp, and I stamped and cut it out, before stamping the sentiment from My Craft Spot in 3 different Tim Holtz distress inks to coordinate with the scrap papers.
I added some jute twine from Ribbon Carousel, and then attached it with pop-dots over the doily. 
It needed a little something for balance, so I rounded the top corner of the card. Still felt like it was missing something, so I hand trimmed a bit of white paper into a couple of banners, and added some Tattered Angels Glimmer mist. Finally, I added a few stick on pearls for a finishing touch.
Well, I officially branched out and tried something new! Never tried an Asymmetric card before - but I think I might have to do them a bit more! It was kind of fun! 

Thanks for stopping by - and have a wonderful Friday and weekend!


Wednesday, January 12, 2011

Snow much fun - Circle Challenge Card

So...I wasn't really in love with this card, but once it was finished, it wasn't too bad. I was trying to meet the requirements of the challenge on the Cricut Circle blog for the weekly challenge - to use metal, white paint, and a snowflake cut. There had to be a minimum of 2 cricut cuts to qualify.

So the metal is the four brads on the corners to loop the ribbon through. For the white paint I used perfect pearls (it's white, and it's paint!) and sponged it over the background that I had run through my Cuttlebug. For the snowflake and Cricut cuts, I used Winter Woodland and cut out 3 different snowflakes, several times and in a couple different sizes. I stacked them up with pop-dots in the middle, stamped a sentiment from my Pink by Design stamps in the center of one of them, and then sprayed them with Glimmer mist before I attached them to the card. Now if we could just get some snow here where we live...