Good morning! Today is the blog hop to celebrate Pinkfresh Studio's January 2023 Stamp, Die, Stencil, and Hot Foil Release! You aren't going to want to miss a stop along the way - TONS of inspiration and prizes up for grabs! YAY! You can find links to all of the new release items I used on today's cards at the bottom of this post! We are starting off 2024 with a great release - can't wait for you to see it all!
We also have a special freebie promo to celebrate the release! You can get the
Folk Art Slimline Stencil set for FREE with any $30 or greater purchase, while supplies last! No code needed - it will automatically be added to qualifying orders. In case you want to see this stencil in action -
HERE is a card I created with it for a YT live, so you can even check out the links to watch the card come together!
All right - now that we've gotten past all the introductory information, how about we get to the cards with the new release! First up - this is one of my favorites from the new release! Both the card, and the sets I used to create it!
The new Heart of Gold set is so sweet and pretty - and was illustrated by one of our card design team members, Isha. I used fairly soft pastel tones to color the image, and then turned it into a shaker card! I used the Ornate Circle die to create the window, and backed it with aqua cardstock. Added a hot foiled frame from Nested Rectangles, using the reverse foiled image created with the Solid Hot Foil plate. I also tucked a few Iridescent Clear Drops in the centers of the flowers. Here are more photos of this first card:
Next up, I combined a new floral set with some older supplies!
The new Wildflower Bouquet set has some lovely stamped florals, and then some that are stenciled and have added die cut details! I die cut some extra of those ones just from gold foil cardstock without stenciling, to add some extra detail and fun to my bouquet. I used the stitched vase from Farm Fresh to tuck my bouquet into, then used Arch Backdrop for a window to place them in. I backed that with some Glacier glitter cardstock, then added a little edge panel at the bottom using one of the Classic Edgers dies. I also used one of the new Best Wishes cardstock stickers for part of the sentiment! Here are more photos of this card:
Next up, a mini slimline card!
The new Best Wishes set is the perfect size for an A2 card, but it also works great for a mini slimline! I hot foiled the image, and then colored in with the layering stencils, mixing and matching the ink colors easily with how they are spaced out. I used Dotted Scallops coverplate for the background, Mini Slimline Stitched Scallop Rectangles to frame it all up, then embellished with some Champagne Clear Drops. Here is a closer look at this card:
This next card features a fun new concept that we are introducing as part of this release!

This card features the new Stylized Florals, one of two new sets that feature a layering stencil for floral and greenery elements, then coordinating dies that add a stitched detail to the layers. The die can also be used alone with colored cardstock, which is a super fun option! This set layers together in two swag elements, unless you choose to keep the pieces separate to use differently. I put those elements around a circle created with Stitched Scallop Circle and Inverted Stitched Scallop Circle. Floral and Diamond coverplate die creates a bit of texture on the background, layered white on white. And the sentiment is created with a mix of the fun new Julieta Alpha dies (LOVE the scale of these alphas, so perfect for cardmaking!) - and another sentiment from Wildflower Bouquet. I also tucked in a few Leafy Branch pieces die cut from the same gold cardstock as the die cut letters for the sentiment. A few Iridescent clear drops finish this card off! Here are more images of this card:


And next, we have yet another mini slimline card!
For this card, I used the new Sending Love set. This is a beautiful swag, that has a single coordinating layering stencil - great for the budget and a way to test out layering stencils! I foiled it in Cobalt Blue foil, the colored in with coordinating blue for the leaves, and pretty pinks for the blooms. I stamped my secondary sentiment in the same ink as the blooms, and then added another secondary sentiment using the Julieta Alpha dies again. I used Floral Tiles coverplate die for the background, and Mini Slimline Frame die for the background, using Navy glitter cardstock for both the letters and the frame. I also did a touch of ink blending on the coverplate to draw all the colors together and make it feel more cohesive. A few Bubblegum jewels finish this card off! Here are a few more photos of this card:
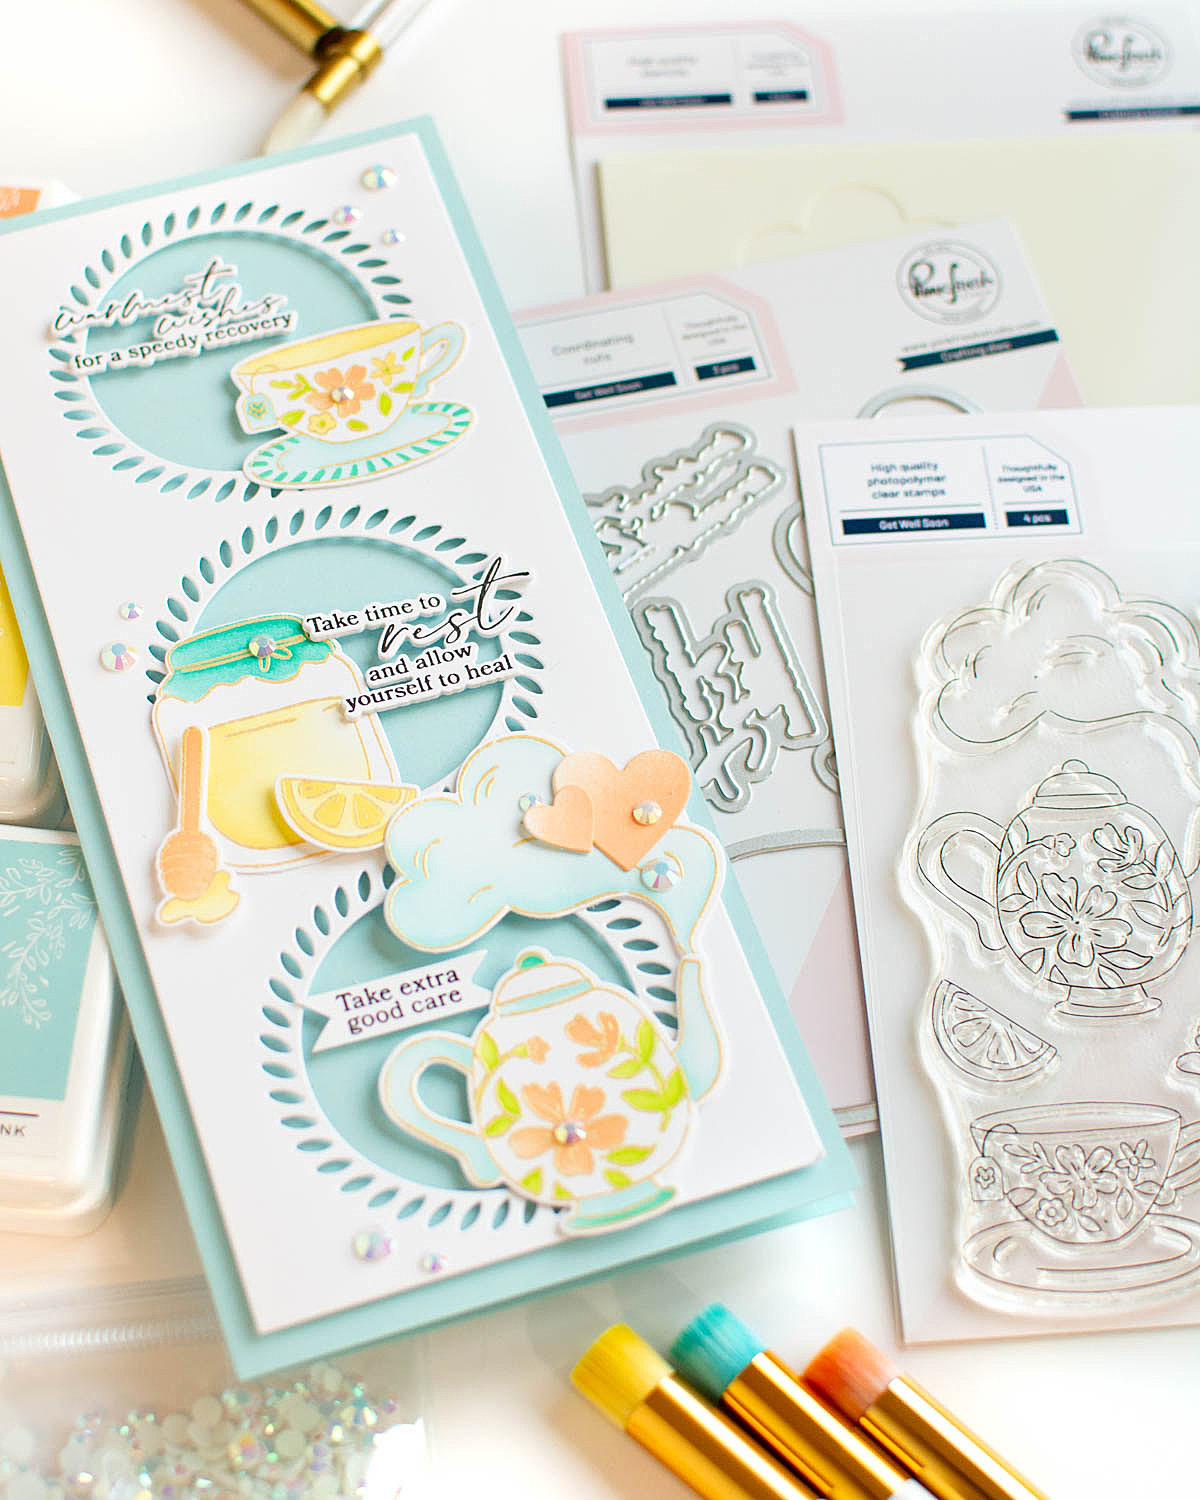
And finally - ending on one full size slimline card!
This card features a bit of a different set than you are probably used to seeing from Pinkfresh! This set is called Get Well Soon, and has some adorable tea, honey, and lemon images. I used the Slim Braided Circles die to anchor all my images, then heat embossed them in gold, and colored with the coordinating layering stencils before die cutting with the coordinating one piece die. I arranged all the images, then used all 3 sentiments from the kit as well. I added a couple of ink blended hearts, die cut using Shaker Tag Book dies, and a few sparkly Glacier Jewels to finish this off! Here are some more photos of this final card I'm sharing today:


GIVEAWAY INFO:
Make sure and leave a comment before you leave for a chance to win one of 10 $25 gift certificate to
Pinkfresh Studio chosen from comments left across the hop! All winners will be chosen and posted on the
Pinkfresh Blog on Monday, February 5, 2024 - so make sure and check back to see if you were a winner! Winners must check that page and claim their prize within 2 weeks.
Here is the entire blog hop line-up so you don't miss a single stop - and product links are below - including
affiliate links where possible, which simply means if you use one of the links below that I receive a small commission at no additional cost to you. Thanks so much for stopping by! Have a wonderful day!!!