Friday, June 30, 2023

Proud of You Stars - Simon Says Stamp Out of This World Release

 Good morning! I'm popping in to share one more card using the BRAND NEW Out of this World Release from Simon Says Stamp. By now, you might be able to tell the set I'm loving from this release - it is small, but so many fun possibilities, and I love that! With the 4th of July holiday coming up very soon, I felt this card was especially appropriate as well!


I used the new Happy Icons stamp set (yes...I know...again!) - but this time I focused on the stars. I stamped in a bright and happy combo of colors of Pawsitively Saturated Inks, and then trimmed each one out with my paper trimmer. I then aligned them together, rotating each one as I placed it, and backing with a scrap of white cardstock, so I could pop them all up at once on my cardbase. Before I did that, however, I die cut the older Stacked Stars die a couple times, and used it to create a background. I adhered the outline first on a Fog cardbase, then used all the punched out stars to place back into a few of the negative spaces. I stacked up 3 on each of the ones I filled, so it gave a bit of dimension. Then I adhered the stamped stars, and added a sentiment stamped from the set, and hand trimmed into a banner shape. Here are some more photos and a closer look at this card:


Thursday, June 29, 2023

Happy Days Ahead - Simon Says Stamp Out of This World Release

 Hello! Today I am part of a fun Instagram hop to celebrate the BRAND NEW Out of this World Release from Simon Says Stamp. There are giveaways up for grabs, so hop on over to check that out if you haven't yet! 


The card I'm sharing today is all about the squares - 4 1/4" by 4 1/4" square card, square die cut, and cute stamped square images from the new Happy Icons stamp set in bright summery colors. I stamped the images in Sunbeam and Surf Pawsitively saturated inks, and trimmed them down with my paper trimmer. I used a bit of foam adhesive between layers for extra dimension, and added a sentiment from the stamp set, trimmed into a banner shape. Here is a closer look at this card:


Product links are all below - including affiliate links where possible, which simply means if you use one of the links below that I receive a small commission at no additional cost to you. Thanks so much for stopping by! Have a wonderful day!!!


Wednesday, June 28, 2023

Birthday Balloon Squares - Simon Says Stamp Out of This World Release

 Good morning! I'm popping in to share another card using the BRAND NEW Out of this World Release from Simon Says Stamp. This is a fun birthday card that is heavy on the sentiments, and includes a soft color palette of geometric balloon images - with a bit of sparkle of course!


I started off by repeatedly stamping the balloon image from the new Happy Icons stamp set in Melon, Limelicious. Lemonade, and Tidepool Pawsitively Saturated inks, then trimming them into squares with my paper trimmer. I laid those out on my white cardbase, and planned where to stamp my sentiments from the new Birthday Shenanigans stamp set. I used my MISTI to stamp those, then adhered the balloon squares with foam adhesive for a bit of dimension. I also added some details with a white gel pen on the balloons. I finished off with a few coordinating jewels tucked around the balloon squares for extra sparkle! Here are some more photos of this card:


Product links are all below - including affiliate links where possible, which simply means if you use one of the links below that I receive a small commission at no additional cost to you. Thanks so much for stopping by! Have a wonderful day!!!


Tuesday, June 27, 2023

Fairytale Inspired Roses - Pinkfresh Studio Instagram Release Hop

 Hello! Today I am part of a fun Instagram hop to celebrate the new Pinkfresh Studio release. There are giveaways up for grabs, so hop on over to check that out if you haven't yet! I have had so much fun creating with this release - yesterday was the blog hop, and I shared a TON of cards for that! Today I'm sharing a fun hot foiled and stenciled card I created on last week's YouTube Live with Lea Lawson as a sneak peek. We used the some different elements of the same product suites in different ways to create two completely different cards. It was so fun! You can watch that video HERE if you want to see more details!


Here is the replay of the live video if you'd like to watch it here:


I thought it would be fun to do a Beauty and the Beast inspired card - those roses were just begging for that treatment! And the recently released Terrarium die was perfect for that. I heat embossed the roses, and then used the layering stencils to color them in with very traditional colors. I created a window with the Terrarium die in some glittery paper, and then added some iridescent vellum behind it - it's hard to see in the photos, but so pretty in real life, and adds a little something extra. I used Basic Banners: Everyday stamp set to add a sentiment, and then embellished with a few Peach Fuzz jewels to finish it off. I'm so happy with how it came out - here are a few more photos of the finished card:


Product links are all below - including affiliate links where possible, which simply means if you use one of the links below that I receive a small commission at no additional cost to you. Thanks so much for stopping by! Have a wonderful day!!!


Monday, June 26, 2023

Pinkfresh Studio June 2023 Stamp, Die, Stencil, and Hot Foil Release

 Good morning! Today is the blog hop to celebrate Pinkfresh Studio's June 2023 Stamp, Die, Stencil, and Hot Foil Release! You aren't going to want to miss a stop along the way - TONS of inspiration and prizes up for grabs! YAY! You can find links to all of the new release items I used on today's cards at the bottom of this post!

First up, I'm actually sharing something that released a little while ago with the new paper collections, but we haven't featured yet for cardmaking - so putting it to good use for this release!


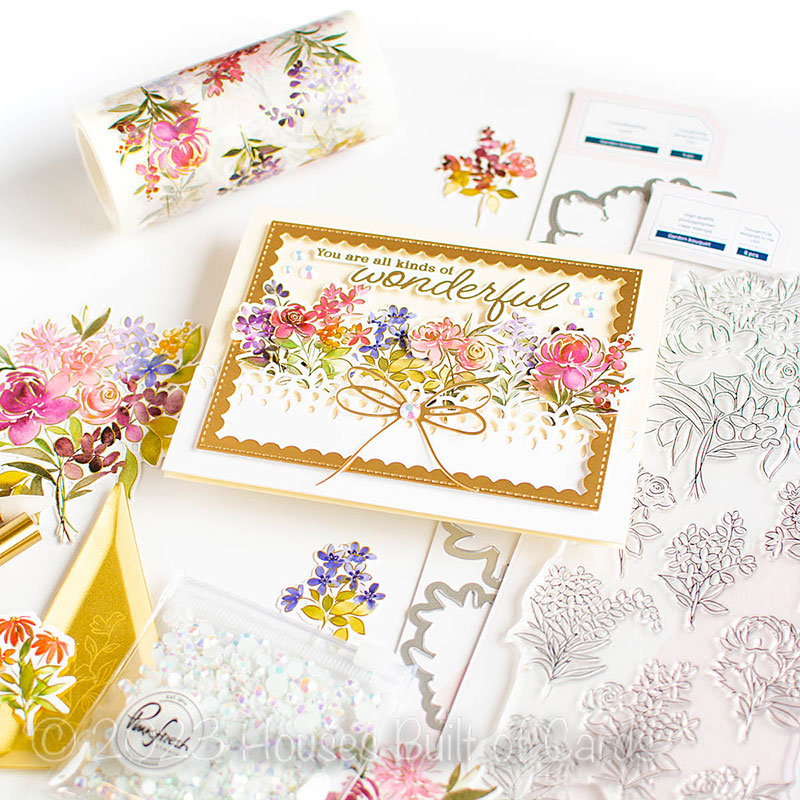
For this card I used lots of the little blooms from Garden Bouquet washi tape. I created a little pocket to tuck them into using the Lacey Edgers die cut from white cardstock. I used a cream cardbase for some subtle contrast, and framed it up with a Stitched Scallop Rectangle. Once I had my florals tucked in, adhered with a mix of foam tape and liquid glue for varying dimension, I added a bow cut from the Wrap Around Elements die, a sentiment from the coordinating Garden Bouquet stamp set, and afew Glacier Jewels to finish it off! Here are more photos of this first card:


This next card uses a favorite new set from this release - the Delicate Rosebuds hot foil plate, paired up with the coordinating layering stencils and die. I also used the stamp set for the sentiment. I used a soft gray cardbase, and then a panel of white cardstock that I first used the Stitched Diamonds coverplate on, then cut a window from using the Nested Hexagons die. A bow tied with jute string, and a few Ombre Glitter Drops in Pixie Dust, Enchanted Forest, and Sparkle and Shine finish this card off! Here are some more photos of this card:


This next card features some florals that were actually part of a previous Create and Connect Event. The hot foil plate, however, is a new addition! And I'm so glad these florals are releasing for everyone now - they are so fabulous! I love how pretty the layers are with the coordinating layering stencils, and how many blooms you get once you use the coordinating one piece die. I also used a new addition to the Basic Banners set - Basic Banners: Everyday stamp set, that coordinates with the previously released Basic Banners die. I stamped and heat embossed in gold to coordinate with the hot foiling. I also used a foiled Nested Arch, foiled in the aqua from the Satin Pastels foil set, and then die cut with the coordinating Nested Arches die. I used a soft pink cardbase, and then added the arch with foam adhesive, before nestling the center on the inside with a tape runner. A few Metallic Gold Pearls finish this card off! Take a peek at some more photos of this card:


And finally - and super simple and sweet new set called Humbled & Grateful. What makes this one super fun is that it only has two stencil layers. Super cost effective - and foolproof to stencil! I also love that it is sized for either an A2 or mini slimline size card - so versatile! I used a mix of colors for each stencil layer - red and orange for the florals, and aqua and blue for the greenery. I stamped in Warm Buff ink for a sort of gold look, without the actual heat embossing. I used Sparkling Diamonds die for the background, cut from cream cardstock, then die cut that panel using the Mini Slimline Frames die. I also cut the larger frame with that die, popped the frame up with thin foam strips, and added the center adhered down to my coordinating cardbase. I added a sentiment to this one from the extras on the last card using Basic Banners: Everyday stamp set and the previously released coordinating dies. Finished off with a few Ombre Glitter Drops in Pixie Dust! Here is more of a look at this final card:


GIVEAWAY INFO:

Make sure and leave a comment before you leave for a chance to win one of 10 $25 gift certificate to Pinkfresh Studio chosen from comments left across the hop! All winners will be chosen and posted on the Pinkfresh Blog on Wednesday, July 5, 2023 - so make sure and check back to see if you were a winner! Winners must check that page and claim their prize within 2 weeks.

Here is the entire blog hop line-up so you don't miss a single stop - and product links are below - including affiliate links where possible, which simply means if you use one of the links below that I receive a small commission at no additional cost to you. Thanks so much for stopping by! Have a wonderful day!!!

You are invited to the Inlinkz link party!

Click here to enter