Showing posts with label MISTI. Show all posts

Saturday, May 31, 2025

Elegant Floral Stripes - Simon Says Stamp Moments in Time Release

Good morning! Stopping by again today with a couple more cards using more of the BRAND NEW Moments in Time Release from Simon Says Stamp! For these cards, I used a technique that I demonstrated in a previous YouTube Live video - you can check it out HERE if you want to see it in action!


I used one of the large beautiful florals on the new Vintage Blooms stamp set to stamp directly on two corners of my card bases, then layered over strips of Gina K cardstock and restamped over the top to get a perfect crisp image over all the layers, and perfect alignment thanks to my MISTI. I stamped sentiments from the same set (isn't that a STUNNING font?) - then finished off with a few coordinating Dazzling Gems! Here are more photos of these finished cards:


Product links are all below - including affiliate links where possible, which simply means if you use one of the links below that I receive a small commission at no additional cost to you. Thanks so much for stopping by! Have a wonderful day!!!


Friday, May 2, 2025

Layered Flower Wand Thank You Card Trio - Simon Says Stamp

Good morning! I'm back with some more inspiration using the You Are My Favorite Release from Simon Says Stamp I have a full process video on YouTube for this set as well, showing how to easily create these multiple images. I'm so excited be creating videos to share again! You can find all the supplies I used for this card listed at the bottom of this post, as well as in the video description on YouTube!


You can click HERE to watch it in full resolution, or watch it posted here in my post:


Hope you enjoy the video! Here are more photos of these finished cards:


Product links are all below - including affiliate links where possible, which simply means if you use one of the links below that I receive a small commission at no additional cost to you. Thanks so much for stopping by! Have a wonderful day!!!


Tuesday, April 19, 2022

Plaid and Floral Cards - Simon Says Stamp Happy and Joyful Release

 Hello! I'm stopping by with my first couple of cards using the newest release from Simon Says Stamp - Happy and Joyful! I'm using a new background stamp for these cards - paired up with a beautiful floral stamp set. And as always, I have a hard time creating just one card - so I've got a set of two to share!


I did two slightly different techniques with the floral stamp set - not planned...I just made a mistake, and didn't want to throw it all away! I also mixed up the color combo for a different look on each card. :) 


This first card, I used two colors of ink that were actually included in the SSS May Card Kit in cube form - Lucky, and Ocean. I blended blue on the top and bottom of the Soft Plaid cling background stamp, and green in the center. I used a MISTI, so I was able to just do one color at a time, and stamp them overlapping so they blended together. I love the ombré look it gave!


I die cut an oval out of the stamped panel using Nested Ovals, and then stamped the flowers from the new Just a Note Pansy stamp set. Before mounting on the white cardbase, I positioned the panel, and lined up the cardbase, so I could stamp again, and pop up the florals in the center for a spotlight effect.


For the second card - I created the background the same way, only used Rose and Citrine ink. Don't you love how the colors mix to create a third color in an orange shade?


This is where I made my mistake. I tried to stamp the image two times on the oval panel, only the panel shifted in the MISTI, and I ended up with a double stamped image. At first I didn't think there was a way to save it - but I thought I would stamp out the florals, fussy cut them out, and mount them over my mistake. It worked! A totally different look, but better than starting over, and I actually loved the end effect!


I finished both cards off with a stamped and heat embossed sentiment from the stamp set, and a few coordinating Pinkfresh jewels in Bubblegum and Ocean Breeze to finish them off!


Product links are all below - including affiliate links where possible, which simply means if you use one of the links below that I receive a small commission at no additional cost to you. Thanks so much for stopping by! Have a wonderful day!!!


Friday, April 8, 2022

Potted Plant Sympathy Cards Part 2 - Simon Says Stamp

  Good morning! I'm stopping by this morning to share a couple more cards using a fairly recent release from Simon Says Stamp that I finally had a chance to use - and I fell in LOVE with it! So easy and versatile - and perfect for mass producing! It is called Printmaking Plants - and the name is fitting for how I put it to use! I shared a couple other cards last week with a different color combo (you can see them HERE) - these use a cooler color combo, and some different sentiments from the same sentiment set.


I needed to build up my stash of sympathy cards - those ones you don't ever want to use, but are grateful to have on hand when you need them. I actually stamped out a total of 3 of each of these 2 designs - and 3 each of 2 more in a different color combo that I shared last week (see HERE). So in a short amount of time, I had a total of 12 sympathy cards for my stash - just because I was able to stamp each layer repeatedly, and so easily!


First, I stamped the black outline on 3 panels of white cardstock. These I used as a baseline to line up each of the solid fill-in images in my MISTI, and stamped on all 3 of the cards with the black outline.


Before I removed each layer from the MISTI, I then stamped 3 more times with the same color on more white panels of the same size. As this went along, it built up the layers to create a different look - sort of a not line coloring effect!


Once all the layers were added, I stamped sentiments under the complete images using an older set - but one of my favorites for sympathy cards - Moments of Grace. So many great sentiments, and I love the fonts as well.


To assure everything was lined up perfectly, I used Basic Rectangles dies to cut the panels down to size. They could easily be trimmed down with a paper trimmer, I just preferred to die cut them out so they would be just right.


Since these were sympathy cards, I generally prefer to keep them simple, without too many embellishments, so I refrained from adding any bling or sparkle. Adding texture and interest with white cardstock however is perfect! I added a simple mat of white cardstock around those die cut panels, then mounted those up with foam adhesive on a white cardbase - an extra, and perhaps not necessary step, but love the added texture and dimension! 


Product links are all below - including affiliate links where possible, which simply means that if you use one of the links below, I receive a small commission at no additional cost to you. Thanks so much for supporting my blog, and stopping by! Have a wonderful day!!!


Thursday, March 31, 2022

Potted Plant Sympathy Cards - Simon Says Stamp

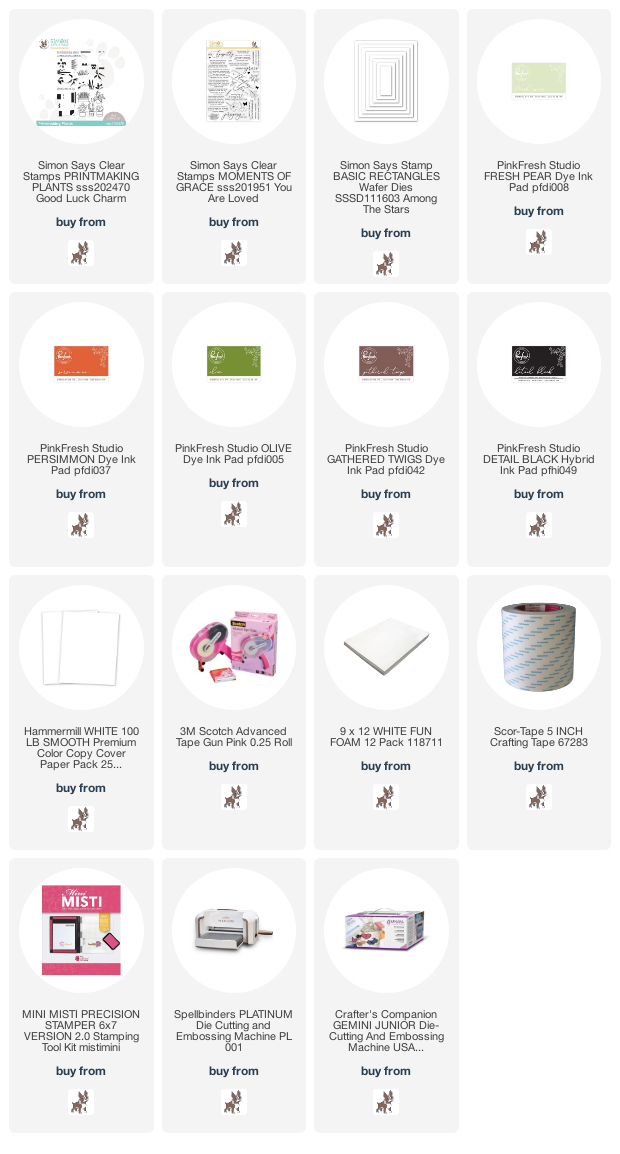
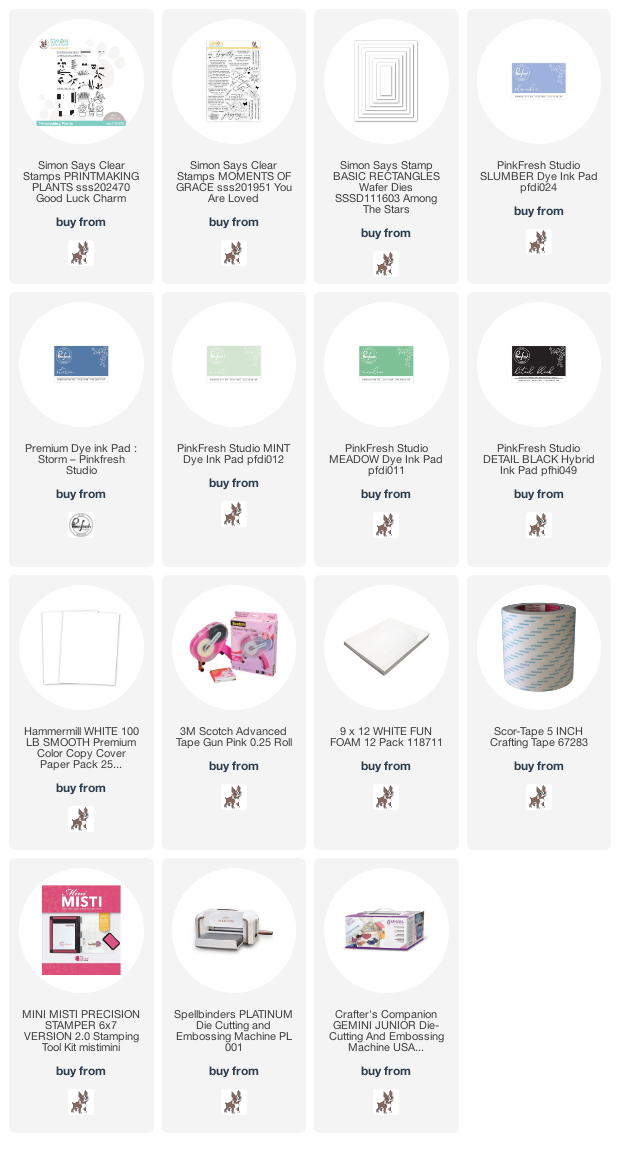
 Good morning! I'm stopping by this morning to share a couple cards using a fairly recent release from Simon Says Stamp that I finally had a chance to use - and I fell in LOVE with it! So easy and versatile - and perfect for mass producing! It is called Printmaking Plants - and the name is fitting for how I put it to use!


I needed to build up my stash of sympathy cards - those ones you don't ever want to use, but are grateful to have on hand when you need them. I actually stamped out a total of 3 of each of these 2 designs - and then did 3 each of 2 more in a different color combo that I will share soon. So in a short amount of time, I had a total of 12 sympathy cards for my stash - just because I was able to stamp each layer repeatedly, and so easily!


First, I stamped the black outline on 3 panels of white cardstock. These I used as a baseline to line up each of the solid fill-in images in my MISTI, and stamped on all 3 of the cards with the black outline.


Before I removed each layer from the MISTI, I then stamped 3 more times with the same color on more white panels of the same size. As this went along, it built up the layers to create a different look - sort of a not line coloring effect!


Once all the layers were added, I stamped sentiments under the complete images using an older set - but one of my favorites for sympathy cards - Moments of Grace. So many great sentiments, and I love the fonts as well.


To assure everything was lined up perfectly, I used Basic Rectangles dies to cut the panels down to size. They could easily be trimmed down with a paper trimmer, I just preferred to die cut them out so they would be just right.


Since these were sympathy cards, I generally prefer to keep them simple, without too many embellishments, so I refrained from adding any bling or sparkle. Adding texture and interest with white cardstock however is perfect! I added a simple mat of white cardstock around those die cut panels, then mounted those up with foam adhesive on a white cardbase - an extra, and perhaps not necessary step, but love the added texture and dimension! 


Product links are all below - including affiliate links where possible, which simply means that if you use one of the links below, I receive a small commission at no additional cost to you. Thanks so much for supporting my blog, and stopping by! Have a wonderful day!!!


Friday, August 7, 2020

Pinkfresh and My Sweet Petunia Blog Hop - Stamped Plaids

Good morning! Today is an amazing blog hop to celebrate both Pinkfresh Studio and My Sweet Petunia - the inventor of the amazing MISTI tool! You aren't going to want to miss a stop along the way - TONS of inspiration and a couple of fabulous prizes up for grabs! YAY!


I'm sharing a look at two cards today - the first one was one I recreated in a different color combo for yesterday's Facebook Live video - you can check it out HERE if you want more info on how I created these cards using one of Pinkfresh Studio's Pop Out Stamps and my MISTI tool!


The first card I'm sharing uses the versatile Pop Out Straight Stripes to create a full plaid background for my card with a mix of Peach Fuzz, Coral Reef, and Rocky Slope dye inks (all of which are on SALE this weekend!). These stamps make it so easy! Check out the video on Facebook to see more of how it was done!


I die cut that panel with Essentials: Stitched Rectangles to mount with foam on a white cardbase. 


I also die cut cut the smaller die from Essentials: Braided Ovals from vellum to layer over the top and add my sentiment. The sentiment is from the new exclusive Scrapbook.com Everyday Script Word Dies.


Finished off with a few jewels from Essentials: Jewels mix to add a touch of sparkle!


The second card to share uses the exact same technique, but instead of continuing on to fill my entire card front, I only did 3 strips of the same colors in each direction.


I trimmed this panel down with the same Essentials: Stitched Rectangles to mount with foam on a white cardbase as with the first card.


I added some floral outlines with Blooming Bouquet stamp set and Detail Black ink in the corners, and used the same stamp set to add a sentiment in the center.


And...just like before, finished off with a few jewels from Essentials: Jewels mix to add a touch of sparkle!


So there you go - two cards, same technique with the MISTI, and two very different and fun looks!


Which version do you like best? And what color combo would you like to try?


I also wanted to mention this promotion - since it goes along perfectly with the lovely ink pads I used for my cards today! All Full Size Ink Pads are 15% off this weekend only!


GIVEAWAY INFO:


Make sure and leave a comment before you leave for a chance to win a $50 gift certificate to either Pinkfresh Studio or My Sweet Petunia! All winners will be chosen and posted on the Pinkfresh Blog on Friday, August 14, 2020 - so make sure and check back to see if you were a winner! Winners must check that page and claim their prize within 2 weeks.

Here is the entire blog hop line-up so you don't miss a single stop - and product links are below - including affiliate links where possible, which simply means if you use one of the links below that I receive a small commission at no additional cost to you. Thanks so much for stopping by! Have a wonderful day!!!

You are invited to the Inlinkz link party!
Click here to enter