Wednesday, February 28, 2018

Bright Mahalo Birthday card on the the Reverse Confetti Blog

Good morning! Just stopping by to give you a little look of a card I have posted on the Reverse Confetti Blog this morning for this week's edition of Wednesday in the Works! There is a video tutorial as well! You can check it out HERE.


Thanks for stopping by! Have a wonderful day!!!


Technique Tuesday Countdown Day 2 - Old Goats' Club

Good morning! Welcome to Countdown Day 2 for the March Release from Technique Tuesday - all products will be available on March 1st - that's tomorrow!!! This is my first release on the DT, and I'm super excited about what a fun and fabulous release it is! Make sure and check out the Technique Tuesday Blog to find links to all the Design Team's projects for today!


Today's card uses the absolutely HILARIOUS Gertie and Garth Goat Stamp Set! STORY TIME: I grew up on a little country farm, and we raised goats. So I spent my childhood in spring waiting for the new baby goats to arrive, cuddling them when they arrived, feeding them their bottles, and running them around the yard (picture 5-8 baby goats bounding and bouncing around chasing us as we ran around our huge yard - and it's just as cute as you can imagine!) I also spent many mornings and evenings milking 2-3 mama goats as well. So...needless to say, I ADORE this set and see it getting LOTS of use!


For my card today I went total rustic farm style! I stamped one of the goats on a panel of white cardstock along with the sentiment, then used Technique Tuesday's Threaded DIY border die set to add the stitched border along the top and bottom. I also added some Antique Linen Distress Inking around the edges. 


Some twine attached with a tiny paper clip to the top corner, and some fun pattern paper - part of it with a torn edge - finish off this card. That...and of course I couldn't resist tiny Wiggly Eyes either! I think that alone ups the cuteness factor of this card SOOOO much!!!


Product links are all below - including affiliate links where possible, which simply means if you use one of the links below that I receive a small commission at no additional cost to you. Thanks so much for stopping by! Have a wonderful day!!!


Tuesday, February 27, 2018

Make My Heart Happy - Simon Says Stamp Storybook Bear

Good morning! I'm sharing a card today using a recently released die from the popular Picture book Dies line from Simon Says Stamp - this one is Picture Book Love Bear - paired up with some other Simon Says Stamp dies and a stamp set for the sentiment!


I started off by die cutting the sweet bear from Neenah Desert Storm Cardstock. I then separated the pieces, and used Copic markers to add color to the hearts, eyes and nose, and the main body part. I then reassembled it, using tape on the reverse side to hold everything together.


Next, I pulled out some Authentique pattern paper, and die cut the Front Collage Wafer Die from a panel of pattern paper, I used that to tuck the bear behind so he was peaking out - so cute, right?


To carry the heart theme out, I die cut several of the smallest Wonky Hearts Wafer Dies from more pattern paper, and tucked them in and around the bear. I added a sentiment from the recently released Love and Friendship stamp set, and some jute twine tied around the panel as well. I love all the rustic texture, and the pink and red tones tied through it all - so warm and cozy!


Product links are all below - including affiliate links where possible, which simply means if you use one of the links below that I receive a small commission at no additional cost to you. Thanks so much for stopping by! Have a wonderful day!!!


Technique Tuesday Countdown Day 1 - Love You To Pieces

Good morning! So excited to begin sharing my cards for the March Release from Technique Tuesday - all products will be available on March 1st! Woohoo!!! This is my first release on the DT, and I'm super excited about what a fun and fabulous release it is! Make sure and check out the Technique Tuesday Blog to find links to all the Design Team's projects for today!


Anyway - here is my first card to share with you using some of the new goodies we are sharing a peek at today - Pieces of my Heart Die and Love You To Pieces Stamp Set!


I went with a soft and dreamy color palette for my card today - white, blue, and gold - with a pop of bold black for the sentiment! I die cut the new die from white cardstock (it all stays attached) - then die cut it again from gold glitter cardstock, and carefully snipped out just the middle piece of the puzzle to attach with foam adhesive over the center of the white die cut.


I did some simple distress ink blending on a panel of white cardstock, added white paint splatters and gold splatters with my Starry Colors Palette, then stamped my sentiment from the new Love You To Pieces Stamp Set. Attached the puzzle die with more foam adhesive, then attached the entire panel onto a coordinating cardbase of Simon Says Stamp Sea Glass cardstock!


Product links are all below - including affiliate links where possible, which simply means if you use one of the links below that I receive a small commission at no additional cost to you. Thanks so much for stopping by! Have a wonderful day!!!


Monday, February 26, 2018

CAS with Layers - on the Unity Stamp Company Blog

Good morning! Also stopping by with a peek at a CAS card - but with layers! This is over on the Unity Stamp Company Blog today with a video if you want to check it out HERE!


Thanks for stopping by! Have a wonderful day!!!

Heffy Doodle/MISTI Blog Hop

Good morning! Super excited today to be part of a fun collaborative blog hop with Heffy Doodle and the My Sweet Petunia team! There is also a giveaway up for grabs - make sure and read to the bottom for more info and that! You should have arrived here from Chris Dayton - if you just happened along feel free to head back to the Heffy Doodle blog to start at the beginning!


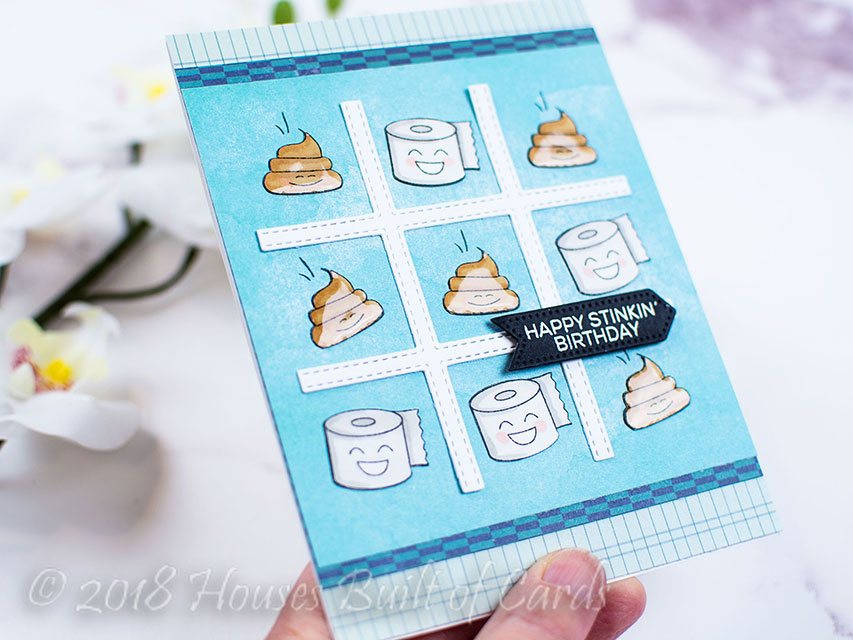
I have a card with a simple and sweet little scene that I put together using my Mini MISTI and several Heffy Doodle Stamp sets - as well as a photo tutorial showing how I used my MISTI to help put it together!


The MISTI made it so easy to create my scene with a bit of masking, and get a great impression on my watercolor paper - since the texture of watercolor paper can make it a bit more tricky sometimes.

First of all, I planned out my little scene that I wanted to create using one of the bunnies from Hunny Bunny Boo, the umbrella from Beary Big Heart, and a sentiment from Hello Squeakheart.


At this point I removed the bunny, then I could swing the top of my Mini MISTI over to pick up the umbrella and sentiment images...


...and then stamp them! As you can see here, my first stamp was a bit lighter than I wanted, with some gaps in the lines especially on the sentiment. No problem! I simply inked up my stamps one more time, and stamped again! The MISTI makes sure it is perfectly aligned the second time for a nice dark and crisp image!


Next, I stamped the umbrella on a bit of masking paper. TIP: When masking, only cut out the portion that you are going to be stamping over! In this case the bottom of the handle, and the right edge of the umbrella where the ear is going to hit. This way you don't spend extra time fussy cutting out parts of an image that aren't going to affect your finished card! Arrange the bunny where you want it to be, then swing the MISTI lid over to pick up the stamp...


...and stamp the bunny in place!


Remove the mask - and voila! Your scene is ready to watercolor!


I used my Gansai Tambai watercolors to color my scene, adding some little splatters to it as well.


Finished off by trimming it down a little smaller than my white cardbase, and mounting it with foam adhesive over the top!


Your next stop along the hop is Stephanie Severin - make sure and continue there next!

GIVEAWAY INFO: There will be two lucky winners chosen from those who leave comments along the hop. One will win a $50 shopping spree to My Sweet Petunia, and the other will win a £25 gift certificate to Heffy Doodle! Comments must be left no later than 11:59 Central Time on Sunday, March 4, 2018 and a winner will be announced on Tuesday, March 6, 2018 and announced on the My Sweet Petunia and Heffy Doodle Blogs.

Here is the entire blog hop line-up in case you get lost along the way:

Chris Dayton
Heather Hoffman (you are HERE)
My Sweet Petunia

Product links are all below - including affiliate links where possible, which simply means if you use one of the links below that I receive a small commission at no additional cost to you. Thanks so much for stopping by! Have a wonderful day!!!


Saturday, February 24, 2018

Sparkle Dot Patterns 2 - On the Pretty Pink Posh Blog

More sneak peeks happening today for the upcoming Pretty Pink Posh release! Go check out some of the new goodies on this card on the Pretty Pink Posh blog today - you can find it HERE!


Thanks so much for stopping by! Have a wonderful evening!

Friday, February 23, 2018

Modern Shout it from the Rooftops - Simon Says Stamp

*I have a step-by-step of my coloring for this card on my Instagram Story today - I also have started doing weekly giveaways over there if you want to come check out this weeks! You can follow me on Instagram HERE!*

Hello! I'm sharing a card today using one of my favorite recently released stamp sets from Simon Says Stamp called From the Rooftops. I love the clever sentiments that go with the fun scenes! Today's card uses some gray cardstock, heat embossing, and colored pencils!


I have been drooling over the Polychromos Colored Pencils, but since I don't have them yet, I decided I should probably pull out some of the ones I actually DO have and use them! One set that hasn't seen NEARLY enough use is my Chameleon Double Ended Colored Pencils - they work so well for easy blending and were perfect for this technique!


I heat embossed in gold, then used both ends of various pencils to color in the skyline. I created a window in the same color of cardstock and placed it over the top with foam adhesive. Finished off by heat embossing my sentiments on black cardstock and attaching them in place!


Product links are all below - including affiliate links where possible, which simply means if you use one of the links below that I receive a small commission at no additional cost to you. Thanks so much for stopping by! Have a wonderful day!!!


Tic Tac Poo - Happy Stinkin' Birthday

Good morning! I'm back with another fun card today using an ADORABLE Technique Tuesday stamp set with a super fun Pretty Pink Posh die! For some reason when I saw this super cute stamp set, I thought how fun it would be to have a "Tic Tac Toe" board with a toilet paper and poo image! Heehee! I think it would also be fun to attache velcro to the back and turn it into a game - whatcha think? Would you play that game?


I used the adorable Tic Tac Toe Die from Pretty Pink Posh, adhered it to some Lawn Fawn Watercolor Pattern Paper, then stamped all my images from Love Stinks in the centers of each square. I then stamped them on a separate piece of white cardstock to color, then fussy cut the colored portions of the images out and paper pieced them onto the card. 


I heat embossed a sentiment from the set on a little label from Little Labels Crafting Dies from Technique Tuesday, and adhered that with foam adhesive for dimension. 


Finished off with a good coat of Tonic Crystal Glaze on the poo (shiny poo!) and some Crate Paper pattern paper layered underneath. I was kind of thinking this would be a fun guy card - what do you think?


Product links are all below - including affiliate links where possible, which simply means if you use one of the links below that I receive a small commission at no additional cost to you. Thanks so much for stopping by! Have a wonderful day!!!


Thursday, February 22, 2018

Crow About It - You're the Best

Good morning! Today I'm sharing another card using some of the newest Heffy Doodle Release - oh my goodness, this release is ADORBS! This card was a fun instance where I had the PERFECT pattern paper to go with that darling image - they were made for each other, don't you think?!?!?!?


For my card I used Eggcellent News for my image, die cut it with the coordinating Eggcellent News Dies, and had fun coloring it with Copics. I stamped a sentiment from Whatcha Sayin' on a speech bubble cut with the coordinating Whatcha Sayin' Dies.


I used Clover Frames Dies to cut my center frame, cutting it once from kraft and once from white cardstock, then layering it together - popping up the white part with foam adhesive. I also layered up my pattern paper, adding a bit of white paper with a torn edge for some texture. Finally, added my little birdie and sentiment with foam adhesive as well!


Product links are all below - including affiliate links where possible, which simply means if you use one of the links below that I receive a small commission at no additional cost to you. Thanks so much for stopping by! Have a wonderful day!!!


Cherry Blossoms on the Pretty Pink Posh Blog

Good morning! It's time for sneak peeks of the BRAND NEW Pretty Pink Posh Release - YAY!!! I have this card up on the Pretty Pink Posh blog today sneaking some of the newest goodies! You can check it out HERE!


Thanks so much for stopping by today - have a wonderful day!!!


Wednesday, February 21, 2018

Pattern Paper and Die Cuts on the Reverse Confetti Blog

Good morning! Just popping in to let you know I have this card - with a video - up on the Reverse Confetti Blog this morning! Go check it out HERE - combining pattern paper and die cuts creatively!


Thanks for stopping by! Have a great day!!!

Stands Out from the Crowd - Technique Tuesday Giraffe

Hello! Popping in today to share another card using a sweet stamp set by Technique Tuesday - less than a week until we get to start sharing some sneak peeks of the new release for March - and they are adorable!!!


For this card I used the super cute June the Giraffe. In true Technique Tuesday fashion, this stamp set has tons of fun and cute sentiments! And the giraffe is pretty darn cute as well!


I colored it with watercolors, added the birdie standing on the edge of the sentiment, and added some white gel pen accents on the giraffe before matting with coordinating cardstock and mounting on a white cardbase.


Product links are all below - including affiliate links where possible, which simply means if you use one of the links below that I receive a small commission at no additional cost to you. Thanks so much for stopping by! Have a wonderful day!!!


Tuesday, February 20, 2018

Rainbow Sunshine Birdies on the Pretty Pink Posh Blog

Good morning! Just popping in to let you know I have this card over on the Pretty Pink Posh Blog this morning for my Something Old Something New Feature! You can check it out HERE if you want more info!


Thanks for stopping by! Have a wonderful day!

Awesome Spring Bunny


Good morning! Today I'm sharing a card using some fun Spring theme goodies from Lil' Inker Designs - and news on an AWESOME freebie that you can grab with qualifying purchase through the end of the month! I have actually used the freebie on my card that I'm sharing today! :)


For this card today, I started off with the adorable bunny from Rustic Spring Stamp set. I love how the coordinating Rustic Spring Dies cut out the arms as well, which make it perfect for tucking the little bouquet of flowers in its hands as well!


I colored it up with Copics, then added a frame using the Instant Camera Die and kraft paper.


Next I layered up lots of yummy pattern paper from a couple of spring Authentique paper pads. I die cut some with Silly Stitched Die set for the green panel, and created a banner by die cutting Anytime Tag Die Set 2 and trimming it in half, tucking it behind the photo frame so that it looks much longer than it actually is. I punched a couple holes through that part and tied some jute twine through them.


I added my sentiment by die cutting the Awesome Word (one of the freebies) 3 times from white cardstock and layering it up for more dimension, then adding an additional sentiment from the coordinating Hello Awesome Stamp set (the other half of the freebie).


Finished off with a white cardbase that I used Quilted Stitched Pattern Die on for a bit of texture, and some foam adhesive under the photo frame and the bunny.


This card just feels like spring to me - and I don't know about you, but I am ready for spring!


Product links are all below - including affiliate links where possible, which simply means if you use one of the links below that I receive a small commission at no additional cost to you. Thanks so much for stopping by! Have a wonderful day!!!