Showing posts with label Mister Huey's Stencil. Show all posts

Wednesday, September 2, 2015

Lil' Inker's September Release - Day 1

Hello! It's time for a new release at Lil' Inker Designs! Fall is definitely in the air this week with the new release. I don't know about anyone else, but here in the Northwest it has been HOT and DRY - the rain that started this past weekend is so very welcome, along with the cooler days. I'm looking forward to hot soup, fresh bed, and cozy nights curled up by the fire with a cup of tea and a good book...some of my favorite things!


Of course, one of the things I so often associate with fall is pumpkins - so I thought I would start off today with a couple different projects using some of the new fall pumpkins. First off, one using the new stamp set called Seen on Halloween:


Here is a picture of that new stamp set:


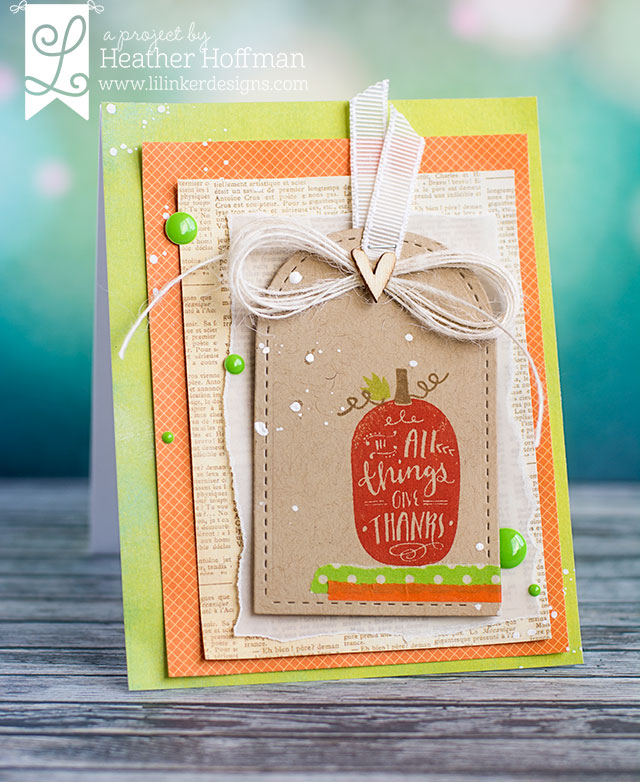
I stamped it on a kraft tag that I cut out with Anytime Tags Die Set - using colored MFT inks, with some washi tape under the image to ground it. Added some ribbon and jute twine to the tag, then layered everything up with some torn vellum and pretty pattern paper. Finished off with some enamel dots and some splatters with some white Mister Huey's mist.


Next up, there is a coordinating die set for this stamp set - Seen on Halloween Dies - that works well combined with the image, but because of the unique design with the added stitching options, it also works amazingly well on it's own for some of the images! In particular, that large pumpkin looked like the perfect die to make a pretty fall shaker card with:


Here is a peak at that die set - see how there are separate pieces to add the stitching? So fun and versatile!


I also used a sentiment from this lovely new set:


I also used Stitched Mats: Rectangles to add the stitching to my card base, as well as cut out the center panel. I added my sentiment from another new release, So Thankful, heat embossed in white. 


The shaker is filled with a fun assortment of goodies from Pretty Pink Posh - Lime, Lemon Meringue, and Tangerine sequins (didn't realize what a citrus combination that was until I wrote it down!), gold star sequins, and white seed beads. :)


And now the fun part! There is, of course, a chance to win some shopping money to spend on the new goodies! YAY! Laura is giving away 3 gift certificates for random comments left along the hop - so the more comments you leave, the better your chance of winning!


Here is the entire Blog Hop line-up - make sure and check out each stop and leave your comments:

Heather Hoffman - You are HERE

Thanks for stopping by today! Have a wonderful day!!!

Thursday, May 1, 2014

Ribbon Carousel Challenge - Party Time!

{This is my third post today - if you are looking for Day 1 of the Mini Release for My Craft Spot click HERE or scroll down two posts. If you are looking for my Growing in Unity Day 4 post click HERE or scroll down to the last post}

Hey there Party Goers!  Welcome to this month's Birthday Celebration Party challenge, which is going to be so easy, you'll be able to enter almost ANYTHING you make! 


May has many, many reasons to Party. A special day to celebrate our heritage, honor our Moms, Queen Victoria and those who have died defending our freedoms too.  Here is a list of a few celebrations that definitely deserve a special day:
  • May Day
  • Cinco de Mayo
  • National Teacher's Day
  • Mother's Day
  • Armed Forces Day
  • Victoria Day
  • Memorial Day which is also......
  • My Son's Birthday (Woot Woot - Go Ian!!) 
Then of course, there are Birthdays, Anniversaries, and Weddings, Graduations, even TGIF counts as Party Time!  So whatever YOU are celebrating, please share your creation with us!


This month's theme is...you guessed it.....
Party Time!

 So what prize is up for grabs? How about a Ribbon Carousel?!

 This Birthday month we are giving away a Ribbon Carousel to one of our randomly chosen challenge participants! Just a reminder that our Ribbon Carousel Crewmates have divided up into two teams. Each 1st and 15th of the month you will see fresh projects for this months challenge!


 There are only four (4) rules you must follow to be eligible for the prize:
  1. You MUST use ribbon, twine, thread, washi tape or anything that comes on a spool on your creation 
  2. Your project must be based on the theme of the month. 
  3. You must add a NEW project to the inlinkz below and link directly back to your project on your blog or online gallery. (Unfortunately, we've had participants who would have won the challenge, but they didn't do a direct link to their blog and I couldn't find their creation!)
  4. You may enter the challenge 3 times maximum to be qualified to win a prize.
I decided to make a graduation card!


I started off by stenciling a background. I wish it showed up better in the pictures - but I used Delicata Golden Glitz ink - which shimmers so pretty in real life! I used a chevron stencil and did the top portion of the card, then rotated it and did the bottom part.


My sentiments are some super fun ones from Winnie and Walter - The Big, the Bold, and the You.  I just LOVE the font on these! Then I finished off with a strip of washi tape along the bottom.


Thanks so much for stopping by today! Have a wonderful day!!!


Tuesday, March 25, 2014

Happy Anniversary!

Good morning! Today my husband and I are celebrating our 14th anniversary...don't quite know where the time has gone! So grateful for the man he is - God has blessed me so much! So here is the anniversary card I made him:


A little while back, I glanced at a card using the Positive Strokes stamp set - and for some reason, I saw a feather! So...of course I had to make a card with a feather! So I stamped the brush stroke in the middle of the set with Hero Arts shadow ink, and doodled in the lines with a black Copic pen.


I stamped the word "darling" from Scripty Sayings right at the bottom of one of the feathers, so it looked like it was written with a feather pen, then added the rest of the sentiment from Many Thanks. I added the little hearts also from Scripty Sayings. Finished off by spritzing a little bit of Heidi Swapp Color Shine in the corners, then used a stencil to add the chevrons with white embossing paste.


Thanks so much for stopping by today! Have a wonderful day!