Monday, September 30, 2013

MCS - Sketch Challenge - Thank You!

Good morning! Happy Monday - and I'm happy to be sharing a new card with you for the brand new challenge starting today at My Craft Spot! This week we have a sketch challenge - here is what I made:


And here is the sketch - for some reason I found this sketch really challenging! Don't know why! Took me about 3 different days of working on this before I was happy with it - and I took a few liberties with the sketch to make it work for me...hope you can see where I followed well enough!


I used some My Mind's Eye pattern paper, then used DCWV Glitter paper to cut the 4" Doily Die. Layered a stitched circle die from Lil' Inker's over the top of that, and stamped my sentiment from Thank You Stamp set, as well as the cute acorns from Jar Full of Fall - don't you just love their faces?!?!?!


I added some lace trim, a banner cut from a new Simon Says Stamp banner that I got recently - with another sentiment from Thank You Stamp set stamped on it - and added some Black Licorice Traditional Twine tied in a bow. Finished off by attaching that entire panel to my cardbase using foam adhesive. 


Thanks for stopping by today! Hope you will hop on over to My Craft Spot to check out what the rest of the Design Team put together and join in the challenge! Have a great day!!!


Sunday, September 29, 2013

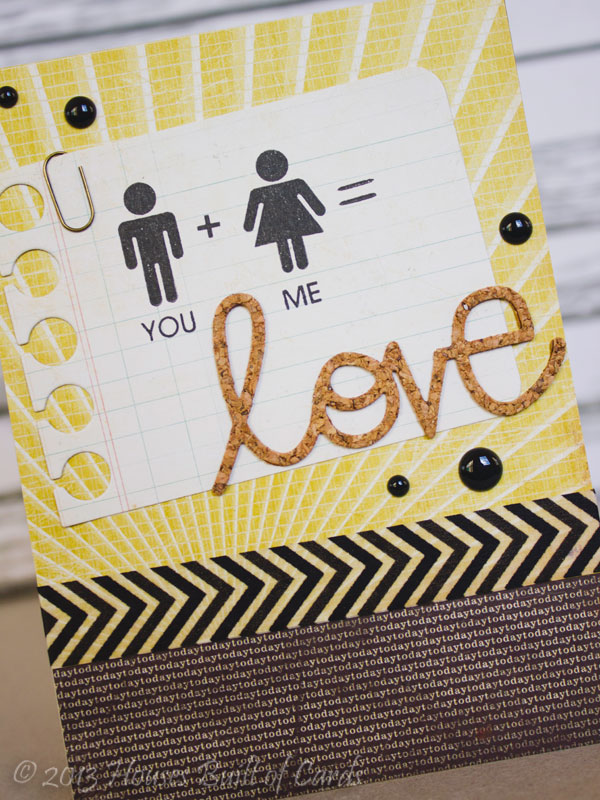
PS SPARKS - YOU + ME = love

Hello! Welcome to the last challenge of the month over at Paper Smooches SPARKS challenge!  Here is what I put together:


Since this is the 5th challenge date in September, it means it is anything goes!


This is actually a card I have had on hand for quite some time - I submitted it twice for publication, and no luck! So...I figured I would share it here!


I used a couple of Paper Smoches Dies - Notebook Basic, and Love Word Dies, as well as a couple of stamp sets - Off The Charts and Chart Toppers to put this together. I used cork to cut the Love Word Die, and my pattern paper is by Crate Paper. I added a tiny Tim Holtz paperclip, some enamel dots, and some washi paper to finish it off.


I am also linking this up with the Metal, Wood, and Cork Challenge in the Moxie Fab World.

Thanks so much for stopping by to visit! Please stop by and see what the rest of the SPARKS team put together:

Saturday, September 28, 2013

Thinking of You...

Good morning! Today I'm sharing a card I made for the current Avery Elle Challenge:


Here is the inspiration photo:
I loved the mottled background effect, and decided to use that, but in another color pulled from the image. I used some Crate Paper pattern paper, and the Petals and Stems stamp set to heat emboss a design along the bottom (like the picture!) using a few different colors of Zing embossing powder. 


I overlapped a few of the images as I embossed them - kind of gives a fun effect! Finished off by using some distress inks on the edges of my pattern paper, and adding a few Berry Blend sequins.


Thanks for stopping by! Hope you are having a wonderful weekend!

Friday, September 27, 2013

Chalkboard Fall Card

Good morning! Today I'm sharing a card for Unity Friends with Flair that I made for Eyelet Outlet - it was shared on their blog a couple of days ago HERE.


I used the beautiful word art image from my Unity August KOTM on some chalkboard paper cut with Paper Smooches Notebook Basics Die, and heat embossed it in white before smearing some white pigment ink around a bit on it. My background paper is from Echo Park. 


I added the cute pumpkin brads, black bling strips, washi tape, and red bling to embellish - all from Eyelet Outlet. You can find a link to each item on the post at Eyelet Outlet (HERE).


Thanks for stopping by today! Have a wonderful Friday!

Thursday, September 26, 2013

Horse Birthday Card for my Daughter

Good morning again! I managed to get my daughter's birthday card made and photographed yesterday afternoon - so I thought I would pop by and share it! Shhhh...she hasn't seen it yet! :-)


I am also entering this in the current challenge over at My Creative Time - Birthday:


In case you couldn't tell, like most girls, my daughter is very in love with horses at the moment! Actually, she is my little animal lover anyway, but horses are definitely a big one right now! So I used my Silhouette Cameo to cut a horse image, and made a shadow for it.


I used lots of Basic Grey pattern paper, and stamped my sentiment from two different My Creative Time stamp sets - Polka Dot Surprise, and It's All About You


I also put foam adhesive pretty much between each layer, and tucked a little jute twine tied in a bow in there as well.


Sorry about the pictures! They seem a little gloomy - the last couple days have been unusually overcast here in Wyoming...and we have been getting SNOW already! Yep...I'm still trying to get used to the idea! Definitely a first for my little birthday girl - to wake up to it SNOWING! She's happy though, so I don't mind!

Birthday Cake Banner Decoration

Good morning! Today I'm sharing a special project over at My Craft Spot! Today is my youngest daughter's 9th birthday, so I have birthday's on my mind today for sure! This isn't her cake though, but a cake I made and decorated this past week for a good friend:


I created my banner by using Tiny Banners and Toppers Metal Dies, and cutting the larger size banners on a folded piece of white cardstock, which allowed me to hang them over my twine. I then cut the smaller size banners in different colors, as well as the cute toppers, and adhered them all together. I used Small Alphabet Metal Dies to create my "happy birthday" sentiment. 


Finally, I folded them over some Black Twinery Twine and glued them together, and attached them to some skewers pushed into the cake to hold them up. (I also added a dot of glue to the twine where it tied on the skewer so my banners didn't land in my frosting!)


All in all, it took a while, but was a relaxing and enjoyable way to spend a Sunday afternoon - so I didn't mind! And here is a picture of my little birthday girl - I took this just a couple of days ago:


Thanks for stopping by today! Hope you have a wonderful day!

Wednesday, September 25, 2013

Celebrate Birthday Balloons

Good morning! I'm over on the Neat and Tangled Blog this morning to share a fun birthday card using the newly released Just for You stamp set:


LOVE the look of these darling balloons layered together! I used 3 different colors of shadow ink - they blend and overlap so fun! 


Layered with some American Crafts pattern paper, and a bit of washi tape to hold it down. Super simple and fun!


Thanks for stopping by! Have a super day!

Monday, September 23, 2013

MCS Challenge - Fall Gift Bag

Good morning! Popping in to share a project for the newest challenge at My Craft Spot! I made a gift bag this week: 


This week is a Pinterest Inspiration - LOVE this image! I just want to jump into it...so ready for fall!


I used tons of goodies from My Craft Spot on my gift bag, and a couple of cuts from my Silhouette Cameo as well. I started off by cutting the jar with Jar Basics metal die out of blue cardstock and vellum, then stamped the jar using Jar Basics stamp set. also added a water line with Jar full of fall stamp set, then inked with some distress ink, before layering the two pieces together, tucking the wheat that I cut with my Cameo in between the layers.


The pumpkins were cut with my Cameo, and I added some pattern to them with Pattern Blocks stamp set and some Hero Arts inks. I also wrapped some Natural Jute twine around the jar, tied a bow, and added a little bling I got from Michael's recently. The label on my jar was cut with Tickets Metal Dies, then I applied some distress ink and stamped my sentiment from Thank You Stamp set with Hero Arts ink.


I splattered some Mister Huey's white mist on my kraft bag, blotted with some plain paper, attached a row of lace trim, and added my embellishments with foam adhesive.


Thanks so much for stopping by today! Hope you are having a wonderful day! 

Tuesday, September 17, 2013

SPS Inspiration - Sending Hugs

Good morning! It's my morning to share over at Shop Pumpkin Spice! Here is what I made for today:


I used a cute Penny Black set from the SPS Ebay store called Mimi at Play, and stamped it on some pattern paper from Crate Paper's 6x6 Pretty Party Collection. I planned on leaving it plain, but then ended up sort of coloring it in with Stickles! Lots of sparkle on this card!


Finished off with some assorted MME enamel dots, and a little distress ink on the edges to finish it off.


Thanks for visiting today! Have a wonderful day!

Monday, September 16, 2013

MCS Challenge - Favorite Technique

Good morning! It's time for a new challenge over at My Craft Spot! The challenge for this week is to use your Favorite Technique. I don't know if I could possibly pick one favorite technique, but I have been enjoying the chalkboard technique a lot lately, so I decided to go with that for the challenge this week, and play with some of the new releases:


I used Jar Basics Stamp Set, and Jar Basics Metal Dies, and the Chalkboard technique to make my chalkboard jar. The sentiment on the inside of the jar is from the new stamp set called Bon Appetit, as well as the "mmmm good!" over the top of the jar.


Pattern paper is from Crate Paper, I added some Black Jute Twine, and some sequins from the Tuxedo blend at My Craft Spot.


Thanks for stopping by today! I hope you'll play along with us this week and share your favorite technique! Have a great day!


Sunday, September 15, 2013

PS SPARKS - Cool Shades - Celebrate Big Time

Hello! It's time for a new challenge over at Paper Smooches SPARKS challenge!


This week it is a Cool Shades Challenge:


Here is the color palette - Fresh Fall:


I started off by masking off the square I wanted to use on watercolor paper with washi tape. It works perfectly, because it comes off easily afterwards without ruining the paper. Then I used 3 different colors of MFT ink, pressed them on my nonstick mat, then dipped a waterbrush in and blended together to make the background. I removed the washi tape, very carefully, while it was still wet so it didn't ruin my square shape.


Once that dried, I cut the city skyline using Super 2 Dies out of DCWV Glitter cardstock, and glued it directly on my watercolored square. I added the sentiment from Hullabaloo and Many Thanks to finish it off.


Thanks so much for stopping by to visit! Please stop by and see what the rest of the SPARKS team put together:


Friday, September 13, 2013

N&T New Release - Merry and Bright

Good morning! It's the 5th and final day of sneak peeks for the new release peeks at Neat and Tangled - all new sets are now available in the store!


Today we played with a set called Merry and Bright - Here is what I made for today:


I used one of my favorite color combos, but with the twist of adding gold in! Pattern paper is from an older October Afternoon holiday paper pack, and the glitter strip on the side is from a DCWV 6x6 paper pad. I cut the center panel using a Spellbinder's Nestabilities die, then stamped the ornament with MFT ink, heat embossed the top piece and stamped a separate starburst in the center to heat emboss as well. I punched a hole in the center top of the ornament hanger, and tied through some Baker's twine, with a bow and button at the top.


Stamped my sentiment with black ink, added a few black pearls, then attached the front panel with foam adhesive.


Thanks for stopping by today! Make sure and head over to Neat and Tangled to see all the other Design Team samples, and to check out the new release in it's entirety! Have a great and weekend!!!

Thursday, September 12, 2013

N&T New Release - Thankful Turkey

Good morning! We've already reached Day 4 of the new release peeks at Neat and Tangled!


 Today we played with a mini set called Thankful Turkey - Here is what I made:


I kept a super neutral color scheme on this. All my pattern papers were random loose ones from my stash - so I have no idea who they are by! But I thought they blended well together! I cut a stitched circle from Lil' Inker's Designs for my center panel, then stamped the turkey, his cute hat, and the dot border on the bottom from the new stamp set with PTI ink. 


I added the sentiment, heat embossed with Zing embossing powder, a bit of washi tape, some Flat Matte Marshmallow Sequins, and a couple wraps of jute twine tied in a bow.


Thanks for stopping by today! Make sure and head over to Neat and Tangled to see all the other Design Team samples, and to check out the info on today's giveaway! Have a great day!!!