Tuesday, December 31, 2013

Me and You...

Hello! One final post for this year - sharing a card for the current Avery Elle Challenge:


This time around it is a sketch challenge:


I found this sketch pretty challenging for some reason! Actually started a few times, and threw away a few partly finished cards before finishing and being happy with this one. I used some Avery Elle Woodgrain cardstock for my cardbase, a bit of Crate Paper, and a Project Life card for the center panel.


I used Avery Elle's Handwritten Notes Stamp Set, stamped in PTI and Hero Arts Inks. Added some glitter washi tape, a chipboard element from Crate Paper, and finished off with some Avery Elle Winter Blend sequins.


Thanks for stopping by today! Have a super safe and fun New Years Eve!!!

Monday, December 30, 2013

Neat and Tangled Wreath

Somehow I missed this and didn't get it posted before Christmas - sooo...here it is late!


I used Neat and Tangled Simple Christmas Stamp set, some MFT ink, and some glittery DCWV paper cut with a Lil' Inker's die to make the bow.

Thanks for stopping by to see my (VERY) late Christmas project! 

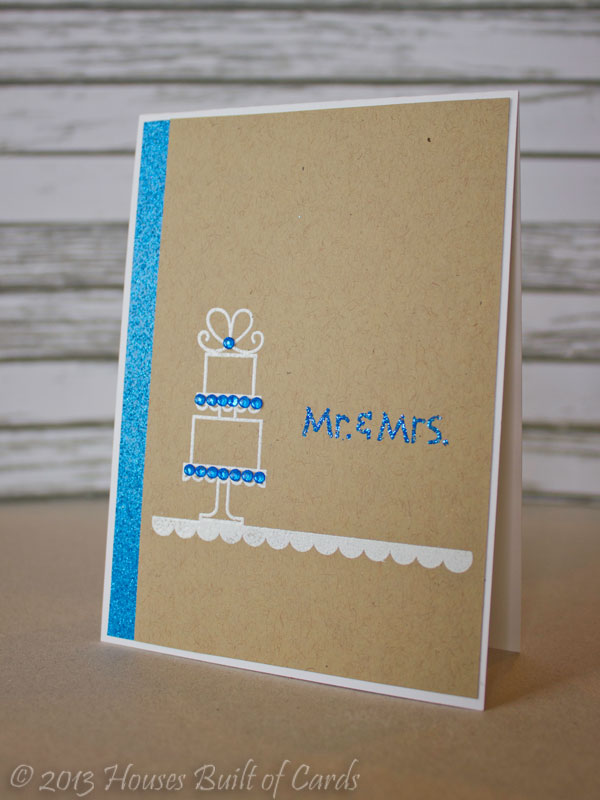
Paper Smooches Glittery Mr. and Mrs.

Hello! Happy almost New Year's Eve! Just popping in to share a card for the new Paper Smooches SPARKS Anything Goes challenge, as well as the Paper Issues Shiny and New Projects, CAS-ology Week 76 PARTY,  and Simon Says Stamp - Bling it On


I used some sparkly DCWV Glitter paper for the border down the side. Heat embossed the cake from Hullabaloo, and the bottom border from Fascinators in white, then the sentiment from Helping Hands using Zing glitter embossing powder. Finished off with some bling from Eyelet Outlet.


Thanks for stopping by! Have a wonderful afternoon!

MCS New Store!!!

Exciting news! I have been so blessed to be on the Design Team for Kimberly at My Craft Spot - and things have grown so much that she now has a new website dedicated to her store! Here is what Kimberly has to say:

Thanks to all of you, My Craft Spot blog has grown until it is bursting at the seams!  I have so many fun stamps, metal dies, ribbon and twine colors, that my little blog can no longer hold it all.  So . . .  I just had to make a new website for My Craft Spot store

To make shopping at My Craft Spot easier, I have separated my online store from my blog

My blog will still be full of great inspiration and fun challenges with prizes, but when you want to shop, everything will be so much easier to find! The new store is organized by product type, searchable, and has a shopping cart.

Stop by My Craft Spot and let Kimberly know what you think of the new store for a chance to win the Build  A Valentine stamp set!


To celebrate her new online store opening, every order over $25.00 will receive a FREE bag of Snow Flurries Sequins!


 What are you waiting for?!  Go check out the NEW My Craft Spot Store!!

Saturday, December 28, 2013

End of Year Clearance Sale

Hello! It is the end of the year, and I am feeling like clearing some stuff out and cleaning up my house! Soooo...everything in my Crafty Stuff for Sale page HERE is 50% off of the marked price! 

Help me clean out my house, and get a great deal on stamps and dies! 

I will also be throwing something extra in each package from my stash...a little surprise to say thank you!!!

Friday, December 27, 2013

Love is...Unity FWF

Good morning! So excited to be playing along with Unity Friends with Flair this morning using the current December 2013 Kit of the Month:


I recently saw a technique that Jennifer McGuire used (you can see her post HERE) that I wanted to give a try! She used clear embossing paste with a stencil, then sprinkled embossing powder over and heat embossed. I didn't have any clear embossing paste, so I used the white I had and sprinkled over some Zing embossing powder on the top and bottom corner, leaving the center just white. I really like the effect this gave, and will probably be trying it again!


I stamped my image on chalkboard paper and heat embossed it in white, then added some smudges of white ink as well, then attached it to my card base with foam adhesive.


Added some silver sequins, and a wrap of Twinery Baker's Twine to finish it off.


Thanks for stopping by! Have a wonderful Friday - and a Happy New Year!!!

Thursday, December 26, 2013

Stitched Nativity Peace on Earth

Another Christmas card to pop in and share a day late! (smiles) Used some Webster's Pages and DCWV pattern paper, the Market Street Stamps retired set again, and some machine stitching. Super simple!


Have a wonderful day!

Earth Tone Peace on Earth

Oops - meant to post this one before Christmas! Still catching up with another Christmas Card this morning! Super simple - Bazzil green cardstock, Paper Smooches Die and image, Market Street stamps (retired) sentiment, and a bit of jute twine to finish it off.


Thanks so much for dropping by! Have a great day!

Joy to the World

Hello! I hope everyone had a very Merry Christmas! I know it is the day after - but it is so easy to move on too quickly after Christmas, that I kind of like slowing down and not forgetting what I celebrated only yesterday! So bear with me as I share one more Christmas card with you!


This card uses a (retired) Market Street Stamps set for the background, over which I stamped a music note background from Unity Stamp Company. The edges are inked with distress ink, I added a die cut angel, and stamped my sentiment from "Joy to the World" stamp set from My Craft Spot.


Hope you continue to remember the true meaning of Christmas - and that you have a very Happy New Year!

Tuesday, December 24, 2013

Christmas Gift Tags for my Girls

Merry Christmas Eve! Just wanted to share a last minute Christmas tag idea with you today:


I made so many Christmas tags this year, that I actually put them on all my gifts! My girls wanted me to make them special ones for their gifts as well, so I set out yesterday to put together something special for them using My Craft Spot's Joy Filled Christmas Stamp set and my Silhouette Cameo:


My youngest spends all of her days dancing around the house, and begging to wear my pointe shoes to play dress up - so I cut a ballerina silhouette for her and attached it with foam adhesive - here it is on her gift - all wrapped up and pretty:


My oldest is very much into her gymnastics moves and is constantly working on those, so I used a gymnast silhouette for her and also attached it with foam adhesive. My sentiments were stamped with MFT red ink. Here is her's all tied to her gifts:


The tags were both pre-made ones I had in my stash, and I tied them up with some pretty May Arts sheer green ribbon and tied them on the gifts with some jute twine.

Thanks so much for stopping by! Wishing you a VERY Merry Christmas!!!

Simple Last Minute Tags for SPS

Merry Christmas Eve!!! Today is my last post for Shop Pumpkin Spice. Yesterday I put together a bunch of simple tags, and in case I'm not the only one with a last minute need for some Christmas tags, I thought I would share them here this morning! Here they all are together:


I used my Silhouette Cameo and Silhouette Designer Edition Software to cut the tags and fun embellies with pattern paper. I also inked the edges of each one with distress ink. Here is a close up of each of them:


These first four were cut using Crate Paper's 6x6 Story Teller Paper Pad.


I added some tiny jingle bells to this little reindeer, and a red bling nose.


I added some MME Enamel Dots to this Christmas tree, and some Glossy Accents and glitter to the star on the top.


All the others I attached with foam adhesive, but this one I glued right onto my tag. I kind of wish I had cut the bow with a different color, but realized it too late - and since the point was to keep these simple and easy, I left it this way!


These next two used paper from Crate Paper's 6x6 Little Boy Blue Paper Pad.


On the star one, I took a wood veneer heart, colored it with markers, and glued it in the center.


These last two use pattern paper from Crate Paper's 6x6 Random Paper Pad.


I also added a tiny wood veneer star, also colored with markers to the top of the tree.

Thanks so much for stopping by today! Wishing you all a VERY Merry Christmas!!! 


Monday, December 23, 2013

Vellum Love You

Trying to catch up on posting a few cards that I have had finished for a while and never posted - this was for a publication call and wasn't picked up:


I used some Avery Elle kraft cardstock misted with White Mister Huey's mist, then inked the edges with distress ink for the cardbase. The doily is cut from vellum using My Craft Spot's 4" Doily Die, and the center banner was cut with my Silhouette Cameo once from white cardstock and once from vellum. I stamped the sentiment on the white cardstock using an Avery Elle stamp set, then layered the vellum over and stapled the two layers together. I decided I didn't like the look of the staples very much, so I covered them up with the little bling strips, then finished off with a few sequins.

Thanks for stopping by! Hope your final Christmas preparations are going well!

Thursday, December 19, 2013

Sweet and Sparkly Deer

Hello! Around Thanksgiving, I took advantage of the awesome sale that Nicole over at Sweet Stamp Shop did and got a couple of the then newer sets that I had been drooling over! The other day I had the opportunity to finally play with them (YAY!!!) - and made this using the Monogram It set to link up with the Simon Says Stamp - Bling It On Challenge:


You really can't see it in this picture, but I stamped the deer with Tsukineko Golden Glitz Delicata Ink - and it is TOTALLY my new favorite gold ink! LOVE! Totally shimmery and glitzy and pretty! I stamped the bow over the top with MFT ink, and the sentiment on the bottom with Hero Arts Shadow ink, then cut it out with a Spellbinder's Nestabilities Die.


I used Basic Grey Persimmon pattern papers, and cut a shadow for behind the front panel and wrapped some jute twine around it before attaching each layer with foam adhesive.


For the outer edges of the card, I rounded the corners, smeared (technical term here!) some Glossy Accents on, and sprinkled on some Gold Crushed Glass Glitter - also love the texture and glitter this gives! Finished off with a few Avery Elle sequins tucked here and there.


Wednesday, December 18, 2013

Paper Smooches Thank You Tomato

Hello! Just popping in with a Paper Smooches card I made a while back for a publication call, that didn't get picked up. A pretty simple card - but I kind of loved how it came out! I stamped my shadow from Fascinators, the pin cushion and hearts from Needle Little Love, and the sentiment from Many Thanks - all on some Avery Elle Kraft cardstock. Colored the tomato in with Copic markers, and added enamel dots to the top of the pins!


I am also linking this up with the current Paper Smooches Anything Goes Challenge:


Thanks for dropping by! Have a great day - Friday is almost here! YAY!

Candy Cane Lane!

Hi there! I'm over on the My Craft Spot blog today sharing a holiday card with you - a very bright and festive card!


I love creating with the chalkboard technique - simply stamp your image on chalkboard or black cardstock and heat emboss with white embossing powder. Next, stamp again slightly off the first image with white pigment ink. Finally, add some details with a white colored pencil, and add some smudges of the white pigment ink to complete the effect.

These Candy Cane Brads from Eyelet Outlet just make me feel festive - so bright and fun! I thought they would look beautiful on a chalkboard paper tag - and I do love how they pop!

I used Bazzil Cardstock for my cardbase, and a Mister Huey's mask and embossing paste to create my background. The chalkboard tag was cut with a Paper Smooches Die, and I also used some pretty White Sheer ribbonBlack Jute Twine, and Cherry Red Traditional Twine for the top of my tag.


Thanks for stopping by! Have a great day!!!

Merry and Bright Bokeh Card

Good morning! I'm sharing over on the Neat and Tangled blog this morning - this Christmas card using my Neat and Tangled stamps a little creatively - I really like the "bokeh" style cards, and it occurred to me that it would work perfectly to make a Christmas tree!


 I used the solid and outline circle from Merry and Bright to build my tree, stamping each in a different shade of green ink, then stamping off 2 or 3 times to make it look like even more colors. The sentiment also came from this set. I added the star on top, and throughout the tree from Sparkle and Shine. I also used some Raspberry Red Satin Sequins, with a touch of black bling in the center.


I used some foam adhesive between a few of the layers, and also a bit of distress ink on the edges of the white card just to soften it a bit.


Pattern paper is from October Afternoon, and the stitched rectangle is a Lawn Fawn die. The tiny clothespin was in a pack I found at Michael's and just HAD to have - full of cute and fun colors! I tied some jute twine and added some tiny jingle bells to my card to finish it off.


Thanks for stopping by today! Have a wonderful day!

Tuesday, December 17, 2013

Eyelet Outlet Christmas Tag

Good morning! I had this tag shared over on the Eyelet Outlet Blog yesterday, and thought I would pop in and fill in a bit more detail here this morning!


This tag came from this inspiration piece i found on Pinterest - pretty, isn't it? 


I cut the tags using my Silhouette Cameo and some Avery Elle cardstock. I stamped and heat embossed a sentiment from my Unity October 2013 Kit of the Month with gold Zing embossing powder. I then added some swipes of white pigment ink to give a bit of chalkboard effect. I also did this on the base kraft layer - I think it gives it a nice frosty look!


The background glitter stripes were created by using my ATG gun to run strips of adhesive and sprinkling it heavily with American Crafts gold glitter. I attached the two tags together with foam adhesive so they would stay put where I want them! The snowflake brads are from Eyelet Outlet (you can find them HERE) and I finished off with some sheer white ribbon and natural jute twine.


I am linking this up to a couple of challenges - first, CAS-ual Friday's: Let It Snow:


Thanks for stopping by today! Hope you are having a fabulous day!!!