Showing posts with label Diamond Glaze. Show all posts

Friday, January 4, 2013

Lovely Flowers - Unity FWF

(((If you happen to be looking for my New Years Giveaway of the Unity set Snowflake Kisses, click HERE or just scroll down. It is open for a few more days!)))

Good morning! Happy first Friday of 2013!!! Can't believe that I'm writing that already! But...since it's Friday, it is also time for Unity Friends with Flair - so here is what I made for this week:
This used a couple of my new favorite stamps from the December Kit of the Month. Want to know what I especially love? See that lace on my card? Yep...that is the stamp from the kit, just heat embossed in white! Doesn't it look amazingly REAL?!?!?! I can't believe how great it stamps - and the detail!!! LOVE LOVE LOVE it!
I also stamped that flower image, colored it with Copics, and cut it out with a circle Spellbinder's Die, and inked the edges with distress ink.
Just for fun, I added some dots of Diamond Glaze on the flower to look like dew drops. 
I trimmed the bottom of the circle flat so it would fit against the lace, attached it to the green cardstock, then wrapped some jute twine around several times, tying in a bow. 
Finished off by attaching that to the background with foam adhesive, stamped the sentiment with PTI ink, and used distress ink on the edges, before also attaching with foam adhesive along the bottom.
Thanks for stopping by! Hope your new year is off to a great start!

Saturday, December 29, 2012

Thank You for your kindness

Hello! For those of you who didn't know, this year we moved away from all our family and friends  - about 1,000 miles away! So this year was our first Christmas on our own. Until the evening of Christmas Eve, we thought we would just be home by ourselves on Christmas Day - which would have been a bit strange since we both have a rather large family and have never spent that day away from them. But when we were at our church Christmas Eve service, another family invited us over to share Christmas Dinner with them. It was such an incredible gift - and a huge blessing! So I wanted to make a thank you card for them - to let them know how blessed and thankful we were for their kindness.
I got my color inspiration from this weeks Play Date Cafe challenge:


I started by pulling out some Paper from Basic Grey that seemed to go well with the challenge colors. Then I dusted off some older sets of Craft Secret stamps that I haven't used in forever!
I cut out a circle and lacy oval with some Spellbinder's Dies, and stamped and colored the image with my Copic Markers. Added some sparkly snow with Diamond Glaze and some fine glitter. 
The sentiment banner is hand trimmed, and I stamped those beautiful sentiment stamps from My Craft Spot using PTI ink in coordinating colors. 
Added a tiny Tim Holtz paper clip and some self adhesive pearls. 
Finished off by attaching the frame a little off center, trimming the edges, and adding some jute twine tied in a pretty bow.
Thanks for stopping by today! Hope you continue to have a wonderful weekend!

Wednesday, December 26, 2012

Papertrey December Blog Hop Challenge - White Inspiration

Good morning! I hope you all had a wonderful Christmas! I am joining in today for the first time with the Papertrey Ink December Blog Hop Challenge. Something about the challenge of white on white called out to me. I have to apologize for a picture heavy post though! I got on Pinterest to browse ideas...and boy did I end up inspired! I ended up making two cards for the challenge - so I will show you three of the pictures that helped inspire each one! (I have never posted a picture from Pinterest to my blog before, so if they don't link correctly, you can click HERE to go to my "white" board on Pinterest and find the proper credits) Anyway, here are the first three inspiring photos:


And from those, this is what I made:
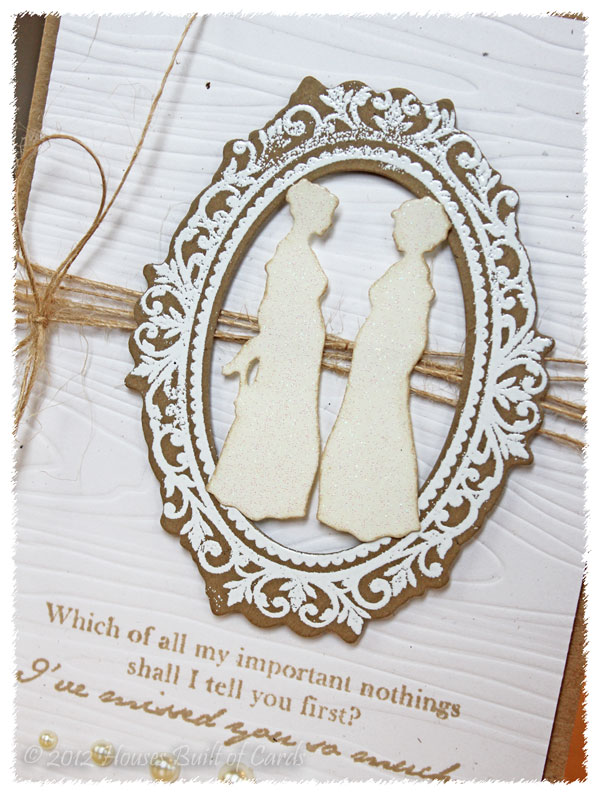
Can you see the frame, the texture, and the colors? I used the matching dies and stamps to create the frame, and heat embossed the white ornate part. 
Cut the silhouettes out of glitter paper, then inked the edges a bit with kraft ink. 
Used the Woodgrain Impression Plate on some rustic white PI cardstock for the background, then stamped the sentiment with kraft ink. 
Finished off by adding some jute twine, attaching the frame and silhouettes with foam adhesive, and adding a few self adhesive pearls.
Next up - here are my inspiration photos for my second card:


White just makes me think winter and snow - so this was a no brainer! Here is what I made:
The background is also Rustic White cardstock, and I used the Linen Impression Plate. I then used the Button Bit Dies, stamped the tree trunks with kraft ink, then added some PI buttons with a bit of jute twine.
Added some tiny dots of Diamond Glaze, then sprinkled with tinsel glitter. 
Made the snowbank by tearing a scrap of rustic white cardstock, then coating with Diamond Glaze and Tinsel glitter as well.
Finished off with some crinkle ribbon, jute twine, another pearl, and a sentiment with kraft ink, before matting on kraft paper on a white cardbase. 
Thanks for stopping by today! Make sure and check out the rest of the challenge participants and hop along! I'm sure it will be fabulous and fun!

Thursday, December 13, 2012

Growing in Unity Day 4 - Baby it's Cold Outside

Good morning! Hard to believe that it's Thursday already and the week is almost over! It is always kind of sad when a fun week like this comes to an end - but I have been having so much fun with my Unity Stamps this week! 

Here in Wyoming, I'm discovering it is a lot colder than it was this time of year in Washington! So wearing warm cozy clothes is essential. It is even better if they are still cute! So...here is what I made for today:
I used another cute Itty Bitty stamp:


I started out cutting a frame shape of pattern paper using a Spellbinder's Nestabilities Die. I then stamped and paper-pieced the image...and yes, there's glitter again! I can't seem to help myself right now!
After paper piecing, I used diamond glaze and Martha Stewart tinsel glitter again to bling it up a bit. I colored the belt a bit with Copic markers, then added Diamond Glaze and not glitter to the hearts and the belt.
I cut another frame shape, again with a Spellbinder's Die, to layer behind. (I'm not sure what all my papers are - they came out of a random clearance bin, and weren't labeled - I just know I liked them and thought they were pretty!) 
I tucked some crinkle ribbon behind and tied in a bow, then added some jute ribbon and a PTI button - in the picture it looks more red, but in real life I promise it is pink! I then attached the frame with the paper pieced image over the top with foam adhesive.
For the sentiment banner on the bottom, I cut a thin strip of paper, trimmed the edges into a banner shape, then double folded the sides to give it a bit of dimension. I stamped the sentiment with two different colors of PTI ink, then attached it with foam adhesive.
Once again - thanks so much for stopping by to see me today! As with the rest of the week - don't forget to leave me a comment for a chance to win two Unity Itty Bitty's! I will draw a winner after the week is over!

I am also linking this up with the Ribbon Carousel Holiday Spirit Challenge, and the Simon Says Stamp Challenge - Favorite Things (I used several of my favorite things on this - jute twine, crinkle ribbon, glitter, distress ink, one of my favorite color combos, Unity Stamps, Spellbinder's Dies, etc...)

Wednesday, December 12, 2012

Growing in Unity Day 3 - Sparkle and Shine

Good morning! And welcome to my third Growing in Unity Day!!! If you are just stopping by from the Unity Blog - welcome! So happy to have you visit! Don't forget to leave a comment before you leave for a chance to win 2 Unity Itty Bitty's of your choice! I will draw a winner at the end of the week.

Well, I know I warned you about the glitter yesterday, right? Well...now you can see why! Here is what I made to share today:
I was totally inspired for this card by this weeks Moxie Fab Tuesday Trigger (can you tell?):


I used a new Unity set that I absolutely ADORE right now! 


There are SOOOO many fun possibilities with this set! I decided to go glitz and glam all the way! 
I started by stamping and heat embossing the snowglobe in brown, then stamping and heat embossing the city skyline using PTI ink. Then, I added some rows of diamond glaze on the bottom, and coated them heavily with Martha Stewart tinsel glitter in gold and silver.  
Finally - I put a very light coat of diamond glaze over the glass part of the snowglobe, then lightly sprinkled with clear tinsel glitter. I used two layers of DCWV glitter paper, distressed on the edges with my Tim Holtz distress tool, then attached the snowglobe with foam adhesive so it stands out all on it's own. 
I added a row of silvery ribbon with some gold flecks in it that I had in my stash, a row of lace trim from Ribbon Carousel, and some jute twine with a pretty Crate paper button in the center. Finished off by stamping the sentiment on a tag and tucking it behind the bow with a bit of glue to hold it in place. 
Whew! That's a lot of glitter, huh? I think it might take all week to clean it all up in my house - but by then I will have added more anyway, right? Fortunately my daughters don't mind...and my poor husband puts up with it! 

Thanks again for stopping by! So glad you came to visit! Halfway through the week now - hope to see you back here tomorrow and Friday for my last two days of Growing in Unity!

Also linking this up to the Ribbon Carousel Holiday Spirit Challenge!

Tuesday, December 11, 2012

Growing in Unity Day 2 - Most Wonderful Time of the Year

Good morning! I'm excited to be sharing my second Growing in Unity day with you! Remember to leave a comment for a chance to win 2 Unity Itty Bitty's of your choice! I will draw a winner after the week is over!

I made two of my projects for the week yesterday - and went a little crazy on the glitter! This one actually isn't too bad - but wait until you see what I made for tomorrow! Total glittery overload! I think it has made its way to every corner of the house! Anyway - here is what I made to share with you today:
I love how sweet and whimsical this image is! It was a pure delight to color with my Copic markers! 
I stamped it on a circle cut with a Spellbinder's Nestabilities die, then colored it with Copics. Next, I applied some Diamond Glaze in several places, and sprinkled on some Martha Stewart tinsel glitter that I have been dying to try! 
The background doily was cut from DCWV glitter paper, also using a Spellbinder's die. 
I layered together a couple different papers from Webster's Pages, and the red polka dot paper in the background is from October Afternoon. 
Stamped the sentiment and hand trimmed my own tag, then used some crinkle ribbon and jute twine (I don't know if I can make a project without that stuff anymore), as well as a PTI button to attach it and add a pretty bow. The edges of each layer were also inked with Tim Holtz distress ink in Antique Linen (my fav!)
I hope you could see the sparkle at least a little bit on here! Just a reminder - don't forget to leave a comment so you have a chance to be my winner for the week! I look forward to seeing you again tomorrow! Have a great day!!!