Showing posts with label Pinkfresh Studios inks. Show all posts

Sunday, February 11, 2024

Seeing Stars - Pretty Pink Posh 10th Birthday Blog Hop Day 5

  Good morning! I'm so excited today to be joining Day 5 of the release blog hop for the 10th Birthday Pretty Pink Posh release. It's such a fun one, not surprisingly with a birthday theme - and I was super excited to play with all the cuteness included! Keep reading for more details on my cards, as well as hop and giveaway info at the bottom!


And since it's a birthday party, you know there have to be gifts, right? Use the code CELEBRATE10 to receive 10% off your order, and also check out the free gifts with qualifying orders:


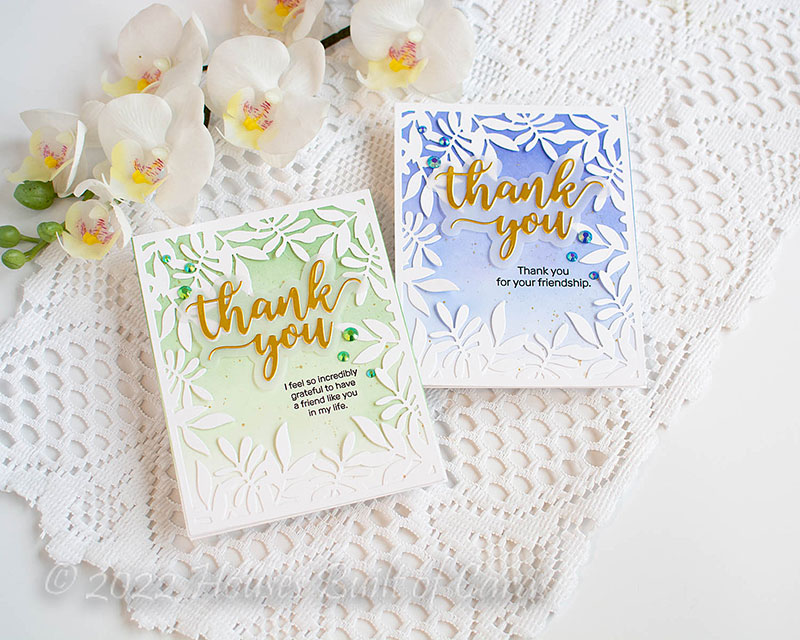
I made a couple of very similar cards for the January release, but using the heart version of these two dies. I loved how they came out so much that I decided to keep a similar template for these cards - and switch up the colors to be a tad more masculine. I cut the Star Cover Plate die from white carstock, and used the main part to create a window shaker, filled with the fun Bright Rainbow Clay Confetti, and backed with some pattern paper to set the confetti off. I added a sentiment over the top, heat embossed in white on black cardstock from the new Sentiment Strips: Birthday stamp set, and die cut it with the previously released Sentiment Strips dies. Then for the second card, I used the Pierced Stars Plate die for the background. I ink blended the stars from the previous card in blues and sage greens, alternating the colors from soft to deeper. I layered them down with a mix of liquid glue and foam adhesive for dimension, and added a good splatter of gold with my Starry Colors palette. Finished off with another of those sentiments, hand trimmed into a banner on this one. Here are some more photos of these two cards:


GIVEAWAY INFO:
Now the fun part - there are a total of 5 $30 Gift Certificates up for grabs - 1 for each day of the hop!!! Winners will be picked randomly along the blog hop. Make sure and leave comments by 11:59 PM PDT on February 16, 2024 to qualify! Winners will be announced after that on the Pretty Pink Posh Blog!


Product links are all below - including affiliate links where possible, which simply means that if you use one of the links below, I receive a small commission at no additional cost to you. Thanks so much for supporting my blog, and stopping by! Have a wonderful day!!!


Monday, October 30, 2023

Happy Christmas from the Woods - Simon Says Stamp Season of Wonder Release

 Good morning! I'm here with a couple more cards using some of the NEW Season of Wonder Release from Simon Says Stamp. For these cards I used a new 3D Embossing Folder, and a new word die!


I started off by embossing the new Textured Pine Trees folder on two different panels of colored cardstock - Soft Navy, and Lavender. I then brushed directly over the surface the new Calico White ink pad from Pinkfresh Studio - this highlighted the raised areas, and in some spots smooshed down a bit more to add a bit of white even on the background. I love the perfect snowy effect! I trimmed a bit off the side of each panel, then mounted on white cardbases, leaving a small white border along each side. I die cut the Happy Christmas die, using vellum for the shadow layer, and white cardstock for the main words. Those were layered together and onto the card with liquid glue. Finally, a few Ombre Glitter drops from Pinkfresh Studio add a touch of needed sparkle - and provide an alternate dot on the "i" in Christmas! Here are some more photos of the finished cards:


Product links are all below - including affiliate links where possible, which simply means if you use one of the links below that I receive a small commission at no additional cost to you. Thanks so much for stopping by! Have a wonderful day!!!


Friday, September 30, 2022

Leafy Thank You Cards - Simon Says Stamp

Good morning! When you visit a crafty friend, it is sometimes fun to raid their stash and create cards with supplies you might not normally have to play with! When I was visiting Lea in Minnesota, we went to a crafty retreat, and while I brought just a few things with me, I was mostly packing from her supplies to bring for the weekend. I decided to raid some of her Simon Says Stamp sets to play with - and these cards were the result of part of that weekend of playing! 


As you may have noticed, I am of the opinion that if possible, you should always make more than one card - especially when you can't decide what color combo you want to use! Then you get to use both options! :)


Since I didn't pack all my Simon Says Stamp inks for this trip, I used some Pinkfresh inks that Lea had to blend my backgrounds. For this first one, I used Sapphire first, then added a bit of Stargazer, because it felt like it needed a bit more color.


For this second one, I just used one color - Evergreen. Even though these were deep colors, you can get a soft look just by gently blending bit by bit to build up color - and keeping from heavy ink or blending lines. Once I had backgrounds blended, I added some gold splatters using someone else Starry Colors palette that they loaned me (thanks Brenda!).


Once that dried, I added the Leafy Frames die, cut from white cardstock. I also used the Thank You Script, die cutting the shadow layer from vellum, and the top layer from gold cardstock. To add dimension - I also die cut it twice from white cardstock to adhere behind the stacked layers - and sneaky way to add dimension, without having to cut tons of tiny foam tape strips - haha! I finished off with some coordinating jewels, and these cards are done!


Product links are all below - including affiliate links where possible, which simply means if you use one of the links below that I receive a small commission at no additional cost to you. Thanks so much for stopping by! Have a wonderful day!!!


Wednesday, May 11, 2022

Blue Arches Grad Card - Simon Says Stamp Yay You Release

  Good morning! I'm stopping by with my first card using the newest release from Simon Says Stamp - Yay You! It's definitely graduation season, and I paired a few new items from this release with a couple of older items to create this grad card!


I started off by creating the arch backdrop. I used a favorite new background stamp from the release called Arches Background, heat embossed in gold on white cardstock. Then, I layered up the new Domed Arches stencil over the top, and starting with the largest and working down, I kept adding deeper color in one shade of blue ink.


Once that was done, I just used scissors to fussy cut out the arch around the stencil lines, and could then pop that up with foam on my white cardbase!


For the large sentiment, I used the new You Did It wafer die. I die cut the shadow layer from white cardstock, and then the main words once from black cardstock, and an additional two times from white cardstock to layer up for dimension. Once I adhered all the layers together, I mounted it with foam adhesive on my background as well!


To finish off, I tucked the little graduation cap from the previously released Cap and Gown wafer dies into the top of the sentiment, and then added a secondary sentiment from the previously released Class Act stamp set. Finally, added a few coordinating Pinkfresh jewels for sparkle!


Product links are all below - including affiliate links where possible, which simply means if you use one of the links below that I receive a small commission at no additional cost to you. Thanks so much for stopping by! Have a wonderful day!!!


Friday, April 8, 2022

Potted Plant Sympathy Cards Part 2 - Simon Says Stamp

  Good morning! I'm stopping by this morning to share a couple more cards using a fairly recent release from Simon Says Stamp that I finally had a chance to use - and I fell in LOVE with it! So easy and versatile - and perfect for mass producing! It is called Printmaking Plants - and the name is fitting for how I put it to use! I shared a couple other cards last week with a different color combo (you can see them HERE) - these use a cooler color combo, and some different sentiments from the same sentiment set.


I needed to build up my stash of sympathy cards - those ones you don't ever want to use, but are grateful to have on hand when you need them. I actually stamped out a total of 3 of each of these 2 designs - and 3 each of 2 more in a different color combo that I shared last week (see HERE). So in a short amount of time, I had a total of 12 sympathy cards for my stash - just because I was able to stamp each layer repeatedly, and so easily!


First, I stamped the black outline on 3 panels of white cardstock. These I used as a baseline to line up each of the solid fill-in images in my MISTI, and stamped on all 3 of the cards with the black outline.


Before I removed each layer from the MISTI, I then stamped 3 more times with the same color on more white panels of the same size. As this went along, it built up the layers to create a different look - sort of a not line coloring effect!


Once all the layers were added, I stamped sentiments under the complete images using an older set - but one of my favorites for sympathy cards - Moments of Grace. So many great sentiments, and I love the fonts as well.


To assure everything was lined up perfectly, I used Basic Rectangles dies to cut the panels down to size. They could easily be trimmed down with a paper trimmer, I just preferred to die cut them out so they would be just right.


Since these were sympathy cards, I generally prefer to keep them simple, without too many embellishments, so I refrained from adding any bling or sparkle. Adding texture and interest with white cardstock however is perfect! I added a simple mat of white cardstock around those die cut panels, then mounted those up with foam adhesive on a white cardbase - an extra, and perhaps not necessary step, but love the added texture and dimension! 


Product links are all below - including affiliate links where possible, which simply means that if you use one of the links below, I receive a small commission at no additional cost to you. Thanks so much for supporting my blog, and stopping by! Have a wonderful day!!!


Thursday, March 31, 2022

Potted Plant Sympathy Cards - Simon Says Stamp

 Good morning! I'm stopping by this morning to share a couple cards using a fairly recent release from Simon Says Stamp that I finally had a chance to use - and I fell in LOVE with it! So easy and versatile - and perfect for mass producing! It is called Printmaking Plants - and the name is fitting for how I put it to use!


I needed to build up my stash of sympathy cards - those ones you don't ever want to use, but are grateful to have on hand when you need them. I actually stamped out a total of 3 of each of these 2 designs - and then did 3 each of 2 more in a different color combo that I will share soon. So in a short amount of time, I had a total of 12 sympathy cards for my stash - just because I was able to stamp each layer repeatedly, and so easily!


First, I stamped the black outline on 3 panels of white cardstock. These I used as a baseline to line up each of the solid fill-in images in my MISTI, and stamped on all 3 of the cards with the black outline.


Before I removed each layer from the MISTI, I then stamped 3 more times with the same color on more white panels of the same size. As this went along, it built up the layers to create a different look - sort of a not line coloring effect!


Once all the layers were added, I stamped sentiments under the complete images using an older set - but one of my favorites for sympathy cards - Moments of Grace. So many great sentiments, and I love the fonts as well.


To assure everything was lined up perfectly, I used Basic Rectangles dies to cut the panels down to size. They could easily be trimmed down with a paper trimmer, I just preferred to die cut them out so they would be just right.


Since these were sympathy cards, I generally prefer to keep them simple, without too many embellishments, so I refrained from adding any bling or sparkle. Adding texture and interest with white cardstock however is perfect! I added a simple mat of white cardstock around those die cut panels, then mounted those up with foam adhesive on a white cardbase - an extra, and perhaps not necessary step, but love the added texture and dimension! 


Product links are all below - including affiliate links where possible, which simply means that if you use one of the links below, I receive a small commission at no additional cost to you. Thanks so much for supporting my blog, and stopping by! Have a wonderful day!!!