Tuesday, January 17, 2012

Birthday Card!


Just a quick post to share a birthday card I made this last weekend for a friend's 30th birthday! 
Pulled out my Unity May 2011 Kit of the month for the cake, and the "party" sentiment. Stamped the sentiment several times to get the background, then colored in one of the words to make it "pop."
The cake is also colored with Copics, the corners rounded with my Martha Stewart Corner rounder, then all edges inked with Tim Holtz distress ink. Background paper is from Echo Park. 
Finished off with some Baker's twine! Thanks so much for visiting! Sorry for the quick post this morning, but it is SNOWING!!! And that doesn't happen here very often, so I have some very excited little girls!!! I have a picture of them over HERE on my Project 365 photography blog that I started this year, if you are interested!!!

Have a great day!!!

Saturday, January 14, 2012

Ippity Card for Ippity Chick Challenge

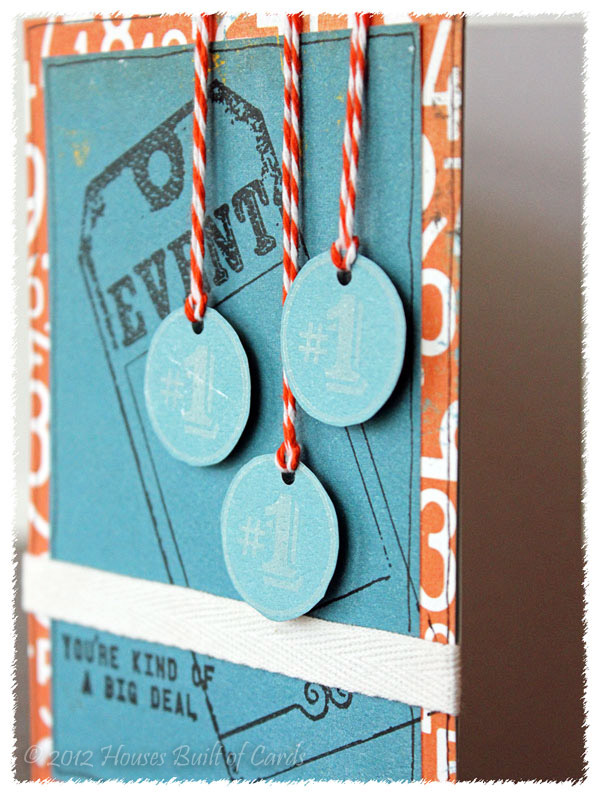
Happy Saturday! The other night I had a few minutes to play along (finally!) with this weeks Chick Challenge (with Ippity) - here is what I came up with:
And here is the sketch:


 I used the Ippity set "The Best" and stamped the #1 circles in Papertrey Ink's white ink (which as I said one other time is DEFINATELY the best, or maybe only, white ink I have been happy with! It stamps beautifully!) and cut them out by hand.
I love the big "event" stamp that I used for the background. The sentiment is also from this set. 
The paper is all from one of Authentique's 6x6 Free Bird paper pads. I strung the circles on some Baker's Twine, and pop-dotted them from the background, so they looked a little like medals (at least that was the goal!).
Finished off with some ribbon from my stash, and some doodling around the edges. 
That's it for today! Hope you are all having a great day!


Friday, January 13, 2012

Peachy Keen Link-Up Party!!!

Good morning!!! It's linky party time at Peachy Keen Stamps! They are easing back into the challenge routine by starting off with the opportunity for you to link up whatever you have recently been working on with your Peachy stamps! Today I am sharing some inspiration from the new Peachy Kit of the Month for January! LOVE it! Here is what I made:
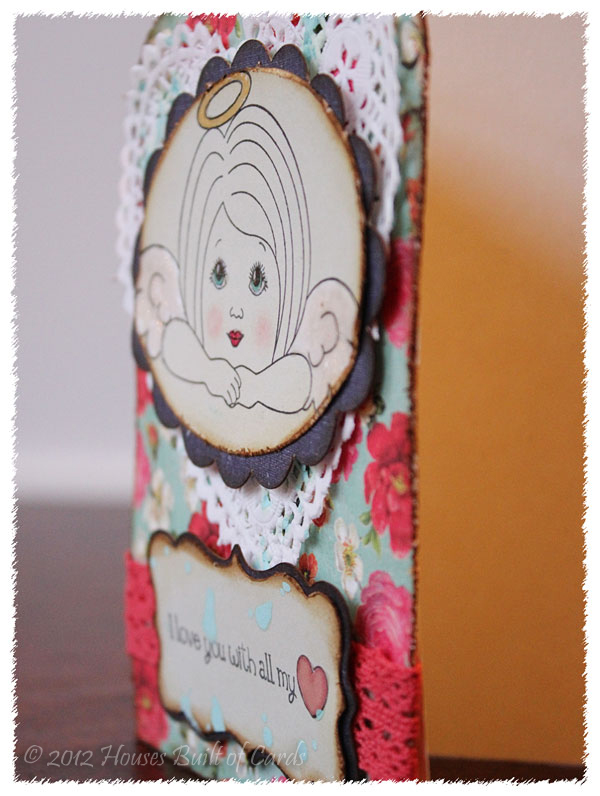
(And I just have to point out the wonderful watermark that my sweet husband made for me! I'm so excited!) Anyway, I stamped the sweet little cherub from the kit on some light gray paper from Crate Paper's "Random" 6x6 paper pad. Used some Copics to color in just the eyes, lips, cheeks, and halo, and a white gel pen to color the wings. Then topped the halo and wings with Glossy Accents. The oval and background was cut on my Cricut using Elegant Edges,
The sentiment is also from this kit, and the frame shape on that was cut from Theresa Collins Sophisticated cartridge. I also colored the heart with Copics, and covered it with Glossy Accents. The trim behind it is from the October Afternoon trim pack with the Holiday Style Collection. 
The edges of everything were distressed with my Tim Holtz distress tool, and inked heavily with Time Holtz distress ink. I found the cute little heart-shaped doily at Michaels the other day and just HAD to get a pack of those! I splashed a little October Afternoon Sprinklers on the doily, and on the sentiment frame to make it look a little more vintage.
The framed image, and sentiment frame, are both pop-dotted from the card for some dimension. You can see it a little better here: 
And there you go! My little vintage cherub Valentine card!!! I LOVE how it came out!!! 

So here is the Kit I used - you can check it out by clicking the link under it to go to the Peachy Keen website:


Now make sure and head over to the Peachy Keen Challenge Blog to link-up your creation! Can't wait to see what you come up with!!!!


Friends with Flair - Bright Butterflies!

Good Friday Morning! It's time for Unity Friends with Flair - I have been busy lately, so I was excited to play along this time! Here is my card:
For the background paper, I stamped the butterfly image in versamark ink, embossed with clear powder, then colored in stripes over the top using a ruler and my Copic markers. The embossing resists the ink, so you can still see the butterflies! 
I then stamped the sentiment right over the copics, matted it on black paper, then adhered it to the card base. 
Finished off by stamping, coloring, and fussy cutting out another butterfly, then glueing just the center to the card, and curling up the wings a bit. 
I had submitted this to the PaperCrafts Magazine's last submission call - but no luck! I plan to keep trying, and one of these days, well, you never know! In the meantime - make sure and head over to the Unity Stamp Company Blog to get the details on how to join in with Friends with Flair and win some prizes!!!

Thursday, January 12, 2012

Birthday Party Invites with a Friend!

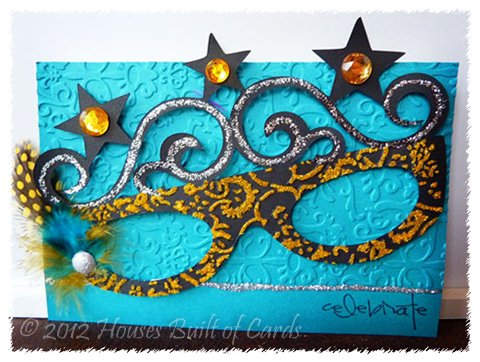
Okay - let me just start with a big disclaimer! I am posting these, but I only helped out a friend - she did the majority of the work, but doesn't have a blog or anything, so she said I could share them here! Just wanted to make it very clear that I helped with the initial design, but she did the final decorating on them - and didn't they come out amazing!?!?!?!? She is having a Mardi Gras style masquerade party for her 30th birthday, and these are the invitations - we made 100 of them!
We used a cut off of Life's a Party, and did a little trimming on each one with scissors to make them look like masks instead of glassees. Used the Cuttlebug to emboss both the card and the bottom of the glasses, then added a sentiment from Pink by Design. On the embossed part of the glasses, she ran a glue pen over the raised edges and sprinkled it with superfine glitter (this is the part I didn't have to help on, and I'm strangely relieved by that!) - then finished off with glitter glue, rhinestones, and feathers. Here is a close up of all the colors:


Thanks for stopping by! And feel free to let me know what you think! I will pass it on to my friend!!!

I am also linking this up with She's a Sassy Lady's Multiple Card Challenge.


Wednesday, January 11, 2012

Another Peachy Keen Angel - Valentines!

Good afternoon! This year sure has been funny! I always used to be an early AM blogger - lately I have been doing it later in the morning, in the afternoon, and sometimes in the evening! Trying to get back into a routine homeschooling - it has been a rough start! My girlies just aren't that excited to be doing their studies, and stretch it out FAR longer than it needs to be!

Anyway - here is another card I made with one of the adorable angels in the new Peachy Keen January Kit of the Month:
I used some My Minds Eye papers, and kraft paper - inked all the edges with Tim Holtz distress ink. 
Here is a close up of the little angel. I stamped her on kraft paper, colored with copics, and added some doodles with my white gel pen. Couldn't resist giving her blue eye shadow!!! 
The Baker's Twine I wanted to use was too white for this card, so I colored over it with a copic marker to give it a little more vintage look. Wrapped it aro und, tied a bow with it, then added a button from Papertrey ink tied on with some Papertrey Ink Button twine. 
And there you go! I LOVE how versatile these images are! So what are you waiting for?!?!?! I promise you will LOVE these stamps!!!
Here is a picture of the set I used - click on the link to go check it out if you're interested! Bye for now!


Tuesday, January 10, 2012

MFT Getting Sketchy #53

Good Afternoon! Just popping in real quickly with a card I made for the My Favorite Things Getting Sketch Challenge #53 (Oops...missed the deadline - it was at noon! Should have uploaded it this morning!). You can find the info HERE. Here is my take, using one of the Pure Innocence line:
And here is the sketch:


I used my Creative Memories circle cutter (that I have had forever!) to cut all the circles, stamped the image, colored her with copics, and inked the edges of everything with Tim Holtz distress ink in Antique Linen and Vintage Photo.
All paper is My Minds Eye, except the kraft cardstock which is Recollections, the banner on the bottom is handcut, and I put a bit of Baker's twine on it. I colored on the twine with a copic to tone down the white and make it a little more vintage looking. 
Thanks for stopping by! Have a great week!