Monday, April 30, 2018

Rainbow Dye Ink Heat Embossing - on the Unity Blog

Good morning! I also have this bright and happy little number on the Unity Stamp Company Blog this morning with a video showing how I heat embossed these sentiments with dye inks! You can check out that post HERE!


Thanks for swinging by! Have a great day!!!

Dimensional Butterfly Cards on the Pretty Pink Posh Blog

Good morning! I have 3 little cards on the Pretty Pink Posh Blog this morning featuring some fun dimensional techniques with butterflies - and some of the amazing new upcoming release! You can check it out HERE!


Thanks for stopping by! Have a fabulous day!!!

Technique Tuesday Countdown Day 2 - Attractive Sir and Congrats Grad

Good morning! Welcome to Countdown Day 2 for the May Release from Technique Tuesday! I had so much fun playing this release! Make sure and check out the Technique Tuesday Blog to find links to all the Design Team's projects for today!


Again today - I have TWO cards to share! First up - this hilarious little sentiment from Sassy Guy Stamp Set just called out to me to go on a card!


As this is a great guy card, I kept it very clean and simple! I started off with a circle of cardstock cut with Circles Crafting Dies and stamped my little image and sentiment on that. I added wiggly eyes to the glasses - because who could resist?!?!?!?


I added some scored lines to the cardbase for some texture, and some simple black splatters for interest, then mounted the circle with foam adhesive. BAM! Done!


And of course this time of year you can't have too many graduation cards! The new Congrats Grad stamp set is perfect for this!


I again used Circles Crafting Dies, only this time I cut three windows out of a panel of white cardstock. I added distress ink in a few colors behind the windows. I used my MISTI to line up and stamp my sentient, laying the front panel on the front of the card, stamping the sentiment, then removing and restamping so that it was clear on both layers and could be lined up and adhered together.


I stamped and fussy cut several of the images from the stamp set and adhered them with foam adhesive on the front of the card. I was going to stop here, but felt it needed just a touch more - so I grabbed a ruler and black pen and added the outline to the top layer. 


Product links are all below - including affiliate links where possible, which simply means if you use one of the links below that I receive a small commission at no additional cost to you. Thanks so much for stopping by! Have a wonderful day!!!


Sunday, April 29, 2018

Technique Tuesday Countdown Day 1 - Lilacs and Nails

Good morning! So excited to begin sharing my cards for the May Release from Technique Tuesday! Woohoo!!! This release has a lovely floral, a fun new addition to the barnyard, and LOTS of great guy sets! Make sure and check out the Technique Tuesday Blog to find links to all the Design Team's projects for today!


I have not one, but TWO cards to share today! First up, featuring the lovely new Lilac Stamps to create a Mother's Day card (a holiday which is coming up VERY quickly!):


I love the detail in this gorgeous new stamp. I colored it up with Copics, added some white gel pen accents, and added on the "mom"from last month's Flowers for Her Stamp Set.


I layered some paper together, tied some jute string to the top, and finished off with a few decorative jewels in a coordinating purple color!


And for my second card - I went totally masculine using the new What a Guy Stamp Set!


We say this so often in our house - usually in a tone of full sarcasm to say that we totally failed! So of course I couldn't wait to use this one! I stamped the sentiment, then filled in the nails above and below.


Colored with Copic markers nice and simple, and then covered each nail with Tonic Crystal Glaze for some nice shine. Hard to see in the photos - but TOTALLY fun in real life I promise!


Product links are all below - including affiliate links where possible, which simply means if you use one of the links below that I receive a small commission at no additional cost to you. Thanks so much for stopping by! Have a wonderful day!!!


Friday, April 27, 2018

Patriotic Birthday Card with Simon Says Stamp

Good morning! Dropping by with a look at a birthday card I made recently for a special request for a friend. Guy cards are always the HARDEST - but this one came together pretty well with the theme request she gave me of the American Flag. I went a little abstract, but ran with that theme, and this is what I came up with using a variety of Simon Says Stamp and Tim Holtz products:


I started off with some kraft cardstock and my Tim Holtz Rays Layering Stencil with Fired Brick Distress Oxide Ink. Over the top of that, I added some stars using Simon Says Stamp Falling Stars Stencil and some Faded Jeans Distress Oxide Ink. I added so distress ink blending around the edges for a more vintage feel using Antique Linen and Vintage Photo. Finished off with a good splatter of white paint over the top, and set that panel aside to dry.


Next, I used the Simon Says Stamp You Wafer Die to die cut the big you out of white cardstock, then heat embossed a coordinating sentiment from Simon Says Stamp You Matter Stamp Set on a strip of black cardstock. Adhered those on my finished panel, then adhered the entire thing on a kraft cardbase!


And also linking up with this week's Simon Says Stamp Monday Challenge - Anything Goes:


Product links are all below - including affiliate links where possible, which simply means if you use one of the links below that I receive a small commission at no additional cost to you. Thanks so much for stopping by! Have a wonderful day!!!


Wednesday, April 25, 2018

Basketweave Background on the Reverse Confetti Blog

Good morning! Stopping by with a peek at a couple cards that I have a post and video tutorial for up on the Reverse Confetti Blog today for this week's edition of Wednesday in the Works. I had fun creating this awesome basketweave background for my cards - go check out the details HERE!


Thanks so much for stopping by! Have a wonderful day!!!

Tuesday, April 24, 2018

LID April Release Day 3 - Sentiment Focus

Hello! Welcome for the 3rd and final day of the the BRAND NEW April release hop at Lil' Inker Designs! There are a ton of fun new stamps and dies to share! You can find the entire new release HERE!


You should have arrived here from Chrissy Larson - if you stopped by here you can refer to the entire blog hop at the bottom so you don't miss a stop or a chance to win the amazing giveaway. I also have links to all the new products I used on today's cards! Today I'm rounding out a bit more of the release that I haven't shared yet!


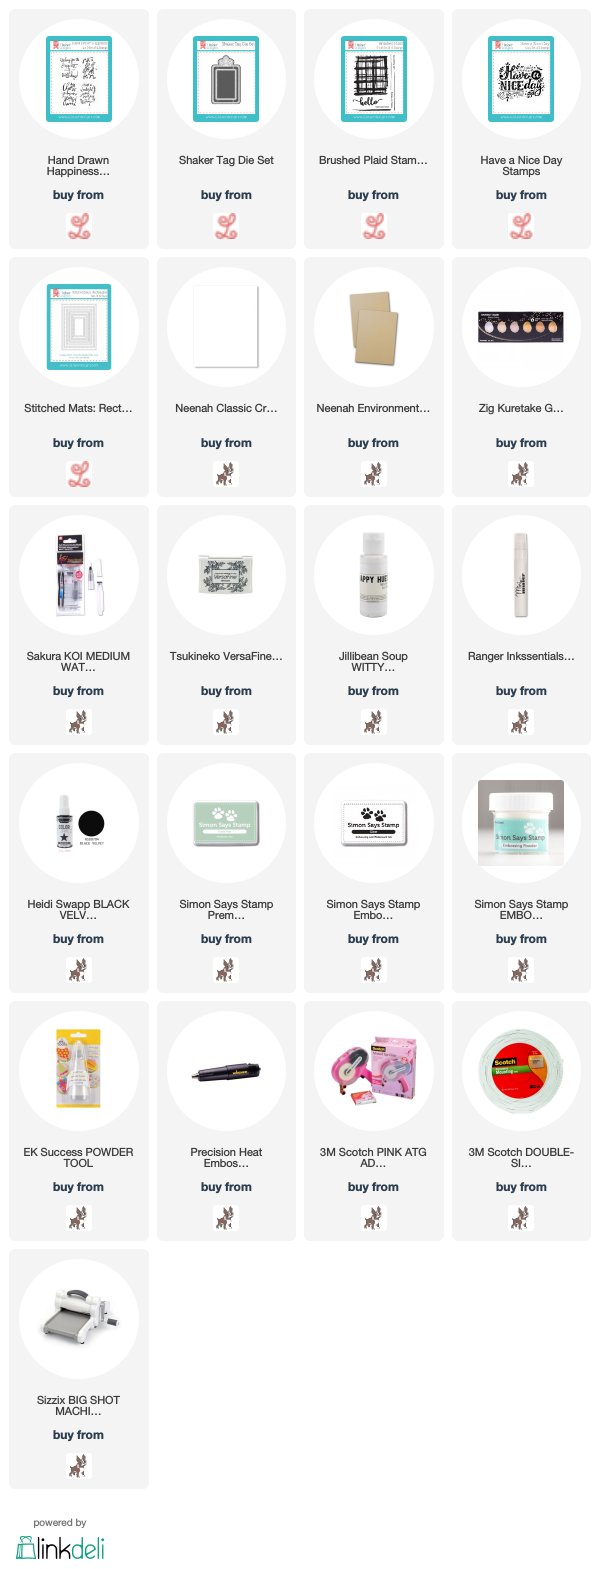
For this one I used the new Hand Drawn Happiness Stamp Set - LOVE the sentiments in this one! I stamped my sentiment from this set on a rectangle cut with the inside of the Shaker Tag Die Set - love when I die can be used more than one way!


This first card actually works really well for even a guy card! I had fun creating the background by adding splatters on kraft paper with white paint, gold watercolors, and black ink mist. I didn't let them dry in between, so it kind of gave a fun effect where they mixed together!


My second card today features a couple of my favorite things from this release!


First off, that gorgeous background which is part of the Brushed Plaid Stamp Set! I stamped it with a soft green ink on a panel of white cardstock, then stamped the gorgeous Have a Nice Day Stamp set over the top in black pigment ink, then heat embossed it with clear powder for a nice shine.


Finished off by trimming that panel down, mounting over a thin white frame, then mounting onto a kraft cardbase on which I used the largest Stitched Rectangle Die. Nice and flat and one layer - but I love how detailed that stamp set is!


Your next stop along the blog hop is Jennifer Carter - head over there next to finish the hop before you go shopping. See you tomorrow with more projects and fun!

Now...how would you like to win the ENTIRE new release?!?!?!? WOW - some lucky winner is going to be VERY happy! Make sure and leave a comment here before hopping along to the next stop - and leave comments at each stop for a chance to win!


Here is the entire Blog Hop line-up - make sure and check out each stop and leave your comments:

Heather Hoffman (you are HERE)

Product links are all below - including affiliate links where possible, which simply means if you use one of the links below that I receive a small commission at no additional cost to you. Thanks so much for stopping by! Have a wonderful day!!!


Monday, April 23, 2018

LID April Release Day 2 - Mother's Day Cards

Hello! Welcome back to Day 2 of the the BRAND NEW April release hop at Lil' Inker Designs! There are a ton of fun new stamps and dies to share! You can find the entire new release HERE!


You should have arrived here from Chrissy Larson - if you stopped by here you can refer to the entire blog hop at the bottom so you don't miss a stop or a chance to win the amazing giveaway. I also have links to all the new products I used on today's cards! Today I have a couple of Mother's Day Cards to share with you!


For my first card, I used the brand new Spring Wreath Die set - full of gloriously intricate and beautiful wreath die cuts! I die cut all 3 from white cardstock, and used them all on my card here!


Tucked a little banner die cut using One Love Die Set with a heat embossed sentiment from Best Mom Stamp Set under the side, and tied some jute string in a bow. Pattern paper is from Crate Paper, and I also used Cover Up: Stitched Quatrefoil for the cardbase for a bit of extra texture.


Next up, a softer colored Mother's Day Card!


For this one I stamped a floral background using the images in Best Mom Stamp Set in soft colors. I then stamped my sentiment over the top from the same stamp set in black ink. I die cut that panel down with a Stitched Rectangle Die, and tied some twine around the panel.


I also used the new Cover Up Die: Dotted Chevrons for this card - die cut from white, trimmed slightly smaller than an A2 card, and layered over a pink cardbase. Over this I mounted the front panel with foam adhesive.


Your next stop along the blog hop is Jennifer Carter - head over there next to finish the hop before you go shopping. See you tomorrow with more projects and fun!

Now...how would you like to win the ENTIRE new release?!?!?!? WOW - some lucky winner is going to be VERY happy! Make sure and leave a comment here before hopping along to the next stop - and leave comments at each stop for a chance to win!


Here is the entire Blog Hop line-up - make sure and check out each stop and leave your comments:

Heather Hoffman (you are HERE)

Product links are all below - including affiliate links where possible, which simply means if you use one of the links below that I receive a small commission at no additional cost to you. Thanks so much for stopping by! Have a wonderful day!!!


Colored Dimensional Dots - on the Unity Blog

Good morning! Dropping by with a quick peek at a post I have on the Unity Stamp Company Blog today sharing how I used Copic Markers and clear dimensional glaze to create these fun colored dots on this card! You can check it out HERE with a video sharing my process!


Thanks so much for stopping by - have a wonderful day!

Sunday, April 22, 2018

LID April Release Day 1 - No Borders

Hello! The day is finally here to start sharing projects with the BRAND NEW April release at Lil' Inker Designs! There are a ton of fun new stamps and dies to share! You can find the entire new release HERE!


You should have arrived here from Chrissy Larson - if you stopped by here you can refer to the entire blog hop at the bottom so you don't miss a stop or a chance to win the amazing giveaway. I also have links to all the new products I used on today's cards!


My first card I used the new One Love Stamp Set - it makes me want to add John 3:16 over the top of it - love the heart shaped earth! For this first card, I stamped and heat embossed it with clear embossing powder on watercolor paper, then added a wash of watercolors over the top in two different colors.


Once that dried, I tore the edges for some texture and mounted it on a white cardbase. Sentiment is heat embossed on a strip of black cardstock, and a few clear droplets are the final finishing touch!


Next up - I thought this sentiment was a PERFECT fit for this image to turn it into a graduation card!


For this card, I used two different colors of Fresh Inks to do a bit of ombre blending on the image. I used my MISTI to keep it lined up, and stamped several times for a nice solid impression and good blending between the colors.


 I then stamped my sentiment and stars from Grad Class (a previous release) and added the year with the new Grad Class 2018 Supplement. (These are on sale together for a bundle price - or if you bought the Grad Class set last year, you can purchase just the Supplement to bring it up to date for this year!). 


Your next stop along the blog hop is Jennifer Carter - head over there next to finish the hop before you go shopping. See you tomorrow with more projects and fun!

Now...how would you like to win the ENTIRE new release?!?!?!? WOW - some lucky winner is going to be VERY happy! Make sure and leave a comment here before hopping along to the next stop - and leave comments at each stop for a chance to win!


Here is the entire Blog Hop line-up - make sure and check out each stop and leave your comments:

Heather Hoffman (you are HERE)

Product links are all below - including affiliate links where possible, which simply means if you use one of the links below that I receive a small commission at no additional cost to you. Thanks so much for stopping by! Have a wonderful day!!!