Saturday, February 27, 2021

Happy Narwhal - Simon Says Stamp Hello Beautiful Release Blog Hop

 Good morning! Excited today to be joining in on Day 2 of an epic blog hop to celebrate the BRAND NEW Hello Beautiful Release from Simon Says Stamp! Make sure and check out all the inspiration with this new release AND link up your creations as you receive your orders HERE in the Gallery created just for this release! And check out the graphic below to receive a FREE Rose Trio 6x6 Stencil with the coupon code below through February 28, 2021 as well - while supplies last (code expires at 11:59 PM EDT)!!!


I'm sharing a cute little trio of mini cards (perfectly sized for a 4 Bar sized envelope!) featuring the super adorable Narwhal Friends stamp set, and a fun new die set called Chunky A2 Scalloped Rectangles!


I started off by die cutting one of the medium size scallop rectangles - then using a panel of white cardstock to cut a window one size down to use as a mask for my ink blending. I then ink blended in two different colors of Distress Oxide inks to create a fun panel - adding some Perfect Pearls splatters before removing the mask to reveal the stenciled panels. For this purple one I used Milled Lavender and Wilted Violet.


For each card, I then stamped and very carefully fussy cut out the images - they could also be used with their coordinating dies, but I wanted to have no border around the outline of my images. I also added a tiny bit of color to the cheese using a soft pink Copic marker - otherwise leaving the images black and white. I was going to color them in originally - but I ended up liking them black and white with the pop of color on the ink blending! For this pink version I used Spun Sugar and the new Kitsch Flamingo distress oxides.


Finally, I stamped sentiments over the ink blended panels, as well as some additional elements on some of them, and popped those cute narwhals up on foam adhesive on the backgrounds. This blue version uses a blend of Tumbled Glass and Mermaid Lagoon distress oxide inks.


Finally, I mounted each panel on card bases created from complimentary colors of Simon Says Stamp colored cardstock, and then used some sparkly clear Nuvo drops on the horns, bubbles, and stars - all to give a touch of extra sparkle and shine!


GIVEAWAY INFO:
Simon Says will be giving a $25 gift certificate to their online store at each stop along the hop - so make sure and leave a comment before you leave for a chance to win! Winners will be announced next Wednesday on the Simon Says Stamp Blog.

Simon Says Stamp Blog   

Laura Bassen

Debby Hughes

Amanda Korotkova

Bibi Cameron

Heather Hoffman (you are here)

Yoonsun Hur

Bobbi Lemanski

Emma Williams

Vicky Papaioannou

Dilay Nacar

Kim Hamilton

Natasha Vacca

Kath Stewart

Mandy Stacey

Product links are all below - including affiliate links where possible, which simply means that if you use one of the links below, I receive a small commission at no additional cost to you. Thanks so much for supporting my blog, and stopping by! Have a wonderful day!!!


Thursday, February 25, 2021

Blooming Meadow Birthday - Simon Says Stamp Hello Beautiful Release

Good morning! I'm a day or two later than I planned - but wanted to pop in with my first card using some of the brand new Simon Says Stamp Hello Beautiful Release! Check back on Saturday when I'm also participating in Day 2 of the new release blog hop, and will have more fun to share with you then!

Today I'm using the gorgeous new Blooming Meadow stamp set! This gorgeous set has lovely florals and leaves in an outline form, and then coordinating solid layers to essentially add color to each piece with stamping! The images in this set remind me of a dogwood tree we had at one of our previous houses - it was always gorgeous when it bloomed! So I chose my colors to reflect that tree.


I don't have the coordinating dies, and didn't want to fussy cut, so I just stamped out a lovely one layer pattern on a corner of a panel of white cardstock to create my card. I used my MISTI and two colors of ink with the "rock and roll" technique to add color to the flowers and leaves. Basically, stamp each solid piece with a light color of ink, then partially ink up the same stamp with a darker shade and stamp again for some shading and shadow effects. Colors are linked below if you're interested!


I mounted that panel with foam adhesive on an Ivory cardbase, then added a sentiment using CZ Design Sentiment Strips Reverse Birthday - popped up on foam as well.


Finishing touch for a bit of sparkle and texture is a few Clear Sequins from Pretty Pink Posh, tucked around the sentiment.


Product links are all below - including affiliate links where possible, which simply means that if you use one of the links below, I receive a small commission at no additional cost to you. Thanks so much for supporting my blog, and stopping by! Have a wonderful day!!!


Tuesday, February 23, 2021

Thinking of You Leaves - Simon Says Stamp

 Good morning! Last week I shared a card using new distress ink color - Kitsch Flamingo - today I'm sharing another card and pairing some different distress inks with the new color, all paired up with some stamps and dies from Simon Says Stamp!

The color combo I used for last week's card (you can see that one HERE) was bright and pink and girly - for this card I paired it up with some different colors to see how it played with some deeper red tones. I started off with the Kitsch Flamingo at the top, then moved to Festive Berries and Aged Mahogany - but keeping the ink blending from getting too dark and crazy on those. As before, I also added some splatters with Perfect Pearls, and the deepest shade of distress ink - this time Aged Mahogany.


I added a die cut leaf using Leafy Branch, and die cut it from black cardstock for a bold silhoutte look, then layered it with another sentiment from Just Because Word Mix 2, die cut with the coordinating dies.


Finished off mounting that panel with foam adhesive on a white cardbase, then added a sprinkle of sparkly jewels to finish it off!


Product links are all below - including affiliate links where possible, which simply means that if you use one of the links below, I receive a small commission at no additional cost to you. Thanks so much for supporting my blog, and stopping by! Have a wonderful day!!!


Monday, February 22, 2021

Slimline Layered Rain Scene - on the Unity Stamp Company Blog

 Good morning! I'm back with another card for my series on the Unity Stamp Company Blog this morning! I'm so excited to be featuring the amazing Kit of the Month on Monday's on the Unity Stamp Company Blog! Since the Kit of the Month was the first thing I purchased from Unity, and what got me hooked to begin with, they hold a special place in my heart, so I'm super excited about this opportunity to give these kits some love! You can check out all the details HERE for today's project!


Thanks for stopping by today - have a WONDERFUL day!!!


Saturday, February 20, 2021

A Little Flamingo Note - Simon Says Stamp

 Good morning! I finally had a chance to break out my new distress ink color - Kitsch Flamingo - and some stamps and dies from Simon Says Stamp to create a this bright and happy card to share!


I wanted to start off by playing with this new color alongside some other distress ink colors - this was my first color combo, and I have another one that I love as well (I'll share that card sometime next week - stay tuned!). For this one, I used Kitsch Flamingo, Picked Raspberry, and Wilted Violet - in that order. I also added some splatters with Perfect Pearls and the Wilted Violet - smooshed onto a clear block , picked up with a wet brush, and splashed on the panel.


Sentiment was from the clever Just Because Word Mix 2 - you basically stamp a bunch of sentiments all at once, and then die cut them all in one piece. So perfect! I paired it up with (what else with this new color?!?) a Flamingo die cut. I die cut it twice from white cardstock to layer together for dimension, then once from black cardstock to add an additional shadow layer. I also added some torn strips of vellum along the bottom to add a ground for the flamingo to stand on.


The main panel was matted with black cardstock before adding the vellum, and then mounted with foam adhesive on a white cardbase. The flamingo and sentiment were also mounted with foam adhesive on the background - and a few sparkly pink jewels finish this card off perfectly!


Product links are all below - including affiliate links where possible, which simply means that if you use one of the links below, I receive a small commission at no additional cost to you. Thanks so much for supporting my blog, and stopping by! Have a wonderful day!!!


Friday, February 19, 2021

Sending Hugs and Smiles Beautiful - Simon Says Stamp March 2021 Card Kit

Hello! I'm here this morning to share one more card with the BRAND NEW March 2021 Simon Says Stamp Card Kit - Spring Windows! This kit is full of all the spring feels! The included stamp set by the same name has the sweetest little window and floral images - along with some fabulous sentiments, there is some DREAMY pattern paper, distress markers, sentiment label stickers - that's all not to mention the cardstock, envelopes, and more! 

Once again today, I couldn't resist using lots more of that pattern paper - but some of the less floral ones for a completely different look!


I love pink paired with black and white - and these were the perfect combo. That gorgeous word die from the kit made a perfect large bold sentiment to line up between the two pattern papers as well - die cut simply from black and white cardstock.


The stamped sentiment from the stamp set in the kit was designed to curve around the top of the windows in the stamp set - but I thought it was such a simple, fun, and playful way to add an additional sentiment around the die cut word! A few sparkly jewels finish this glamorous card off just perfectly!


Here is a closer look at the entire kit contents - you can find all the details HERE:


Product links are all below - including affiliate links where possible, which simply means if you use one of the links below that I receive a small commission at no additional cost to you. Thanks so much for stopping by! Have a wonderful day!!!


Romantic Layered Roses - Pinkfresh Studio Facebook Live Cards

Good morning! Dropping by today to share a card I made last week for Pinkfresh Studio's Facebook Live, as well as a card I made with the extra pieces I had made as a sample element! You can watch the replay HERE if you want to see more details. 

These cards also feature a few dies that are on sale this weekend - woohoo! You can find all the sale items HERE, and make sure to use the promo code ESS20!


First up, I'm going to share the card we created live this week - and then the card I finished off after the live with my extra sample pieces!


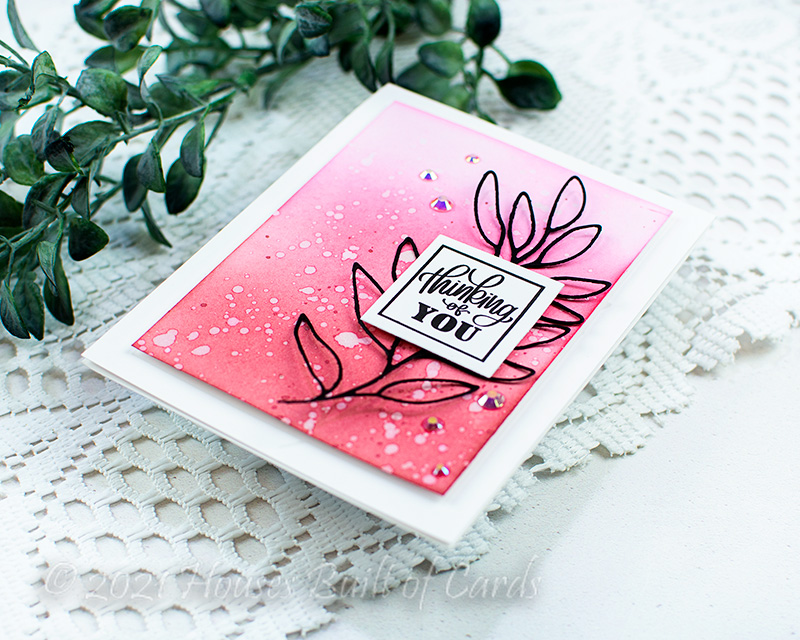
For both cards - I used the beautiful Choose Hope stamp, stencil, and die combo. Easiest way ever to add these gorgeous layers of color to this card!


For this first one, I used Ornate Oval in a mat gold cardstock to pull together the gold embossing I did with the stamp set over the stenciled florals.


The background was stenciled with the Argyle Layering stencil for a soft background, and then sentiment is from My Favorite Things to Say 2 - with a few sparkly Essentials: Crystals to finish this one off.


This second card uses nearly all the same supplies, but I swapped out the oval frame in gold for a Braided Oval die cut from white cardstock. I can't decide which one I love more - but I do love the soft effect of this second one with the white!


The floral on both were stenciled with Ballet Slipper, Sparkling Rose, Bubble Gum, Lemon Whip, Sunshine, Sweet Mustard, Ocean Breeze, and Aquamarine - with gold heat embossing over the top with the stamp set.


The background was stenciled with Peach Fuzz and Coral Reef for a complimentary background.


Both were die cut with Essentials: Stitched Rectangles, and mounted on a soft blue cardbase to finish off!


Product links are all below - including affiliate links where possible, which simply means that if you use one of the links below, I receive a small commission at no additional cost to you. Thanks so much for supporting my blog, and stopping by! Have a wonderful day!!!


Wednesday, February 17, 2021

Sending Hugs - Simon Says Stamp March 2021 Card Kit

 Hello! I'm here this morning to share another card with the BRAND NEW March 2021 Simon Says Stamp Card Kit - Spring Windows! This kit is full of all the spring feels! The included stamp set by the same name has the sweetest little window and floral images - along with some fabulous sentiments, there is some DREAMY pattern paper, distress markers, sentiment label stickers - that's all not to mention the cardstock, envelopes, and more!

I just wasn't done playing with that gorgeous pattern paper, so I have another layered card to share today, just a bit different than the previous one:


I loved both sides of that floral pattern paper, so I thought it would be fun to add a folded corner to my card - that way both sides got featured on the card. I die cut a heart from another piece of the pattern paper using the outline portion of Deco Heart Dies, and layered that over the top.


I added a sentiment by heat embossing that circle sentiment from the stamp set in the kit in gold, fussy cutting out, and layering over a bow tied with jute string, then added an additional sentiment from the label stickers in the kit. Finally, I trimmed the upper corner to tie in to the folded corner on the pattern paper, then finished off with a few sparkly pink crystals from Pinkfresh Studio for a touch more fun!


Here is a closer look at the entire kit contents - you can find all the details HERE:


Product links are all below - including affiliate links where possible, which simply means if you use one of the links below that I receive a small commission at no additional cost to you. Thanks so much for stopping by! Have a wonderful day!!!


Tuesday, February 16, 2021

Slimline Stencil Cards - Pinkfresh Studio Facebook Live Cards

 Good morning! Dropping by today to share a card I made last week for Pinkfresh Studio's Facebook Live, as well as a card I made with the extra pieces I had made as a sample element! You can watch the replay HERE if you want to see more details. 

While I had a bit more of a plan this time around, it was fun to still kind of "wing" it and see what happened for this card!

These cards both use the gorgeous Rustic Floral Wreath stencil and die combo - but with a simple twist and a touch of fussy cutting to create two floral swags instead of just a single wreath.


The tiny new Leafy Circle die is such a cute mini wreath design, perfect for adding as a trio onto a slimline card like this.


Some vellum leaves cut with the new Curvy Leaves die, a sentiment from the new Happy Birthday Sentiments stamp set, and a few jewels and crystals finish this card off!


And...since I had stenciled this prior to the live for a quick sample photo, I couldn't just leave them alone and not use them, right? So...here is the bonus card I created with that leftover item:


I added a stenciled background with the new Slimline Starburst Layering Stencil - seriously such a fun background, and so easy to create!


Sentiment heat embossed in gold is from the new My Favorite Things to Say 2 stamp set, and I added a gold die cut Slim Stitched Scallop Rectangle as well.


A few sparkly jewels finish this card off - can you see all the fun sparkle and shine from the heat embossing and gold frame as well?


Product links are all below - including affiliate links where possible, which simply means that if you use one of the links below, I receive a small commission at no additional cost to you. Thanks so much for supporting my blog, and stopping by! Have a wonderful day!!!