Showing posts with label Sweet Stamp Shop. Show all posts

Tuesday, June 23, 2015

Whatta Pear

Good morning! Popping back in time today to share a card back from last summer when I was on the Splitcoast Stampers Dirty Dozen and hadn't shared over here yet! Getting back from vacation and trying to get unpacked and back in the crafting groove - especially with the added mess of finding a flea infestation when we got home (and we don't even have indoor pets!!!) So, this seemed like a good time to catch up with one of these! :)


This card used an older (I believe now retired) set from Sweet Stamp Shop - colored with Copics and fussy cut out. The sentiment was heat embossed on a banner die cut with a Simon Says Stamp die. Used some woodgrain cardstock, scored some lines in it to give it the feel of wood planking a little, and inked the edges and selectively over the top with distress ink. Hard to see in the photos, but the pears are also coated with Wink of Stella! Finished off with a few yellow sequins.

Thanks for stopping by today! Hope you are having a wonderful day!

Sunday, February 15, 2015

Bee Mine Honey

Good morning! Just popping in this morning with a card from last year when I was on the Splitcoast Stampers Dirty Dozen:


I am also linking this up with this weeks CAS-ology Challenge - Love:


Used an older Sweet Stamp Shop image on this one, did a bit of stenciling, coloring with Copics, and embellished with some sequins and jute twine. Super clean and simple - and sweet!

Thanks for stopping by! Have a wonderful day!

Monday, November 17, 2014

You Are Awesome

Good morning! Just popping in real quick with a second card that I made for Splitcoast Stampers when I was a member of the Dirty Dozen earlier this year! For this one I used some Neat and Tangled stamps for my sentiment, the wreath is a Sweet Stamp Shop stamp, and and I added some gold Heidi Swapp Color Shine mist. Layered some washi tape on some Crate Paper pattern paper for the background, added some jute twine tied in a bow, and finished off with a few sequins.


I am linking this up as a second entry into Virginia's View Challenge as well:


Thanks for stopping by - have a wonderful day!!!

Tuesday, May 27, 2014

Sweet Stamp Shop Watercolor Thank You

Good morning! Hope everybody had a wonderful weekend - ours was super fun, but super busy! I'm looking forward to slowing down a little bit today! Anyway - just wanted to drop by with a card I made a while back and never had a chance to post:


I used a Sweet Stamp Shop set called Monogram It - that I believe is retired now. But I love the pretty wreath on it, and stamped and clear embossed several times on white cardstock, then inked up with a few different colors of distress ink.


I misted with water, then stamped the thank you from the same set 3 times in the center of one of the wreaths. Tied some jute twine around, then adhered with foam adhesive to a cardbase that I added a little strip of washi tape to the side of.


Thanks for dropping by! Have a wonderful day!!!

Wednesday, April 2, 2014

Something fun...and a big THANKS!

Good morning everyone! Eeek! I'm still so excited - last Friday while gone on vacation, I got a very exciting email...one of the cards I sent in for Stamping Royalty was selected as a winner! In the Friendship category! You can read the announcement and see the rest of the winners on the Paper Crafts Connection blog. I can't share my winning card, since it will be published in the July issue of Paper Crafts and Scrapbooking Magazine, but here is one of the other cards I sent in for the Thank You category - I thought it was fitting to share today:


For this card I used some watercolor paper cut with Lil' Inker's Stitched Rectangle dies, and stamped the beautiful wreath from Sweet Stamp Shop's Monogram It set in Versafine Ink. I found it works great with watercolors. I randomly added some color with watercolors, and added a bit of Wink of Stella for sparkle. Added some pearls to the flowers, and stamped my sentiment in the center.


Added some coordinating strips of washi tape on the bottom, some jute twine and a wood veneer feather covered with a couple coats of Wink of Stella for lots of sparkle, and attached it all to some pattern paper from My Mind's Eye. LOVE woodgrain papers right now!


Thanks so much for stopping by! And thanks to Paper Crafts and Scrapbooking Magazine - I can't say enough about all the wonderful fun I have had being part of the paper crafting community!

Saturday, August 24, 2013

Gratitude - Sweet Stamp Shop - UWYH Challenge

Good morning! Another fun challenge card to share today:


I was excited to squeeze in a few minutes this past week to play along with the Use What You Have Challenge over at Sweet Stamp Shop:


I dug into THREE different stashes for this card! First up - the older paper stash:


Then the tangled mass of ribbon stash:


And the Stickles stash that I rarely use anymore:


I used the brand new Fall Gratitude stamp set (so happy this came in the mail in time for me to play with it before leaving on vacation!) I stamped it with MFT ink, then added the sentiment on a separate little banner. I pulled out some pattern paper from an older Crate Paper 6x6 paper pad (On Trend), and layered it all together.


Added some lace trim and ribbon from my stash, a tiny Tim Holtz paper clip, some Neat and Tangled sequins, and finished off by putting some Stickles on parts of the feathers.


{Sigh} A perfect fall card! The trees around our neck of the woods are turning yellow already! YIKES! I guess fall really is on the way! 

Thanks for stopping by today! Have a wonderful day!!!

Monday, July 1, 2013

Sweet Stamp Shop - Use What You Have Challenge #7

Hello! Today was one of those strange days that I just couldn't get my head on straight for some reason! So...I didn't really get much done around the house, but I did manage to get this card put together: 


Here is the stash I raided to make my card - a bunch of tags that I don't even remember where I got them, a plastic drawer full of random ribbons that I never remember to use, and a fun older paper pad that is actually almost used up, but still sitting buried in my stash.


I used the sentiment I won a while back from Sweet Stamp Shop - LOVE it so much! I stamped on one of those tags I found in my stash using MFT ink, then added some of that older ribbon to the top of the tag. 


Used a couple of the pattern papers from the paper pad, some black velvety ribbon and some crochet turquoise that matched perfect, then attached the entire front panel to a cardbase of Avery Elle Sea Glass cardstock - one of my FAV colors right now!


That's it! I noticed that there are only a couple entries to this challenge! You should come play along - it is so much fun to pull out and use some of the older and under-loved items in our stash!


Tuesday, May 21, 2013

Cutie Pie Glasses

Just popping in to quickly share a card I managed to squeeze in making this morning! Sweet Stamp Shop posted on their Facebook page a giveaway - you just had to post a brand new never seen card using their stamps to the Facebook page before noon to have a chance to win. So...this is what I whipped out:
Used my Lil' Inker's stitched rectangle dies to add the stitching to the cardbase, as well as for the center panel. Stamped the glasses from a Sweet Stamp Shop set three times using some new Versamagic Ink I picked up yesterday at Joann's (which is 2 hours away!!!)
 Pattern Paper is from Basic Grey, sentiment stamped with MFT ink. Tucked in a doily, added the sequins, added a bit of washi, and that's it! I tried REALLY hard to keep it flat and mail-able...not sure if the sequins count, but it's close!
Hope your day is going well!

Saturday, February 23, 2013

Guest Designing at Sweet Stamp Shop (and giveaway!)

I might as well warn you - this post is INCREDIBLY picture heavy! It was my day to guest design at Sweet Stamp Shop - and I kind of had lots of fun playing! So...you've been warned! (However...if you make it to the bottom, I have a little something "sweet" to share!)

So...wanna geek out with me?


My first two cards use this set called Spectacle:
I made this card to be more of a guy card - used 3 different PTI inks to stamp them, then added some wiggly eyes in each pair of glasses. 


My pattern paper is from Basic Grey (green) and We R Memory Keepers (brown and words) - and all the edges are inked with Tim Holtz distress ink.


I stamped the sentiment, and colored in the word "geeks" with my Copic markers, then added a twist of blue jute twine on the bottom.


The next card uses the same set - but is decidedly feminine!!!


For this one, I started off with some watercolor paper, rubbed 3 different PTI inkpads directly on the surface, then brushed over with a water brush to give the watercolor background effect. I let it dry very well, then stamped my glasses and sentiment on, added a bit of bling, and Glossy Accents on the glasses lenses - a little hard to see in the picture, but totally fun!


Added some fun Echo Park Happy Day collection papers - that went perfect with the retro feel of these glasses, and finished off with some Baker's Twine and an October Afternoon button. All the layers are assembled with foam adhesive - so this card is full of dimension! 


I carried on the watercolor paper on the next couple of cards, just used a different set of stamps: 


For the next few cards, I used this fun set called Across the Miles:

There is just something fun about a map stamp, don't you think? For this, I did the same watercolor background technique, rubbing 2 different PTI inkpads directly on some watercolor paper, then brushing over with a water brush and allowing to dry. Then I stamped my map piece over the top and fussy cut it out.


I layered some Authentique 6x6 papers for my card base, then stamped my sentiment and the tiny hearts from the kit on the bottom of one panel. 


Next I attached my cut out US map with foam adhesive, and layered some Studio Calico wood veneer people, along with a heart cut with a Fiskar's punch and covered with Glossy Accents.


Finished off with some twill ribbon on the top, and some inking with my distress inks around the edges.


The next one with this set is totally clean and simple! I love how it came out - and plan on making lots of these to keep on hand, since we just moved about 6 months ago from all our family and friends - I have a feeling I could use lots of these! 


I used a simple white cardbase, stamped the map image with black Versafine ink (great coverage!), then added the hearts, arrows, "I'm here" and "You're there" sentiments - the red is distress ink in Barn Door. I also added the compass stamp image, and stamped "I Miss You" repeatedly across the bottom, also with distress ink.


To finish it off, I sponged distress ink in Broken China around the edges - LOVE how simple it is, but how perfect and finished it made it!


Finally, I made one more - using a sentiment from the set above, but also adding in one more set:


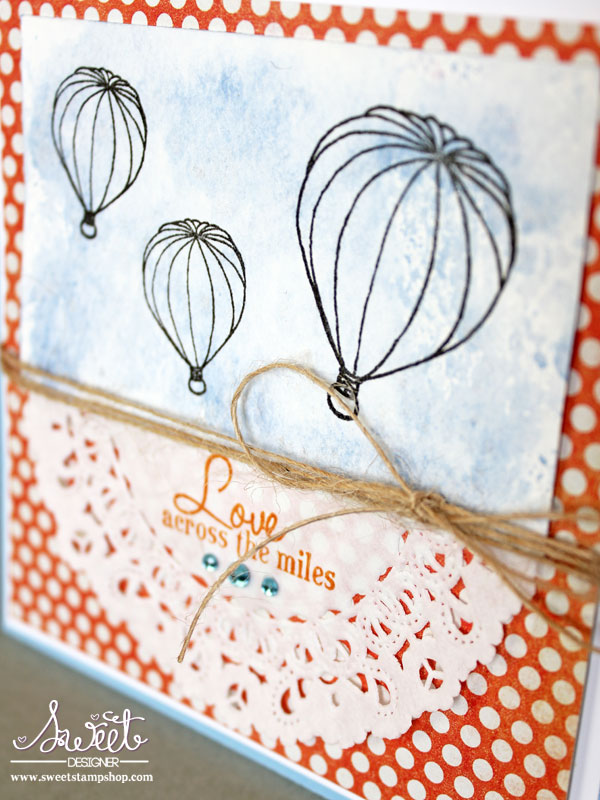
The hot air balloons on this card came from the set called Old Fashioned Afternoon:

I had lots of fun making the background for this one. I rubbed some PTI ink on my nonstick mat in a large square, then sprayed on some Glimmer Mist. I then smooshed a piece of Watercolor paper right onto it, until it was well saturated. I let that dry (once again!) and then stamped my hot air balloons on top of it. I wish I could get the subtle sparkle to show better in the pictures - it is so soft and pretty!


I made a blue cardbase with Bazzil cardstock, then layered on some white and pattern paper (I think it is My Mind's Eye - but it was in some random paper I bought without a name, so I'm not sure!)


Tucked a doily under the watercolor paper, stamped the sentiment with some PTI ink, and tied around some jute twine to finish the whole thing off.


Whew! Incredibly long post, I know! If you made it all the way to the bottom, I have a little something sweet that I would like to give away!!! This sweet set called Sweet Tooth! Just leave a comment at the bottom, letting me know what's your favorite of the *many* cards above!


Thanks for stopping by! Hope you have a fabulous day!!!


Wednesday, February 13, 2013

Sweet Stamp Shop New Release - Day 2

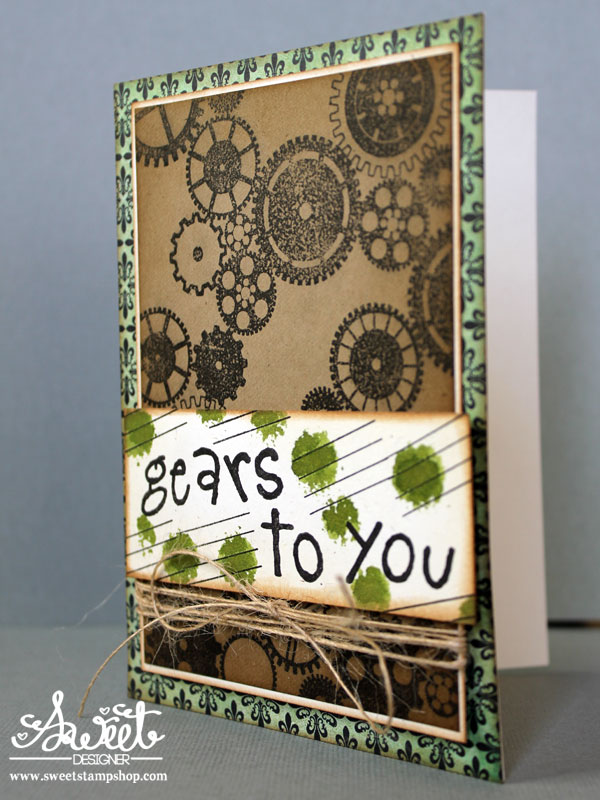
Good morning! It's time for the second day of The Sweet Stamp Shop's new release! I have a couple cards to share with you today using Gear Backdrop. I started off with a card a bit out of my normal comfort zone - but I think it is perfect for a guy card! And those are the hardest! Here it is:


I stamped the backdrop on kraft paper in black ink, then inked the edges with Tim Holtz distress ink in Vintage Photo. I matted it in white paper, also inked with distress ink.


Next up, I took some PTI rustic white cardstock, and stamped my own sentiment using Sweet Alpha Doodles. I added some of the lines from the same set stamped randomly around it.


I inked the edges, again with the distress ink, then added some random splotches of green ink using a bottle of Tim Holtz distress stain. I just pressed the applicator randomly on to my paper, making sure to press lightly.


Finished off with a bit of jute twine tied in a bow, and then used some foam adhesive to attach it all to my pattern paper card base - also inked with distress ink!


Now...my second card I went a totally different and "girlie" direction! Here it is:


This time I stamped my backdrop with pink Tim Holtz distress ink - Spun Sugar. 


I also used it to ink a little around the outer edges, then matted it in white before adhering to my card base.


Next, I stamped the glasses from an older set called Spectacle in Versamark ink and heat embossed them with white embossing powder. The sentiment is from the same set.


Finished off by attaching that panel with foam adhesive to my card base.


There you have it! Two very different cards - same background! Make sure and swing over to the Sweet Stamp Shop blog and check out what everyone else created!!!