Wednesday, August 31, 2022

Always in My Heart - Simon Says Stamp

Good morning! Today I'm back to share a card using some supplies from Simon Says Stamp - once again a mix of some slightly older and newer sets! I love the soft blue and green color combo - isn't it soothing and relaxing?


I started off by using Nested Domed Arches to create the stenciled arch for the backdrop, blending Surf over the area first, then Cadette at the bottom portion, blending out through the center. 


Next, I stamped the leaves from Be Kind stamp set, and the sentiment from Stronger Together over the top with black Versafine ink - I chose that ink, because it was water safe. I then smooshed some Aegean ink on a clear block, dipped a wet brush in, and used it to paint in the leaves. I love the effect it gave!


Next, I trimmed down that panel, added one more layer of white cardstock underneath for a framing effect, and then mounted that on a Sea Glass cardstock for the perfect touch of blue to coordinate with the rest of the card. Finished off with a few Clear Iridescent Drops from Pinkfresh for a touch of sparkle!


Product links are all below - including affiliate links where possible, which simply means if you use one of the links below that I receive a small commission at no additional cost to you. Thanks so much for stopping by! Have a wonderful day!!!


Tuesday, August 30, 2022

Tropical Birthday Trio - Simon Says Stamp September 2022 Card Kit

Good morning! I'm here again to share another trio of cards using the BRAND NEW (well...at least still fairly new!) September 2022 Simon Says Stamp Card Kit - Let's Celebrate! This month's kit is all about those birthday celebrations! The included stamp set by the same name has some fun birthday sentiments to pair with the many birthday theme images, there is a fun 3D Embossing folder, of course some lovely pattern paper, die cut sentiment, shaker mix...that's all not to mention the cardstock, envelope, and more!

The first card I shared was more clean and simple in design - today I'm sharing one of my favorite things to do with each month's card kits, utilizing the pattern paper! It's such a fun and easy way to create several cards quickly and easily that are bright and fun!

For each card, I trimmed down panels from the Sweet Rush pattern paper in the kit, and stamped a sentiment from the included stamp set. I then added some of the sequin mix to embellish - I think I went a bit crazy on this peacock, but isn't it fun?!?


I used some other pieces of paper, cut into thin strips, to embellish the background of my white cardbases. It was a fun way to dress them up a little, and since the paper is from the same paper pad, it's guaranteed to coordinate!


I popped those panels up with foam adhesive, and then added sequins to the final one, so I could tuck them underneath the panel. It was fun to use those sequins in different ways to embellish!


Here is a closer look at the entire kit contents - you can see it all HERE:


Product links are all below - including affiliate links where possible, which simply means if you use one of the links below that I receive a small commission at no additional cost to you. Thanks so much for stopping by! Have a wonderful day!!!


Monday, August 29, 2022

God Planted You in My Life - Simon Says Stamp

 Good morning! Sometimes it's super fun to pull out some older favorite sets and play, and that's what I did for this card I'm sharing today! I used a few older stamp sets, all from Simon Says Stamp - a couple favorites, and one that had been neglected for a while! 


Forest Scenery has always been one of my favorite stamp sets. Living in the Pacific Northwest I have always loved and been fascinated by trees - and this set is so fun for stamping your own woodsy scenes! I stamped in some nontraditional colors for this card today, and it is just as fun! I used SSS Pawsitively Saturated inks in Blush, Cantaloupe, and Limelicious for the trio of trees.


I added that cute little dear in black ink, and then added a simple sentiment from Printmaking Plants stamp set - another favorite set of mine! I die cut that panel with a Basic Rectangle (could also trim down, but I do love the finished edge of a die cut rectangle!) - and then it was time to prepare my cardbase to mount it on.


I pulled out a long neglected cling background stamp - Gingham Background, and used a cardbase created with Lawn Fawn Speckled Egg cardstock. I stamped it with Melon ink - it gives a nice soft ink color, and the texture and color of the cardstock just makes it that much more fun! Finally, I just mounted that front panel over the top with foam adhesive!


Product links are all below - including affiliate links where possible, which simply means if you use one of the links below that I receive a small commission at no additional cost to you. Thanks so much for stopping by! Have a wonderful day!!!


Saturday, August 27, 2022

Older and Wiser - Simon Says Stamp September 2022 Card Kit

 Good morning! I've been traveling a lot this past month, so I'm just now finally popping in to share my first card using the BRAND NEW (well...at least still fairly new!) September 2022 Simon Says Stamp Card Kit - Let's Celebrate! This month's kit is all about those birthday celebrations! The included stamp set by the same name has some fun birthday sentiments to pair with the many birthday theme images, there is a fun 3D Embossing folder, of course some lovely pattern paper, die cut sentiment, shaker mix...that's all not to mention the cardstock, envelope, and more!

While in my usual fashion I have a trio of 3 cards featuring the pattern paper that I will be sharing soon - I'm starting off by sharing a card that features this fun stamp set in a clean and simple one layer card design!


I started off by stamping both the image and the sentiment with Copic friendly black ink directly onto my white cardbase I created from Hammermill 100lb cardstock - which also happens to be great for Copic coloring!


Next, I colored it in with simple Copic marker colors. These would be easy to mass product, and just change up the colors of the cake and stand! I also used some Warm Gray Copic markers to add a shadow or "ground" underneath the cake. Just a little coloring trick that helps create a more 3D illusion.


Here is a closer look at the entire kit contents - you can see it all HERE:


Product links are all below - including affiliate links where possible, which simply means if you use one of the links below that I receive a small commission at no additional cost to you. Thanks so much for stopping by! Have a wonderful day!!!


Friday, August 26, 2022

Thank You Florals - Pinkfresh Studio YouTube Live Card

 Good morning! Dropping by today to share a card made a earlier this week ago for Pinkfresh Studio's YouTube Live - after taking last week off from lives while the Pinkfresh team was in Houston together at the office again, it was nice to be back and doing a live again this week using some of the newest release. You can watch the video replay HERE if you want to see more details and watch these cards come together.

I started off by hot foiling the sentiment using the new Sentiment Suite: Thank You hot foil, then did the reverse foiling using the Solid Hot Foil Plate. I die cut them both, but actually ended up using the reverse foiled sentiment on my finished card.


Next, I stamped those lovely florals from Beyond Measure in gray ink, then added color with the layering stencils, lining up with the stamped image. I left the stamp lined up in my MISTI, so I was able to stamp over again with detail black when I finished for a nice crisp stamped image. I love these bold colors!


I had pre-die cut the Elongated Lattice coverplate die, as well as the Stitched Scallop Square die from soft gold cardstock, planning to make a square card. That plan ended up changing in the middle of the live, and I'm so glad, because I love this version much better!


I used the last bit of aqua and pink ink on my blending brushes to add a touch of color to two corners of my cardbase, and adhered the die cut coverplate over the top with liquid glue, then turned the square diagonally to create a diamond shape, and trimmed off a bit on the edges to fit my A2 card design. I added that with foam adhesive on the background.


Finally, I tucked those florals in at the bottom - after trimming just a hair off the bottom of them - and added the sentiment and some Clear Iridescent Drops as a final embellishment!


Product links are all below - including affiliate links where possible, which simply means that if you use one of the links below, I receive a small commission at no additional cost to you. Thanks so much for supporting my blog, and stopping by! Have a wonderful day!!!


Tuesday, August 16, 2022

Happy Dance - Pinkfresh Studio Instagram Release Hop

 Hello! Today I am part of a fun Instagram hop to celebrate the new Pinkfresh Studio release! I have had so much fun creating with this release - yesterday was the blog hop, and I shared several cards for that! Today I'm sharing a card I created on last week's YouTube Live for Pinkfresh Studio as a sneak peek with Lea Lawson. We used the same product to create 2 completely different cards! You can watch that video HERE if you want to see more details!   


I used the stunning Happy Dance set of products for this card, paired up with the new Elongated Lattice coverplate die.


I started off by stamping and heat embossing my image, then lined my coordinating stencils up with that to add color to the floral bunch. I love the soft look that the gold heat embossing adds to this image! Once it was all colored, I die cut it with the coordinating die. This die in particular seems to give such a pretty and intricate cut around the florals - I love how detailed it is.


I used the extra ink on my green blending brush to add a soft background to my white cardbase where the florals were going to be placed. I tucked the bottom of my florals into the bottom of the lattice die, and adhered it with liquid adhesive, tucking foam adhesive behind the top of the florals for dimension.


I heat embossed one of the two sentiments in the stamp set that has a coordinating die, and die cut it a couple extra times from white cardstock to layer together for dimension. I also stamped a secondary sentiment in detail black ink, trimmed it down to a banner shape, and adhered it underneath with liquid glue.


Finally, finished off with a few Iridescent Clear Drops for some sparkle!


Product links are all below - including affiliate links where possible, which simply means if you use one of the links below that I receive a small commission at no additional cost to you. Thanks so much for stopping by! Have a wonderful day!!!


Monday, August 15, 2022

Pinkfresh Studio August 2022 Stamp, Die, Stencil, and Hot Foil Release

 Good morning! Today is the blog hop to celebrate Pinkfresh Studio's August 2022 Stamp, Die, Stencil, and Hot Foil Release! This release has some fun new hot foil sentiments, a couple lovely coverplate dies, and of course, beautiful florals as you would expect from Pinkfresh! You aren't going to want to miss a stop along the way - TONS of inspiration and prizes up for grabs! YAY! You can find links to all of the new release items I used on today's cards at the bottom of this post! 


I have three cards to share today - usually it would be more, but since I was gone on vacation in Hawaii and only had a couple days to work on my projects (and catch up on everything else!), I'm actually amazed I have 3 cards to share! First up, I couldn't resist making a shaker card with the fabulous new In My Heart floral frame set!


This stamp set makes perfect easy shakers! I started off by stamping it with a soft gray ink on white cardstock, then left the stamp set lined up in my MISTI to restamp at the end. I then used the layering stencils to add color to the image, lining each layer up with the stamped image.


Once I had the full image stenciled, I restamped over the top with Detail Black ink, and die cut with the coordinating dies. Then it was time to build my shaker!


I filled it with Iridescent Circle confetti from Pretty Pink Posh, and backed it with a small panel of yellow cardstock - love how that color pops from behind!


I popped it onto a deep green cardbase to coordinate with my greenery, then moved on to create my sentiment.


The "hello" is hot foiled using the new Phrase Builder: Hello hot foil set, then die cut with the previously released and coordinating Phrase Builder: Hello dies. I added that with more foam adhesive, and then stamped and die cut one of the sentiments with coordinating dies from In My Heart Stamp set to tuck underneath with a bit of liquid glue.


Next up - this may be one of my favorite cards from this entire release!


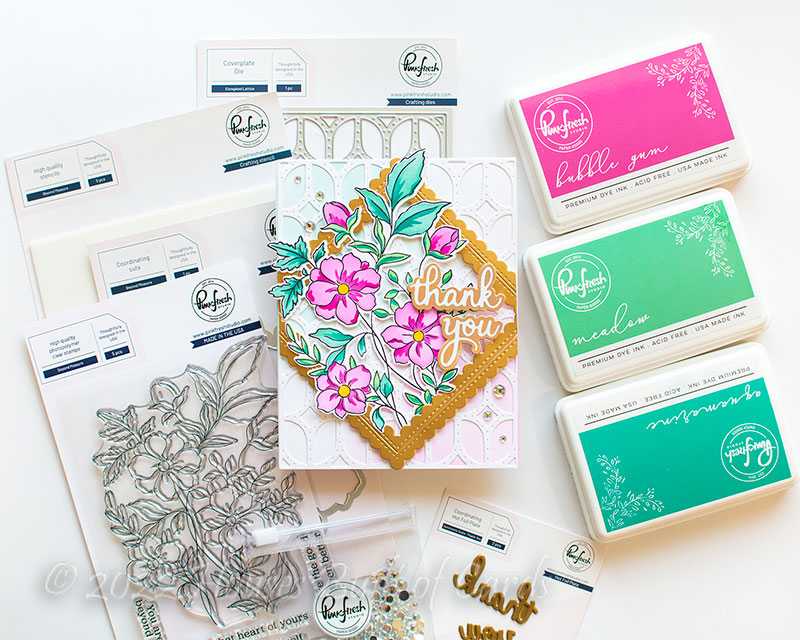
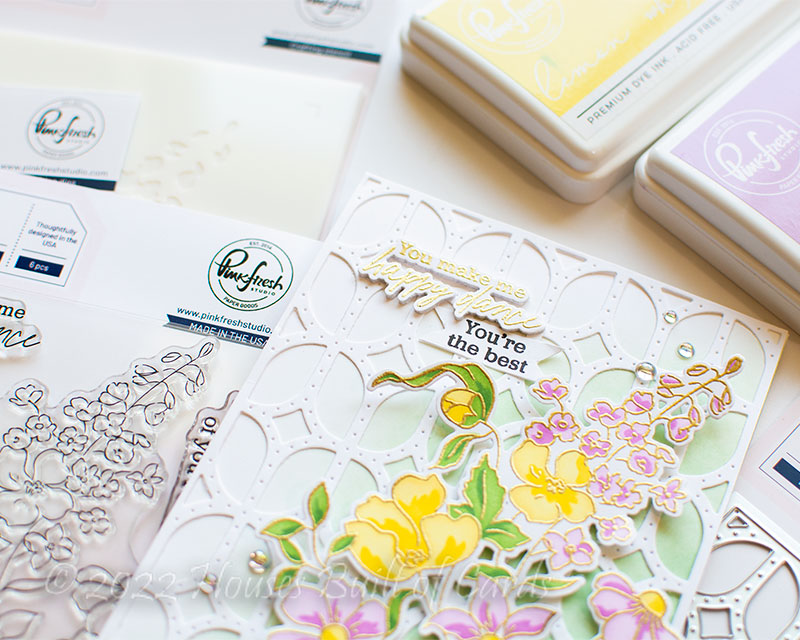
The new Grow Wild set is stunning. I mean - STUNNING! I love how gorgeous the image is stenciled, without even needing the coordinating stamp set. So pretty! I followed the colors on the packaging mock up fairly closely - they are a great reference if you are having trouble choosing colors!


For the background, I used a soft pink cardbase, then added the new Dotted Lattice coverplate die over the top, die cut from white cardstock.


I also die cut the new Fancy Circles die from white cardstock, and used the inner portion to create a frame. I used some leftover green ink from my blending brush to add a soft bit of color to the frame to help it pop.


I adhered everything down, using foam adhesive. I used a single layer on the frame and the bottom of the florals, then tucked an extra layer of foam under the top of the florals so that they popped a little extra off the background. A great way to add a bit of extra dimension!


The "beautiful" word is another hot foiled sentiment from the new Phrase Builder: Hello hot foil, also die cut with the coordinating previously released Phrase Builder: Hello dies. I love the size of this work, and how it fits almost edge to edge on this card. I added a secondary sentiment from the previously released Cosmos Bunch stamp set, trimming it in half to fit around the larger word.


Finished off with a few Iridescent Clear Drops on the centers of the flowers, clustering a few in the center of the largest flower. The perfect final touch of sparkle!


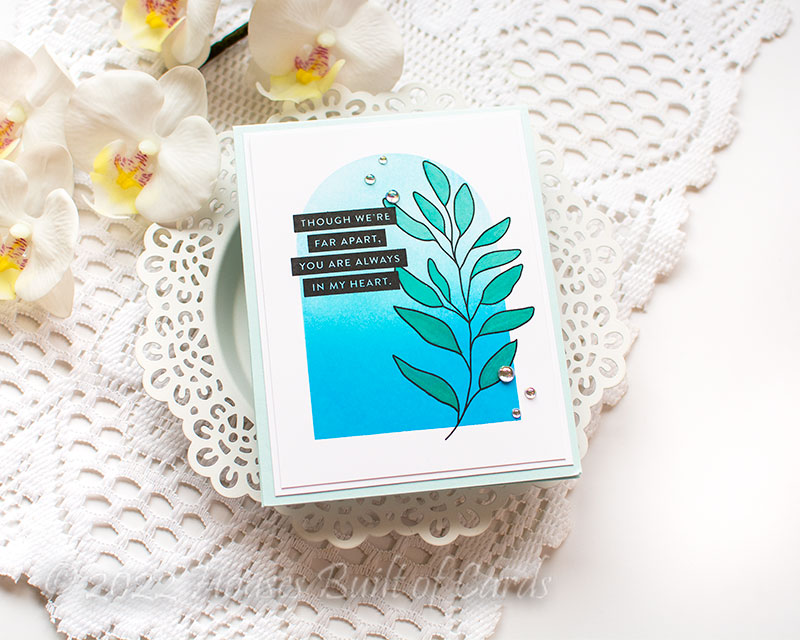
And finally, one of my more simple cards with this release!


For this card, I used the new Leafy Background stencil. It is a stand alone stencil with 3 simple layers - so fun!


I stenciled the 3 layers, then rotated the stencils 180 degrees to stencil again. This gave me a more full stenciled design, and is a fun way to switch it up a bit! I also used up some of the extra ink from my pink brush to add a soft hint of color around the edges, and soften it a bit.


I added some white splatters, and some splatters with Coral Reef (the same color on one of the leaf layers), and let that dry, then die cut with the largest Essentials: Stitched Rectangles.


My sentiment was built with stamped images from In My Heart stamp set, and another hot foiled word sentiment from Phrase Builder: Hello hot foil set, die cut again with the previously released Phrase Builder: Hello dies. I popped that word up with foam adhesive.


I layered a few die cut Leafy Branches in white to add some dimension and texture to the card, and a few sparkly Glacier Jewels to finish off!


GIVEAWAY INFO:

Make sure and leave a comment before you leave for a chance to win one of 10 $25 gift certificate to Pinkfresh Studio chosen from comments left across the hop! All winners will be chosen and posted on the Pinkfresh Blog on Tuesday, August 23, 2022 - so make sure and check back to see if you were a winner! Winners must check that page and claim their prize within 2 weeks.

Here is the entire blog hop line-up so you don't miss a single stop - and product links are below - including affiliate links where possible, which simply means if you use one of the links below that I receive a small commission at no additional cost to you. Thanks so much for stopping by! Have a wonderful day!!!

You are invited to the Inlinkz link party!

Click here to enter