Monday, October 31, 2022

Hot Foiled Snowy Snowflake Mini Slimline Cards - Simon Says Stamp

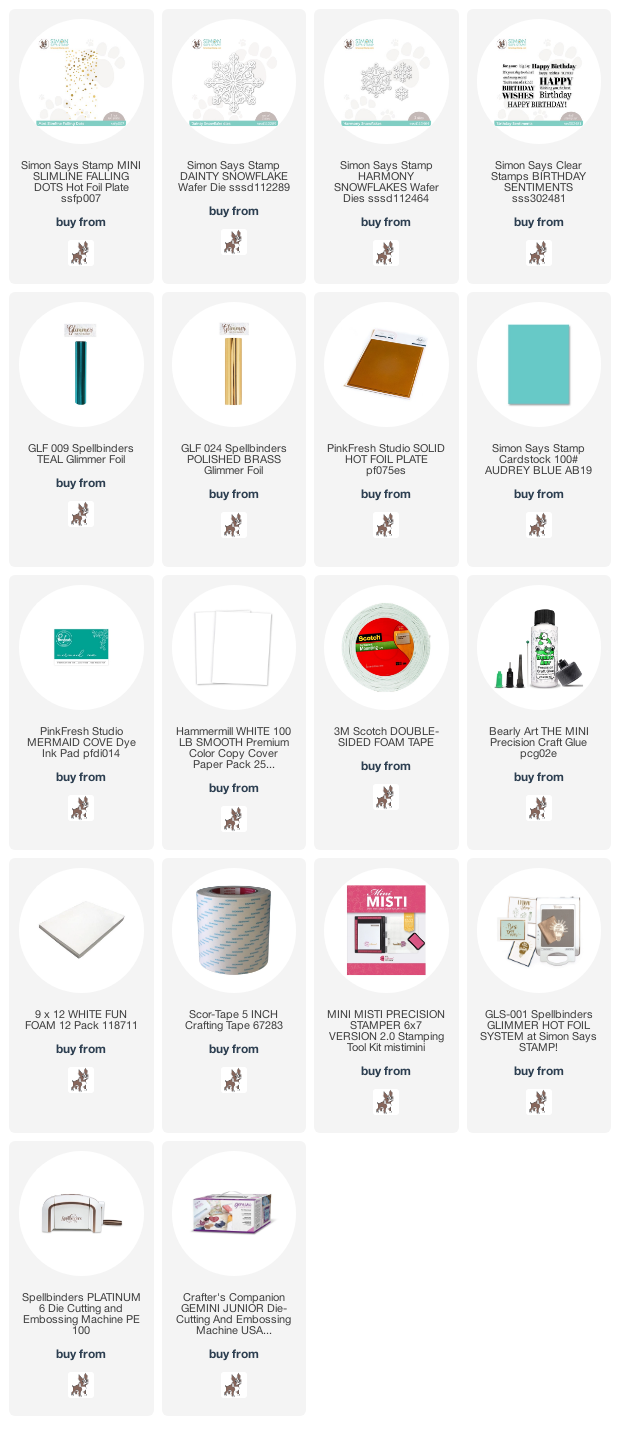
 Good morning! A few weeks back I shared a couple of cards created from a friend's Crafty Stash. When I was visiting Lea in Minnesota, we went to a crafty retreat, and while I brought just a few things with me, I was mostly packing from her supplies to bring for the weekend. I decided to raid some of her Simon Says Stamp sets to play with. I shared two cards before that were the results of that - and here a couple more that I created as part of that weekend of playing! This time, it was all about the hot foiling!


I actually hot foiled not only the background, but used a metal die to hot foil for these cards - and then put the Solid Hot Foil plate from Pinkfresh to good use to foil the reverse images - which made it super easy to create a set of cards, instead of just a single one!


For this first card, you can see that I used the Dainty Snowflake die to hot foil, and the coordinating die to cut the image out. It gives such a dainty foiled line when you hot foil with metal dies, since the lines are for cutting, and therefore thinner. I also layered on some extra snowflakes cut from the scraps of the reverse foil on the other card and using Harmony Snowflakes dies - these added great dimension to the first snowflake.


For this second card, I used the reverse foiled image from Dainty Snowflakes, again die cut with the coordinating die. Also a dainty effect, only more gold with the little fine white outline of the snowflake. I also layered over some of the same snowflakes as the last card, this time I just used white ones so they would pop against all that foil.


For both card backgrounds, I used the Slimline Falling Dots hot foil plate, and Teal Glimmer hot foil. One is the main foiled image, the other is the reverse foiled image. I alternated them, so that neither card would have an overwhelming amount of foil on it.


For both cards, I added a sentiment using Birthday Sentiments, stamped in coordinating ink, and hand trimmed into a small banner to mount on the snowflakes. I love how perfectly the sentiments fit these cards!


And in case I haven't mentioned before...hot foiling is SO hard to photograph! But these cards are so sparkly and fun in real life!


Product links are all below - including affiliate links where possible, which simply means if you use one of the links below that I receive a small commission at no additional cost to you. Thanks so much for stopping by! Have a wonderful day!!!


Saturday, October 29, 2022

Sealed by Spellbinders - Card Trio

Hello! I'm stopping by today to share a few cards I made using the new Sealed by Spellbinders Release - it is designed around wax and wax seals, but there is so much additional product that can be used without those elements! That is what I have to share with you today - a few cards using some of the new hot foil plates, stencils, and dies!

First up - my favorite card of the set - I love the airy bright whites, aquas in a trio of tones, and of course, the gold accents!


I started off by cutting the Leaf Sprigs etched dies from a trio of Spellbinders aqua cardstocks, as well as creating the Mini Bow die that was from a previous release. I built that with white cardstock, thinking it would be a fun alternative to cluster the leaves together.


For the background, I used the Geometric Flower hot foil background to dry emboss using the Universal Plate System, which conveniently has all the necessary sandwiches listed on it! I love the texture that it added to the white cardstock panel! I adhered that to a white cardbase with foam adhesive.


I hot foiled a sentiment from Sealed Glimmer Sentiments in some of the newer Satin Gold hot foil, and trimmed it to a rectangle. I added the leaf cluster and bow to the embossed background using liquid glue to adhere them down, and then added the hot foiled sentiment with foam adhesive off to the side.


I finished off with a few Metallic Gold Pearls to embellish and tie in the gold sentiment with the rest of the card. I just love all that white space, the pop of color and gold, and the dimension and texture!


Next up, I used all the same items to create an entirely different card!


For this card I focused more on the Geometric Flower hot foil plate, hot foiling it in that same Satin Gold hot foil, and then coloring it with the coordinating stencils. I used my Pinkfresh inks to stencil the layers in nice soft tones.


I trimmed that panel down, matted it with a bit of white cardstock, then mounted with foam adhesive on a Pink Sand cardbase to really enjoy all those lovely pink tones!


I added another hot foiled sentiment from Sealed Glimmer Sentiments, again trimmed into a rectangle and mounted with foam adhesive. At that point it was a nice graphic design that I loved - but it felt like it needed something else. So I die cut a few of those Sealed Leaf Springs etched dies in white, and tucked them around the sentiment so it looked like they were coming out from behind it. Just what it needed!


Finished off by adding a few of those same Metallic Gold pearls to enhance the gold hot foiling on this card! Does hot foiling EVER get old? I don't think so!


And finally...just because I couldn't resist using that negative piece of foil from the Geometric Floral hot foil plate on the previous card - I pulled out my Pinkfresh Solid Hot Foil plate and hot foiled the reverse image!


The Spellbinders Satin hot foils have such a beautiful finish - I love them! They are a little shinier than the matte finish ones, but softer than the shiny ones. While I love both of those - there is just something special and elegant about the Satin versions I feel!


I added another sentiment from the Sealed Glimmer Sentiments, and popped up both layers with foam on my white cardbase.


I played a bit with adding bling, but finally decided that this card was just elegant and classy enough that it didn't need anything else! Sometimes simple is best, don't you think?


Product links are all below - including affiliate links where possible, which simply means if you use one of the links below that I receive a small commission at no additional cost to you. Thanks so much for stopping by! Have a wonderful day!!!


Wednesday, October 26, 2022

Foiled Thankful Leaf Duo - Simon Says Stamp November Card Kit

 Hello! I'm back to share a couple more cards using the BRAND NEW (well...at least still fairly new!) November 2022 Simon Says Stamp Card Kit - Full of Thanks! This month's kit is perfect for fall, and perfect for the cards this season always makes me think of - thank you cards! The included stamp set by the same name has some cute fall images with some great sentiments - and also has coordinating stencils for coloring! There are also some fun foil options (I'm sharing cards with those today!), low tack tapeadorable little scissors...that's all not to mention the cardstock, envelopes, and more!

Today I'm sharing a little card duo using the fun foil options in the kit - they made for some super simple and easy card designs that also have some sparkly fun foil effects!


For both these cards I used the fun Fall Leaf Adhesive Transfers in the kit. They adhere to your cardstock just with the pressure of going through a die cut machine, then you add your foil, and run them through again to adhere the foil. You can use a laminator, but since you don't have to, I skipped it on my cards, and love the finished effect!


So hard to see in the photos, but for this card I used Pewter for the leaf, and Gold for the sentiment. I trimmed both panels down, and popped up with foam on a panel of Kraft Woodgrain cardstock to add to the rustic feel.


For this second card - again hard to see in the photos! - I used Copper foil for the leaf, and gold once again for the sentiment. I also embellished both cards with Pinkfresh Butterscotch Glitter Drops for a touch of extra sparkle.


Here is a closer look at the entire kit contents - you can see it all HERE:


Product links are all below - including affiliate links where possible, which simply means if you use one of the links below that I receive a small commission at no additional cost to you. Thanks so much for stopping by! Have a wonderful day!!!


Tuesday, October 25, 2022

Enchanting Flora 2 Ways - Pinkfresh Studio Instagram Release Hop

 Hello! Today I am part of a fun Instagram hop to celebrate the new Pinkfresh Studio release! I have had so much fun creating with this release - yesterday was the blog hop, and I shared MANY cards for that! Today I'm sharing a card I created on last week's Facebook Live for Pinkfresh Studio as a sneak peek. I used both the stamp/die/stencil combo AND the washi tape in one product suite to create 2 completely different cards! You can watch that video HERE if you want to see more details!

I also have added the video here if you want to watch here:


For the first card, I used the beautiful Enchanting Flora stamp, die, and stencil combo. I heat embossed it in gold, then used the layering stencils to color.


One very important detail on this layering stencil set - it was designed with a unique transparent layering effect. For that to work, you need to use the same color of ink for BOTH of the flower layers, and light colors are going to work best for this design. I couldn't wrap my brain around it until I tried it to be honest - but it really made all the difference on this set!


I die cut all the beautiful images using the coordinating one piece die - and I had so many lovely pieces to work with! I only used some of the smaller images, so I still have plenty to put to use on another card soon.


I used Stitched Diamonds coverplate for my background, and die cut the beautiful Gazebo die from Gold cardstock to tuck my florals into.


I layered the florals in the Gazebo, using bits of foam adhesive to pop up the top of them. I also used some of the new beautiful glitter drops to embellish - they are so sparkly and fun!


After the live, it felt like something was missing, so I grabbed some sheer white ribbon and tied it in a bow at the top of the card!


And then...we had just a few spare minutes, so I was able to squeeze in a simple card using the washi tape as well!


I had some pieces die cut in advance to make it easy, and decided to make a cute little square card - perfectly sized for that one beautiful half moon wreath.


My card size was 4 1/4" by 4 1/4", and I cut the largest of the Stitched Scallop Squares from Champagne Glitter cardstock from Simon Says Stamp. 


I popped the frame up with foam adhesive on my cardbase, then started adding my washi tape pieces!


I absolutely LOVE this washi tape - it is so dreamy and magical! I used the main half moon wreath image, popped up with foam adhesive, and then added a few of the smaller images with liquid adhesive to add some fullness to the wreath.


I finished off with a sentiment from the stamp set that also has a coordinating die - and then embellished with a few of the new Champagne Glitter Drops to finish off!


Product links are all below - including affiliate links where possible, which simply means if you use one of the links below that I receive a small commission at no additional cost to you. Thanks so much for stopping by! Have a wonderful day!!!


Monday, October 24, 2022

Fresh Fall Thank You Card Trio - Simon Says Stamp November Card Kit

Hello! It's been busy around here, so once again I'm a bit late sharing my first cards with the BRAND NEW (well...at least still fairly new!) November 2022 Simon Says Stamp Card Kit - Full of Thanks! This month's kit is perfect for fall, and perfect for the cards this season always makes me think of - thank you cards! The included stamp set by the same name has some cute fall images with some great sentiments - and also has coordinating stencils for coloring! There are also some fun foil options (I'll be sharing a card with those soon as well!), low tack tape, adorable little scissors...that's all not to mention the cardstock, envelopes, and more!

I've created a trio of cards using all the main images in the stamp set - and a fall color combo with a hit of a modern and fresh feel to it!


I started off by heat embossing all the images from the stamp set in gold. I originally planned to keep these all as one layer cards, but I messed up while using the layering stencils, and smudged ink on them, so fussy cutting it was! There are also coordinating dies for purchase separately, but since I didn't have those, I decided to stick with fussy cutting. :)


I used a mix of different Simon Says Stamp Pawsitively Saturated inks to ink blend the images. I actually only used the tiniest Detail Round blending brushes, which allowed me to really leave some variation in each section for depth.


The colors I used were: Blush, Pucker, Tidepool, Melon, and Latte. I love how they are softer than traditionally expected fall colors!


I didn't use every color on each card - but the general tones were the same, which makes them still work really well as a set.


Once I had all the stenciling done, I fussy cut them out with the fun scissors included in the kit! They were nice and sharp and worked well to cut these details out.


I added sentiments in Versafine Onyx Black ink, one on the center frame of the fussy cut image, the rest directly on the cardbases, then I adhered the fussy cut images to the card bases with foam adhesive.


Instead of usual bling, these felt like they called for enamel dots. So I pulled out my Pinkfresh Delightful Enamel dots and added a few in coordinating colors. I love how perfectly these colors worked!


And there you go - nice and simple, nearly one layer cards!


Here is a closer look at the entire kit contents - you can see it all HERE:


Product links are all below - including affiliate links where possible, which simply means if you use one of the links below that I receive a small commission at no additional cost to you. Thanks so much for stopping by! Have a wonderful day!!!