Showing posts with label Stick Pin. Show all posts

Monday, December 9, 2013

Christmas Tree Tags

Good morning! It's time for the second week of inspiration over at the Ribbon Carousel challenge blog - and the challenge this month is Anything Goes! I have a fun tag I created a while back and haven't had a chance to share using several different Paper Smooches sets:


I made the trees using the triangle stamp from Hullabaloo, the stars are from Warm Hearts, and the sentiment is from All Yule Need. The tag was cut with a My Creative Time Die, and I added some May Arts chevron ribbon and jute twine with a star stick pin to finish it off.


Here are all the details on the challenge:

Hey there everyone!  It is getting busier and busier around here with all of the holiday festivities looming!  Remember, this months challenge an easy one, so lets see your crafting goodness!

Each month we are giving away a Ribbon Carousel to one of our randomly chosen challenge participants! 

Just a reminder that our Ribbon Carousel Crewmates have divided up into FOUR teams. Each week you will see fresh projects for this month's challenge!

 There are only three (3) rules you must follow to be eligible for the prize:

  1. You MUST use ribbon, twine, thread, washi tape or anything that comes on a spool on your creation 
  2. Your project must be based on the theme of the month. 
  3. You must add a NEW project to the INLINKZ HERE and link directly back to your project on your blog or online gallery. (Unfortunately, we've had participants who would have won the challenge, but they didn't do a direct link to their blog and I couldn't find their creation!)


Tuesday, July 30, 2013

Growing in Unity Day 2

Good morning! Today is the 2nd day of my week of Growing in Unity for Unity Stamp Company! In case you don't know how it works, make sure and leave a comment everyday for a chance to win 2 Unity Itty Bitty stamps of your choice at the end of the week. I will draw a winner from comments left throughout the entire week. 

Now...onto the projects! I decided it would be fun to take some of the fun Sassy Sentiments by Erin Schreiner and focus on those for the week! I will be using one sentiment two different ways for each day of this week, paired up with die cuts or other Unity stamp images. One more classy or vintage inspired, and one more CAS, retro, or modern. Something like that anyway! So, for today I chose the sentiment "SHINE BRIGHT like a diamond" from the set called Sassy Pants. Here is the first card I made with it:


I went bold and strong for this one by cutting the city skyline out of black paper with a MFT Die-namics Die. I layered it on some MME paper, and spritzed it well with Gold glimmer mist, and then heat embossed the sentiment on the bottom with Gold Zing embossing powder.


Added some black sheer ribbon, a stick pin, and a bunch of Studio Calico wood veneer stars.


The next one is all soft and pretty and girlie: 


I started off by embossing a piece of vellum with my Cuttlebug, adhering it to some Avery Elle Cardstock, and then spritzing with some Silver glimmer mist. I made the edges curl up a little, but I love the pretty effect it gave!


Once that dried, I added my sentiment stamped on a hand trimmed banner, some more wood veneer, and a few sequins to finish it off.


That's it for today! I'll see you again tomorrow for two more cards using another sentiment! Have a great day!!!

Saturday, February 9, 2013

Paper Smooches SPARKS Challenge

Hello! I'm a couple days later getting this posted than I was getting it done - but I totally had to play along with this weeks Paper Smooches SPARKS Challenge:
I loved the idea of the polka dots - but I also couldn't resist pulling out the pink and the sheer ribbon:
I cut some vellum with a Lifestyle Crafts Doily die for the background, then cut a circle of the pink polka dot paper with a Spellbinder's Die. Paper pieced the little piece, used Copic markers to color in the hearts and the the peas, then added Glossy Accents to them both.
I stamped the sentiment with PTI ink, curving it on my clear block so that it rounded and fit the shape of my circle. 
Layered those together, used some My Mind's Eye woodgrain paper from an older 6x6 paper pad, tied some tulle around, then mounted the doily shape with foam adhesive over the top. Added a couple of stick pins in the bow, and mounted that entire panel on a white cardbase with more foam adhesive.
Thanks for visiting today! Hope your weekend is off to a great start!

Friday, February 1, 2013

Unity FWF - Love is in the pages of our Story

Good Friday morning! Where has the week gone? Can't believe it is Friday already! But since it is Friday, I do have a card to share for Unity Friends with Flair using the December KOTM  - love it!
I just LOVE this stack of books - and the sentiment goes SOOO perfectly!
I used lots of an older Crate Paper 6x6 paper pad, and layered it up with some pretty lace trim.
Used foam adhesive between some of the layers - so this is a very lumpy and bumpy card! 
I colored the books with Copics, then cut them out by hand. Attached with foam adhesive, added a jute twine bow right above it, ran a heart stick pin down through the center of that, then attached two little wood veneer people to it.
The sentiment I stamped by selectively inking it with black ink, then two different colors of PTI ink.
Thanks for stopping by today! I hope you have a wonderful Friday - and fabulous weekend!

Wednesday, January 23, 2013

Stamped Lace Card

Okay - I know I used it for one other card, but I just have to say, isn't this stamp from the Unity December Kit of the Month amazing?!?!?! I LOVE how intricate it is - and it is a perfect image to emboss! 
I made this card for a challenge I happened upon at KandRdesigns called the 100 Weeks of Inspiration Challenge. The challenge was to look through her Pinterest Inspiration board and pick a card to case. (You can see the one I picked HERE) I loved the colors, and some of the general layout themes, rounded corners, etc...
I started off with some Bazzil Cardstock - which is the blue. I stamped the lace three times and heat embossed it, then the sentiment which is one I got in a random set. I also heat embossed it. 
Here is a close up of that lace - cool, huh? 
I tied a bow with some white twill ribbon, then added a couple of heart stick pins.
Finished off with a couple of rounded corners, a bit of bling, and attached it with foam adhesive to the card base.
That's it for this one! Have a wonderful day!!!

Friday, January 18, 2013

PTI Made it Monday and 10 Embellishment Challenge

Hello! Well...here goes - I decided to be brave and take on the Use 10 Embellishments Challenge in the Moxie Fab World! I just started raiding around in my stash - and instead of using 10 of the same things, I wanted to challenge myself to use 10 DIFFERENT embellishments. It feels a little crazy, but I figured I might as well go for it! Since I had many of my elements extend off the card edge, and I used several different Papertrey Ink products, I decided to also enter this into this weeks PTI Made it Monday Challenge - Oversize Embellishments Packaging as well. So, in all it's wild and crazy glory, here is what I made:
So...my map paper and yellow stripe paper are from a Studio Calico 6x6 paper pad. Sentiment and hearts are from 2 different PTI stamp sets - both stamped with PTI ink.
I used a doily die cut from My Craft Spot, the cloud and mustache are from My Creative Time, and the heart is a Fiskars punch. 
I tied some jute twine around, tied on a button, and added a stick pin.
The bottom banner is attached with adhesive, but also with a tiny Tim Holtz paper clip. I also added some black bling, and some wiggly eyes over the mustache on the heart.
And here is the matching oversize envelope:
So my 10 different embellishments are: Doily Die Cut, Cloud Die Cut, Heart Die Cut, Mustache Die Cut, Wiggly Eyes, jute twine, stick pin, button, bling, and paper clip. There are more than one of several of the items, but 10 different and distinct items!


So...what do you think? I'm still not sure if it is fun, or just plain crazy!

Wednesday, August 22, 2012

Mother's Day Teacup #2


Hello and welcome back! Here is the second teacup I made for Mother's Day - this one was for my Mom:
Pretty similar information I guess - the teacup, flowers, and leaves were cut with my Silhouette Cameo, and cut files from the Silhouette store. 
Inked the edges of the leaves and teacup with Tim Holtz distress ink, then added Glossy Accents and Martha Stewart chunky glitter along the rim of the teacup for some sparkle and shine! 
Wrapped up chocolate in tulle, tucked it inside the teacup with a doily behind it, tied a big bow and added a stick pin and a resin flower to the center of the bow.
And I don't know if I added yesterday or not - but I also put some American Crafts white lace around the teacup - just because it felt like it needed it!

Anyway - thanks for stopping by again! 

Tuesday, August 21, 2012

Mother's Day Teacup #1 (A little past due in posting!)
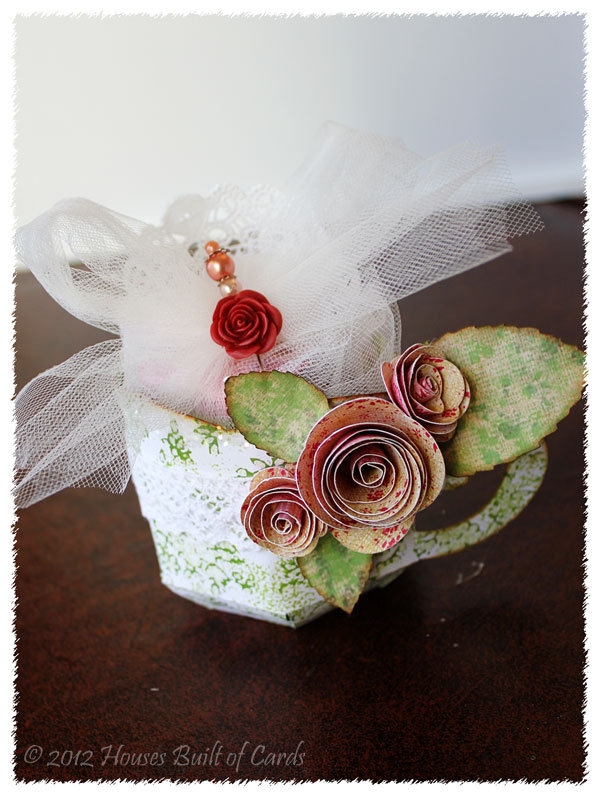

I know...this is WELL past the time I should have posted it - but life happened and I never got around to it! But...it is nice to have this to share while we are moving and I don't have time to craft - so I guess it's okay anyway! This actually the one I made for my mom-in-law - I'll share the other one that I made for my mom tomorrow!
I used my Silhouette Cameo, and a cut file from the Silhouette store for the teacup, and for the flowers and leaves. 
Inked the edges of each leaf and the teacup with Tim Holtz distress ink, then used some Glossy Accents and Martha Stewart coarse glitter along the top edge to add a little glam and glitter!
Finished off by wrapping some chocolates in some tulle, tucking them inside the teacup with a doily behind them (you can barely see it in the picture above) and added a stick pin and resin flower in the center of the tulle bow. 
Okay - I'll see you back here tomorrow with the second one!

Thursday, March 22, 2012

Friends with Flair and Moxie Fab Simple Elegance


YAY for Friday and Friends with Flair!!! I also combined my post this week with the Moxie Fab World Tuesday Trigger:
And here is the trigger photo:


I used Unity Stamp's Tea Time Pattern background stamp for the card base, stamped with Tim Holtz distress ink in Antique Linen. That inspiration came from the area rug in the trigger photo. Then rounded the bottom corners to catch the curve from the chairs.
Took a strip of My Mind's Eye pink paper from a 6x6 paper pad (like the table runner in the picture), stamped the sentiment on it, and wrapped some crinkle ribbon around it, and tied in a bow with a PTI button. Added a couple of leaf stick pins. The crinkle ribbon pulled out the white in the picture from the window frames, and the button and stick pins got the subtle pop of color from the tulips.
Attached all that with foam adhesive to the card base, then added some ribbon along each side - inspired by the curtains on the window. 
Finished off with a couple of stick on pearls on the bottom to pull all the colors together! Thanks for stopping by! Make sure to head over to the Unity blog to find out how to join in the fun with Friends with Flair!!!

Wednesday, March 14, 2012

Patches of Pink - March Post and Spring Link-up Party!!!


Hello! It's that time again for a Linking Party over at Patches of Pink! Our theme this time around is Spring! I am definitely ready for spring to arrive - and it keeps trying to make an appearance...then fooling us somehow! Yesterday I woke up to a couple inches of surprise SNOW!!! Now, I love snow, but only when it falls during what I consider the wintertime! By now, it is March, and I think it is time for spring to be here! Anyway...enough of my rant! :-) Here is card:
I used the newest Peachy Keen Kit of the Month - for March! If you haven't seen it - you should definitely check it out! TOTALLY the CUTEST gnomes you ever did see! You can find it HERE
I stamped and colored it on some pattern paper from My Minds Eye that I first die cut with a Spellbinders Nestabilities Die. I then did just a bit of coloring with my Copic markers. 
I used some pretty pink ribbon from my stash to tie a bow, then added a couple of Prima Flowers, a PTI button, some PTI twine, and a couple of leaf stick pins. 
I curved the sentiment before stamping it, so it fit the edge of the die. And just HAD to add a little bling and a bit of stitching around some of the edges. Oh yes - also rounded the top right corner! 
Thanks so much for stopping by to visit today! Hope you are having a wonderful SPRING day! Make sure and hop on over to Patches of Pink to see what the rest of the Design Team has cooked up, and to link up your own creation! Can't wait to see what you come up with!