Friday, September 30, 2022

Leafy Thank You Cards - Simon Says Stamp

Good morning! When you visit a crafty friend, it is sometimes fun to raid their stash and create cards with supplies you might not normally have to play with! When I was visiting Lea in Minnesota, we went to a crafty retreat, and while I brought just a few things with me, I was mostly packing from her supplies to bring for the weekend. I decided to raid some of her Simon Says Stamp sets to play with - and these cards were the result of part of that weekend of playing! 


As you may have noticed, I am of the opinion that if possible, you should always make more than one card - especially when you can't decide what color combo you want to use! Then you get to use both options! :)


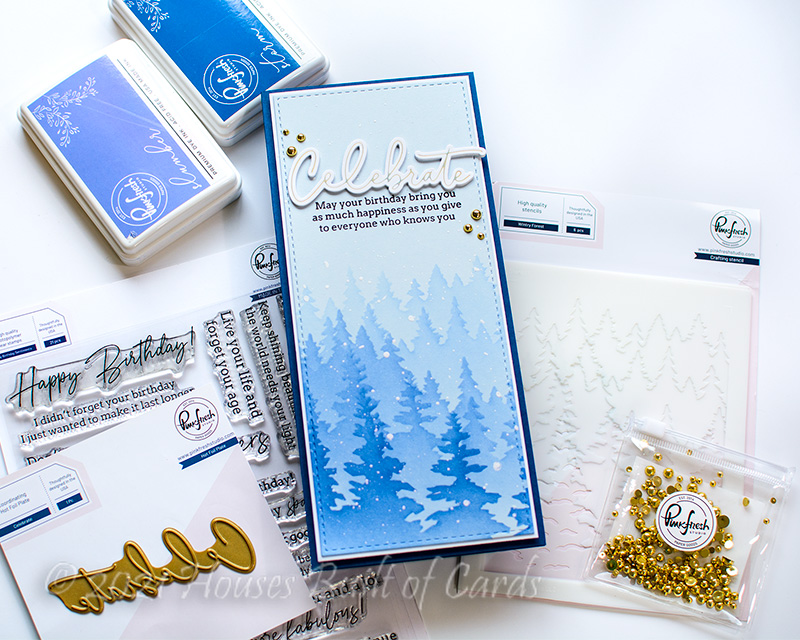
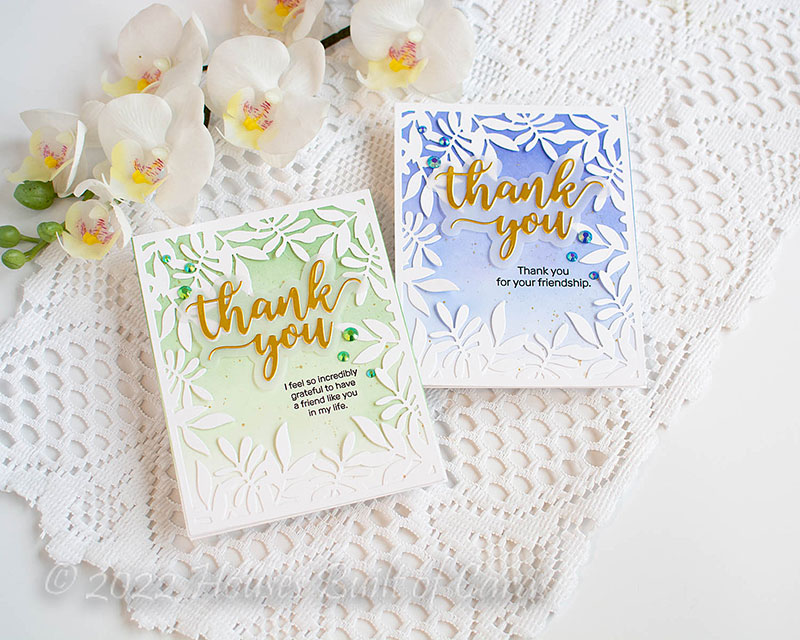
Since I didn't pack all my Simon Says Stamp inks for this trip, I used some Pinkfresh inks that Lea had to blend my backgrounds. For this first one, I used Sapphire first, then added a bit of Stargazer, because it felt like it needed a bit more color.


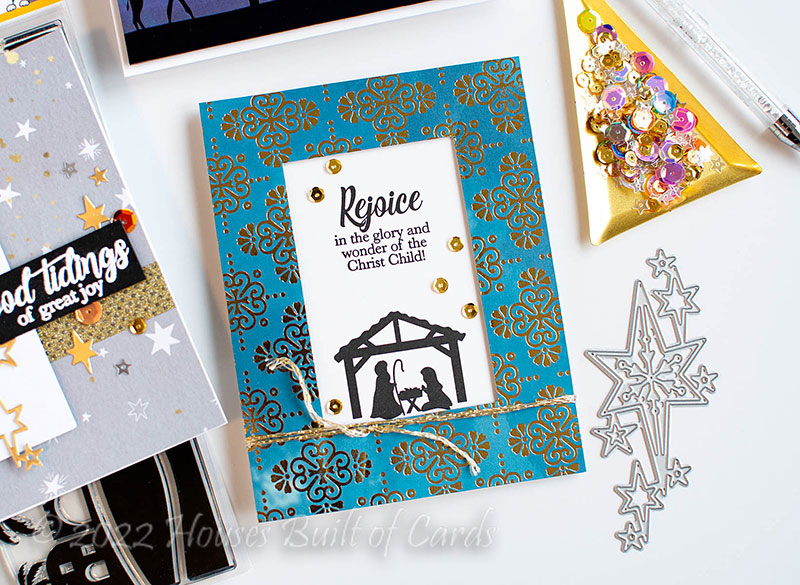
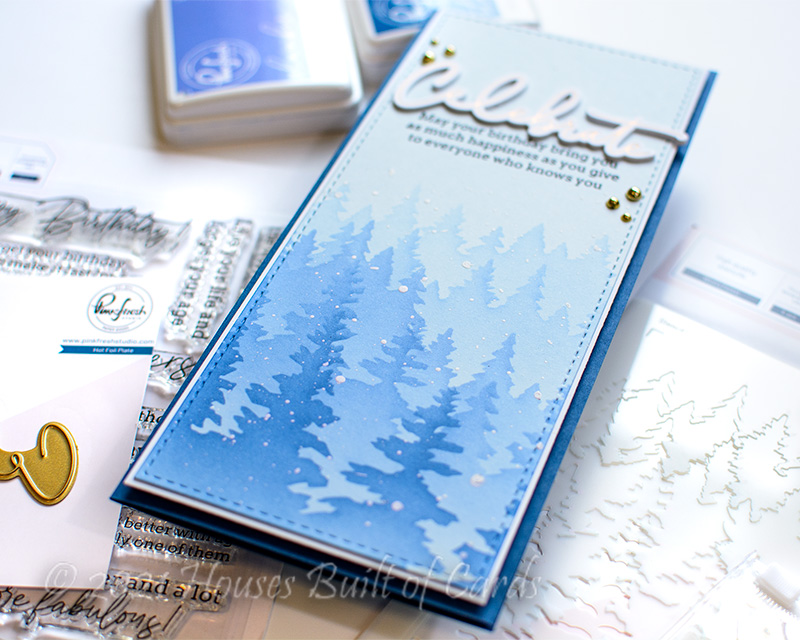
For this second one, I just used one color - Evergreen. Even though these were deep colors, you can get a soft look just by gently blending bit by bit to build up color - and keeping from heavy ink or blending lines. Once I had backgrounds blended, I added some gold splatters using someone else Starry Colors palette that they loaned me (thanks Brenda!).


Once that dried, I added the Leafy Frames die, cut from white cardstock. I also used the Thank You Script, die cutting the shadow layer from vellum, and the top layer from gold cardstock. To add dimension - I also die cut it twice from white cardstock to adhere behind the stacked layers - and sneaky way to add dimension, without having to cut tons of tiny foam tape strips - haha! I finished off with some coordinating jewels, and these cards are done!


Product links are all below - including affiliate links where possible, which simply means if you use one of the links below that I receive a small commission at no additional cost to you. Thanks so much for stopping by! Have a wonderful day!!!


Wednesday, September 28, 2022

First Night STAMPtember Card Kit - Simon Says Stamp

 Hello! I'm dropping by tonight to share a few cards that I created using the BRAND NEW Stamptember surprise - the First Night Card Kit. It is available as a pre-order, and will ship in mid-October - so this is your chance to get it on pre-order! This is such a pretty collection, and so loaded with fun supplies to kick start your holiday cardmaking! I created this trio of cards that were so super quick and easy to put together!


Each of these cards focuses on the beautiful pattern paper in the kit, and sentiments from the included 6x8 stamp set. The pattern paper on this first card has a lovely glossy finish to the silhouette on the paper - super hard to capture in photos, but so fun in real life! Also hard to see in real life - I used the gold calligraphy pen to add a slight gold touch to the edge of the cardstock panel - kind of like gold leaf on book pages! I heat embossed the sentiment for this one in gold on a strip of vellum, wrapped around the panel, and adhered it to my cardbase with foam adhesive. I finished off with a few of the sequins from the mix in the kit.


This second card I added a few more elements from the kit. I die cut the Twinkle Stars die from gold cardstock, and kept some of the center pieces to embellish around the sentiment. I mounted it on a tag from the kit - including some of that sparkly ribbon at the top of the tag. I added some of the Gold Washi tape over the pattern paper in the background (funny story...I thought it was ribbon at first, then realized it had a backing that you could peel off - and it was sticky!). I heat embossed a sentiment from the stamp set in white on black cardstock, and finished off with a few more of the sequins like the last card.


And finally, this card is all about that amazing pattern paper that I just HAD to use! It is gold foil, and the prettiest color! I die cut a rectangle window in the panel, then used that to position and stamp my image and sentiment on my white cardbase. I mounted the frame I created with foam adhesive, and wrapped some more of that sparkly ribbon from the tag pack around, tying in a knot and trimming the edges. I finished off with just a few of the gold sequins from the mix in the kit.


Here is a look at the entire kit contents - you can find out more HERE:


Product links are all below - including affiliate links where possible, which simply means if you use one of the links below that I receive a small commission at no additional cost to you. Thanks so much for stopping by! Have a wonderful day!!!


Sunday, September 25, 2022

Inked and Embossed Daisies card - Simon Says Stamp October Card Kit

 Good morning! I'm back today with another card using the BRAND NEW (well...at least still fairly new!) October 2022 Simon Says Stamp Card Kit - Sunflowers and Daisies! This month's kit is full of floral goodness! The included stamp Sunflower Fields stamp set has some fun sunflower images to pair with the the lovely scripty sentiments, and a layering stencil that coordinates with the stamp set! There is also a fun 3D Embossing folder, of course some lovely embellishments...that's all not to mention the cardstock, envelope, FULL SIZE ink pads, and more!

I created my cards at a craft retreat I attended in Wisconsin with a good friend - and it was a new challenge to try to stick as close as possible to the kit contents, since that is what I brought with me! Not a lot of additional supplies on my kit cards this month! This card is particularly clean and simple, but was kind of fun to create as well!

For this card, I used the the Fresh Daisies 3D embossing folder in the kit, but I wanted to add some different texture and color to it. I grabbed the ink pad in the kit, and swiped it across the recessed side of the embossing folder. That way the embossing ink only stick to the flat portion of the design. 

I carefully put my white cardstock in the folder so it didn't shift any, then ran it through with my usual 3D folder sandwich (Spellbinder: bottom white plate, closed embossing folder, and the cardboard backing from the embossing folder packaging - that seems to work perfectly for me!). Look at the fun detail that ink gives around the daisies!

I popped that panel up with foam adhesive on a white cardbase, then heat embossed a small and simple sentiment from the stamp set on some of that Green Apple cardstock in the kit, trimmed it down to a small strip, and mounted that with foam on top, nestled in those flowers.

Here is a closer look at the entire kit contents - you can see it all HERE:


Product links are all below - including affiliate links where possible, which simply means if you use one of the links below that I receive a small commission at no additional cost to you. Thanks so much for stopping by! Have a wonderful day!!!

Friday, September 23, 2022

Soft Sunflower Mini Slimline Duo - Simon Says Stamp October Card Kit

 Good morning! Once again, I've been traveling a bit this month, so I'm just now finally popping in to share my first card using the BRAND NEW (well...at least still fairly new!) October 2022 Simon Says Stamp Card Kit - Sunflowers and Daisies! This month's kit is full of floral goodness! The included stamp Sunflower Fields stamp set has some fun sunflower images to pair with the the lovely scripty sentiments, and a layering stencil that coordinates with the stamp set! There is also a fun 3D Embossing folder, of course some lovely embellishments...that's all not to mention the cardstock, envelope, FULL SIZE ink pads, and more!

I created my cards at a craft retreat I attended in Wisconsin with a good friend - and it was a new challenge to try to stick as close as possible to the kit contents, since that is what I brought with me! Not a lot of additional supplies on my kit cards this month! I'm starting off by sharing these soft cute little mini slimline size cards - I kind of created my own custom size for these, because, why not?


I started off by stamping that largest sunflower image and heat embossing it in white on white cardstock. I then stenciled over the heat embossing with the coordinating layering stencils. I love how this makes the details pop in the white, and leaves a light and bright image! I used the two ink colors in the kit, and added Lucky as an additional green on the stem layer of the stencils. The same ink color would have been fine, but it was fun to mix it up. I also added some brown to the center of the florals - and since I was traveling and didn't have all my ink colors with me, I used a Pinkfresh Gathered Twigs ink cube for that one. With the heat embossing, that is the color that probably shows the least honestly!


I didn't want to waste a bit of that image, so I trimmed it in half, and that became the start of my cards. I stamped a sentiment in the corner of each panel in black, then matted each image with a bit of the Sunshine and Green Leaf cardstock in the kit.


For this first card, I also wrapped some jute twine (from the tag pack included in the kit!) around that panel, before mounting it wit foam on my cardbase created with some of the Ivory cardstock in the kit.


For the second card, I accidentally trimmed the panel for the cardbase smaller than I meant to. Since I wasn't crafting at home and didn't have extra cardstock, I decided to just go with it!


So this second card has a much smaller Ivory cardstock border. Instead of mounting with foam adhesive, I mounted it directly on that cardbase so you could still see the border, then wrapped the twine around the entire card, and tied in a simple knot before fraying the edges. Just gave a slightly different look and effect.


Here is a closer look at the entire kit contents - you can see it all HERE:


Product links are all below - including affiliate links where possible, which simply means if you use one of the links below that I receive a small commission at no additional cost to you. Thanks so much for stopping by! Have a wonderful day!!!


Tuesday, September 20, 2022

Tropical Summer Hibiscus - Pinkfresh Studio

Continued from yesterday's birthday card post...while we are on birthday cards, how about I catch up this year's birthday card for my other daughter? This one isn't near as badly behind, since her birthday was in June, but I figured now was as good a time as any to post and catch it up! Once again, I used lots of goodies from Pinkfresh Studio to create this card! And...if you hang on until the end, I have a bonus card that I created with extra pieces from this first card!


This was at a time when I was having tons of fun mixing and matching different ink color families to get new color layers. I loved how this combo came out with that in mind! I used Coral Reef and Passion Fruit mixed with Apricot and Clementine for the larger flowers, then mixed a bit of the oranges with the Sunshine and Sweet Mustard for the smaller flowers. I moved onto the greenery, and used a mix of Mint and Aquamarine inks for those. Oh - and forgot to add that I stamped the entire thing with Aquamarine ink - love the fun of a different outline color than the typical Detail Black or heat embossing!


I created the background with Stitched Diamonds coverplate, and die cut a circle out of the center using Nested Circles as a window to allow the coral colored cardbase to show through. This was also the perfect place to tuck my sentiment from Perfect Sentiments, hot foiled in Gold foil, and popped up with foam.


Finished off with a few Clear Iridescent Droplets - the perfect way to add a touch of shine to the entire thing!


And then we have the bonus card I created using some leftovers from the first card!


You can probably quickly spot the leftovers - some extras of the florals, as well as the window I die cut from the first card's background coverplate. I used a soft yellow cardbase this time, and rounded off a couple corners to pull it all together.


It needed a touch of something extra, so I tucked in some white Curvy Foliage around the edges of the circle peeking out from under the foliage. Sentiment is from Perfect Sentiments again, only this time stamped in Detail Black.


Same as the last card, finishing touch on this one is a few more of those Clear Iridescent Drops! LOVE them!


Product links are all below - including affiliate links where possible, which simply means if you use one of the links below that I receive a small commission at no additional cost to you. Thanks so much for stopping by! Have a wonderful day!!!


Monday, September 19, 2022

Celebrate in the Woods - Pinkfresh Studio

 Hello! I am SUPER behind on posting a few card - like this card that I made for my daughter's birthday last year. How far behind you ask? Well...her next birthday is one week from today, so, yeah, it's been a minute or two! I used some of my favorites from Pinkfresh Studio for this card, and as I usually do for my family, I tried to make it somewhat specific to fit her. Super fun!


I think part of why it took so long to share this card, is that the beautiful Wintry Forest stencil went out of stock so quickly after I created it, and then I planned to wait until it came back in stock to post it. And naturally, by then I had totally forgotten about it! I used soft blue cardstock as a background, then two colors of Pinkfresh inks in varying intensity of color to get all the different options for my stenciling. I used Slumber for the first 4 layers, then Storm for the final darkest layer.


I did it on a larger piece of that blue cardstock, then used a slimline die to die cut it, which left me with lots of space to add my sentiment! I added some white splatters for a touch of texture - it felt like to fit the wintry blue feel of this card. I then matted it with a touch of white cardstock to help it pop off my deeper navy slimline cardbase.


For the sentiment, I hot foiled the Celebrate word and die cut with the coordinating die. I die cut a few extra of the Celebrate die cuts to layer up for dimension, and it is easier than trying to fit foam tape on those dainty words! I stamped a secondary sentiment from Happy Birthday Sentiments in Detail Black underneath, directly on the pretty panel! 


Finishing touch is a few Metallic Gold Pearls added in clusters of 3! Gotta have that bit of sparkle, and it perfectly enhanced the hot foiled word!


Product links are all below - including affiliate links where possible, which simply means if you use one of the links below that I receive a small commission at no additional cost to you. Thanks so much for stopping by! Have a wonderful day!!!


Tuesday, September 13, 2022

Merry Christmas Gnome - Pinkfresh Studio Instagram Release Hop

Hello! Today I am part of a fun Instagram hop to celebrate the new Pinkfresh Studio release! I have had so much fun creating with this release - yesterday was the blog hop, and I shared several cards for that! Today I'm sharing a card I created on last week's YouTube Live for Pinkfresh Studio as a sneak peek with Lea Lawson. We used similar product to create 2 completely different cards! You can watch that video HERE if you want to see more details!  


I love the new Holiday Elements washi tape, and the traditional, but slightly vintage colors. But - you add the stamp and die set, and custom color options? That just opens so many possibilities! I loved doing this in a totally different color combination!


I used pinks and blues to color my image, and then die cut them with the coordinating die. After the live, I also did tuck an additional flower cluster at the top left corner - it just felt like it needed a little something extra!


Added a hot foiled sentiment from the new Brushed Sentiments: Holiday set - hot foiled in Bright Pink to match my stenciling.


I used the Dotted Scallops coverplate for the background, and mounted everything on a coordinating blue cardbase. 


Finished off with a few sparkly Clear Iridescent drops for some sparkle! 


Product links are all below - including affiliate links where possible, which simply means if you use one of the links below that I receive a small commission at no additional cost to you. Thanks so much for stopping by! Have a wonderful day!!!