Tuesday, April 30, 2019

Shimmer Powders and Stencils - Simon Says Stamp

Good morning! Dropping by today with a a couple cards with my first attempt at using shimmer powders from Tonic! I paired them up with some Simon Says Stamp stencils - and I'm in LOVE!!! I played with them a couple times just on a watercolor cardstock, and wasn't quite getting the feel for the proper amount of powder and water - my ratio seemed to be off! So I pulled out a couple of stencils and tried that, and oh how I LOVE the effect I got with that! Soooo fun!!! 

I actually combined a few items from the Tonic Studios spring release that I was sent as part of my work with Simon Says Stamp with no obligation to use or share - I did an Instagram Live last week as I opened and looked through all the fun items in the box. But it was very easy to use and love these fun products, so I'm excited to share these two cards here today!


For both of these cards I used some of the Craft Perfect watercolor cardstock that I received in the box. I love the fun texture and the crisp white color to this watercolor paper! For each of the backgrounds, I placed a stencil over the paper, shook a bit of the Lilac Waterfall shimmer powder over the stencil, then lightly misted with water and removed the stencil. This shimmer powder is super fun, since there are multiple colors in in, and the react with the water and mix and blend all on their own! I didn't mess with them at all beyond that - and set them aside to dry thoroughly before adding my sentiments.


This first card I used the newer Simon Says Stamp Mesh Stencil - it worked so well for this!


The second one I used an slightly older stencil called Triangle Blast from Simon Says Stamp - this one also worked great - a little more open and spread out design meant I got a softer background which was kind of fun!


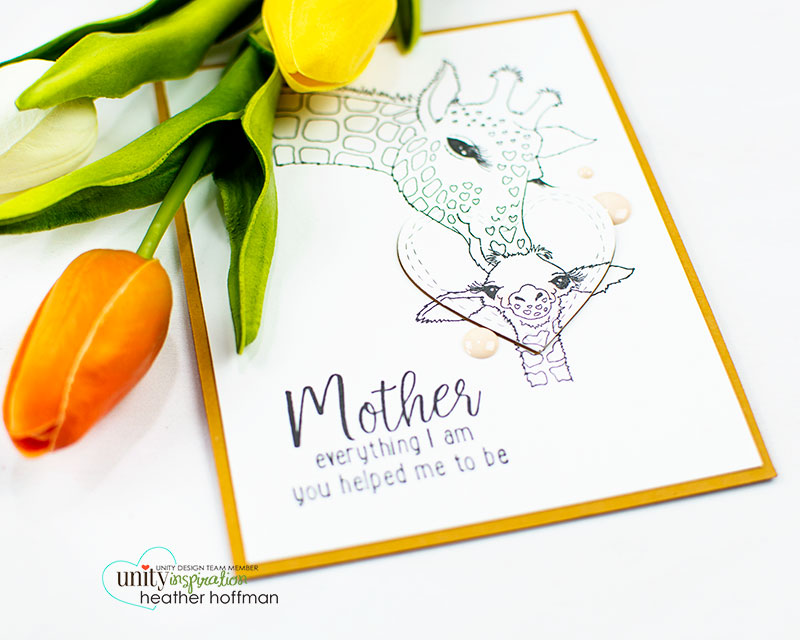
I added sentiments to the panels using You Got This stamp set, and heat embossed them to add to the shine - I don't know if you can see it better in these next two photos - but the shimmer powder has a great soft glittery effect as well! SO fun!


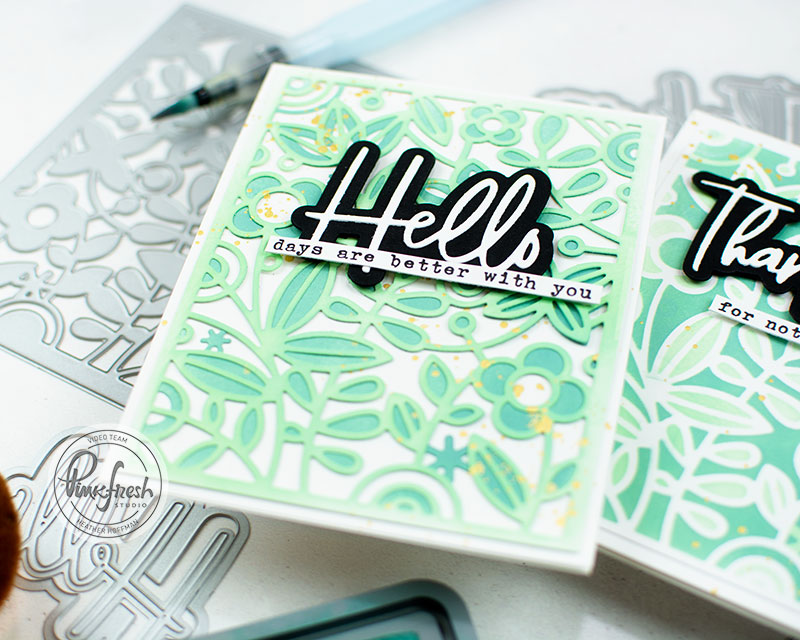
Sentiment on this one added the same way, and then I die cut both panels with a Stitched Rectangle die, and added a bit of Berry Fizz glitter cardstock tucked behind before mounting on my white cardbase.


The final finishing touch is a bit of bling! I added a few of the fun Amethyst Squares to each card, scattered around the sentiment. The squares went great with the other geometric designs from the stencils! And everything coordinates SOOO perfectly!


Product links are all below - including affiliate links where possible, which simply means that if you use one of the links below, I receive a small commission at no additional cost to you. Thanks so much for supporting my blog, and stopping by! Have a wonderful day!!!


Monday, April 29, 2019

CAS Popped Up Detail - on the Unity Stamp Company Blog

Good morning! Stopping by today with a quick look at my cards for this week's video tutorial on the Unity Stamp Company Blog! Today I'm sharing a simple and sweet Mother's Day card with a popped up detail! You can check out all the details HERE!


Thanks for stopping by - have a wonderful day!


Pinkfresh Studio April Release Blog Hop

Good morning! So excited today to be hopping along with Pinkfresh Studios as we celebrate the BRAND NEW April Stamp and Die Release! This is a big month for Pinkfresh Studios - the Essentials release was ust a couple weeks ago, and here we are with another release, and it is AMAZING! You aren't going to want to miss a stop along the way - TONS of inspiration and prizes up for grabs! YAY!

I have a $25 gift card up for grabs here on my blog (details below) - and the ENTIRE RELEASE is up for grabs as well! See details on the Pinkfresh BlogPinkfresh Studio is also having a special promo in honor of the new release! Between now and May 5th head to the Pinkfresh Studio Store and use code "APRFREESHIPWITH50" for free US Shipping and $5.50 off international shipping! 


In addition, everyone placing an order will get an adorable die for free as well while supplies last (no code needed - will add to cart automatically).


I got to create with one of my favorite new sets from this release for my post today - Through the Trees! One night I literally was wishing there was a stamp like this, and woke up the next morning seeing the sneak peek of the new release in the Design Team Group. This stamp set was EXACTLY what I was wishing for - don't you love moments like that?!?!? Makes me so incredibly happy! For my family, the woods are our happy place. When we need to unplug and get away, we go hiking or camping - somewhere in the trees. And one of my favorite things to do is look up at the sky through the trees. I can't tell you how much I plan on using this stamp set!!!


This stamp set is designed to be stamped, then rotated 180 degrees and stamped again for a filled in effect on the trees. However, it also works amazingly with just a single stamp as I did on this card. I stamped it on vellum and heat embossed it in white, then trimmed it out with the largest basic rectangle from Essentials: Stitched Rectangles.


I die cut a panel of pattern paper from Everyday Musings 6x6 Pattern Paper Pad with the largest stitched die, from Essentials: Stitched Rectangles to go behind it. Love how these two dies together create the perfect matted effect!


I tucked another tiny border of gold glitter cardstock behind that, letting just the tiniest bit peek out from behind.


Finally, I heat embossed a sentiment from Through the Trees in gold on a strip of black cardstock. I adhered that to the vellum panel, then hid my adhesive behind that to adhere the vellem to the pattern paper - perfect way to hide the adhesive and not have it show through the vellum! 


And just for fun - here is another card using this set, with a bit more traditional colors! There are some fun techniques I put into play on this card - and I will be re-creating this card in this week's Pinkfresh Facebook Live Event on Thursday, May 2, 2019 at 10 AM PDT - I hope you'll come check it out for more details! A little birdie told me there would be some prizes up for grabs this week as well - so you really won't want to miss it!


GIVEAWAY INFO:

Make sure and leave a comment before you leave for a chance to win a $25 gift certificate to Pinkfresh Studio! Winner will be chosen and posted on the Pinkfresh Blog on Monday, May 6, 2019 - so make sure and check back to see if you were a winner! Winners must check that page and claim their prize within 2 weeks.

Here is the entire blog hop line-up so you don't miss a single stop - and product links are below - including affiliate links where possible, which simply means if you use one of the links below that I receive a small commission at no additional cost to you. Thanks so much for stopping by! Have a wonderful day!!!

You are invited to the Inlinkz link party!
Click here to enter

Friday, April 26, 2019

Layering Dies Two Ways with Distress Oxides - Pinkfresh Studios

Good morning! Yesterday was my second Facebook Live video! This one went much better If you missed it and want to take a peek, you can find it on the Pinkfresh Facebook Page - this weeks video is available HERE. Still planning to do this each week on Thursdays as schedules allow - so I hope you'll be able to come join me sometime! Next week we will be playing with some of the brand new April release that is coming soon, and there will be some giveaways as well - so please come join in the fun! It will be 10AM PDT on the Pinkfresh Facebook Page HERE!

So today I'm sharing the cards we made in yesterday's live video - we had fun with the Pinkfresh Fancy Floral 1 and Fancy Floral 2 Layering Dies and Distress Oxide inks for these!


The best way to understand the process is to go watch the video, which fortunately is saved and posted on the Facebook page now. But basically we used the die cut pieces as stencils for the first card, then used those same pieces to layer together for the second card. We also added some sentiments on top, using the new Essentials: Classic Words Die Set, and some little add on sentiments. This first one the extra sentiment came from Happy Hugs


This second one with the dies we used as stencils layered together has an add on sentiment from Lush Greenery stamp set:


The two distress oxide inks we used for this are Dried Marigold and Abandoned Coral. There are also some gold splatters on both of these that we added with a Starry Colors palette for a bit of sparkle and shine! Isn't it fun getting two cards from one design idea?  


When I started the video, I didn't have a completed card in mind, but I had started playing with some design ideas in a different color palette. So after the video, I completed these into cards as well!


These cards used Cracked Pistachio and Evergreen Bough Distress Oxide inks, and pretty much the same process.


For both of these cards I accidentally used a retired stamp set called Bird with Flowers, so if you happen to have that in your stash you can put it to good use as well! And if not, there are TONS of fabulous sentiments in other Pinkfresh stamp sets fortunately!


Same gold splatters and layers here on these cards. Would love to hear which color combo is your favorite!


Product links are all below - including affiliate links where possible, which simply means that if you use one of the links below, I receive a small commission at no additional cost to you. Thanks so much for supporting my blog, and stopping by! Have a wonderful day!!!


Thursday, April 25, 2019

Simon Says Stamp Celebrate Women Blog Hop


Good morning! I'm super excited this morning to be part of a very special blog hop with Simon Says Stamp celebrating WOMEN! There are also a couple new stamp sets (and one coordinating die) that are releasing today that celebrate the special women in your life - and they are FABULOUS! AND...this weekend, use coupon code WMN999 to receive a 4 pack of Simon Says Stamp EXCLUSIVE Mother's Day Sentiment Strips for FREE with any purchase! 


Here is a look at the new sets - and they are SOO fun! One is a bit sassy but sweet, and one a bit more classic and elegant - so something for every woman in your life! Click on any of the images to get a closer look:


I have several cards to share today - starting off with a few cards created with the Good Job Mama set by CZ Designs - I ADORE all the fun and unique sentiments and combinations you can build. I pulled out a BUNCH of the little sentiments to build my own custom large sentiment for my cards, and can I just say, I think I should create an entire pile of these and give them to EVERY mom in my life?!?!?


I lined up all my sentiments in my MISTI, which made it easy to recreate each of these cards. For the pink and blue ones, I kept it fairly simple, and heat embossed with clear embossing powder for a tone on tone effect. This also gives those sentiments lots of fabulous shine! 


I die cut the panels using Wonky Stitched Rectangles, and matted with a tiny border of black cardstock. I also added a few white paper hearts die cut using Mini Hearts Die Set, and adhered a sprinkling of those around these two cards. I added a coat of Tonic Crystal Glaze over each of them to make the hearts a more dimensional embellishment! Check out the great shine on this card:


The rainbow one I carefully masked and stamped each sentiment with a different color in a rainbow of Simon Says Stamp dye inks, keeping the large sentiments black. Then, I came in with a tiny makeup brush as an ink blender, and blended the same ink over the top of each tiny sentiment - keeping it nice and soft. Once I finished that, since I still had everything lined up in my MISTI, I re-stamped the entire sentiment with clear embossing ink and heat embossed those all with clear embossing powder (after hitting all the ink blending with my heat gun to make sure it was all set and my embossing powder wouldn't stick to it all). This helped make sure all those little sentiments popped up really well - and as with the last two cards, adds a good touch of shine to the card!


Finished off that card with a few Sparkling Clear Pretty Pink Posh Jewels - adhered upside down. I've found adding these clear jewels this way makes them sparkle and shine even better - I think it lets more light circulate around them. Kind of a fun twist though!


Next up, I have a card using the GORGEOUS new Incredible Woman stamp set - I love the style and design of this set, and all the different women you can create cards for: Grandma, Mother, Mama, Mum, and Aunt - a great assortment! 


I used some pretty Simple Stories Spring Farmhouse pattern paper as a guideline for the colors I used on my open letters. I die cut the sides of the panel using Scallop Stitches Dies so that the pattern paper could peek out on each side of the front panel. I added some of the florals from the set stamped in a soft colored ink for a neutral framing of the sentiment - really wanted to let that sentiment take center stage! Finished off with some twine tied around in a loose bow and mounted with foam adhesive on my pattern paper. Finally, I added some of that Tonic Crystal Glaze on each of the colored letters for just a touch of shine and to make them pop a bit more!


Which one of these new sets is your favorite? Is one more your style, or do you have special women in your life who would love both of these?


Here is the AMAZING blog hop line-up for today - make sure and hop to each stop for some INCREDIBLE inspiration with these new sets:

Heather Hoffman (you are here)

Product links are all below - including affiliate links where possible, which simply means that if you use one of the links below, I receive a small commission at no additional cost to you. Thanks so much for supporting my blog, and stopping by! Have a wonderful day!!!


Wednesday, April 24, 2019

Animal Signs and Stencils - on the Pretty Pink Posh Blog

Good morning! Dropping by with a quick peak this morning of a few cards I have shared over on the Pretty Pink Posh blog today with a sneak peek at some of the BRAND NEW release items coming soon! You can check out all the details HERE!


Thanks for stopping by today! Have a wonderful day!


Spring Tulip Border Card - Pretty Pink Posh

Good morning! I'm stopping by today to share a fun card using some stamps and dies from Pretty Pink Posh - and some masking and ink blending as well! 


For this card, I started with a panel of white cardstock, and stamped a row of the little flowers and leaves from Spring Wreath stamp set - I love using some of the smaller elements in a stamp set to create a card! 


Next, I masked off above and below the row of flowers using some Post It Tape, and did blended some Tumbled Glass Distress Oxide ink above and below. Then, I removed the mask, and used Copics to color in my flowers.


I die cut the finished panel with the rectangle from Stitched Notes, and adhered the center directly on my cardbase, and the edges with foam adhesive for a touch of dimension. Finished off with a sprinkle of pretty pink jewels from the Valentine Jewels Mix!


Product links are all below - including affiliate links where possible, which simply means that if you use one of the links below, I receive a small commission at no additional cost to you. Thanks so much for supporting my blog, and stopping by! Have a wonderful day!!!


Tone on Tone Stenciling - on the Reverse Confetti Blog

Good morning! I have a new edition of Wednesday in the Works on the Reverse Confetti Blog and YouTube Channel this morning - this week is a tutorial on creating a soft tone on tone stenciling effect to create this fun teacher thank you note! I hope you'll pop over and check it out for more details!


Thanks so much for stopping by - have a great day!