Good morning! Today is the blog hop to celebrate Pinkfresh Studio's March 2023 Washi, Stamp, Die, and Stencil Release! You aren't going to want to miss a stop along the way - TONS of inspiration and prizes up for grabs! YAY! You can find links to all of the new release items I used on today's cards at the bottom of this post! Our washi releases are always amazing, and this one is no exception!
As often seems to happen with Pinkfresh washi releases, I have a TON of cards to share...so get ready to start scrolling! You've been warned! :)
I'm sharing these in no particular order - pretty much in the order I photographed them, not even the order I created them! Starting off with this light and airy card that captures all I love about Pinkfresh washi tape suites - pops of color, and the easiest cards you will ever make!
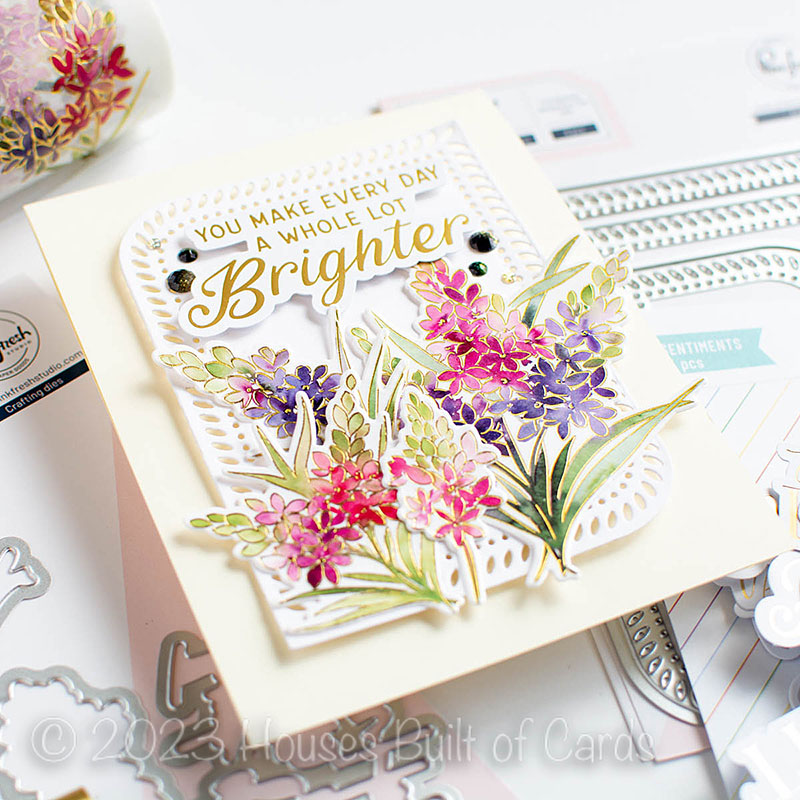
This first card uses the new Tuberose washi paired up with the new Rounded and Braided Rectangles die. This die is so fun to create a pretty backdrop for a card, and the separate elements make it super versatile as well!
I used a Cream colored cardbase, and the rectangle was cut from white cardstock - so it gives a perfect bit of subtle contrast, while still being bright and airy.
I added a sentiment from the newest addition to the popular foiled sentiments - these ones are in silver in gold, but with a satin finish - so still shiny, but a little softer!
I embellished with some Glittering Mountains Ombre Glitter Drops - they just seemed to match perfectly on this card.
And of course - bits of foam adhesive for dimension are a must. Sigh...I love washi tape!
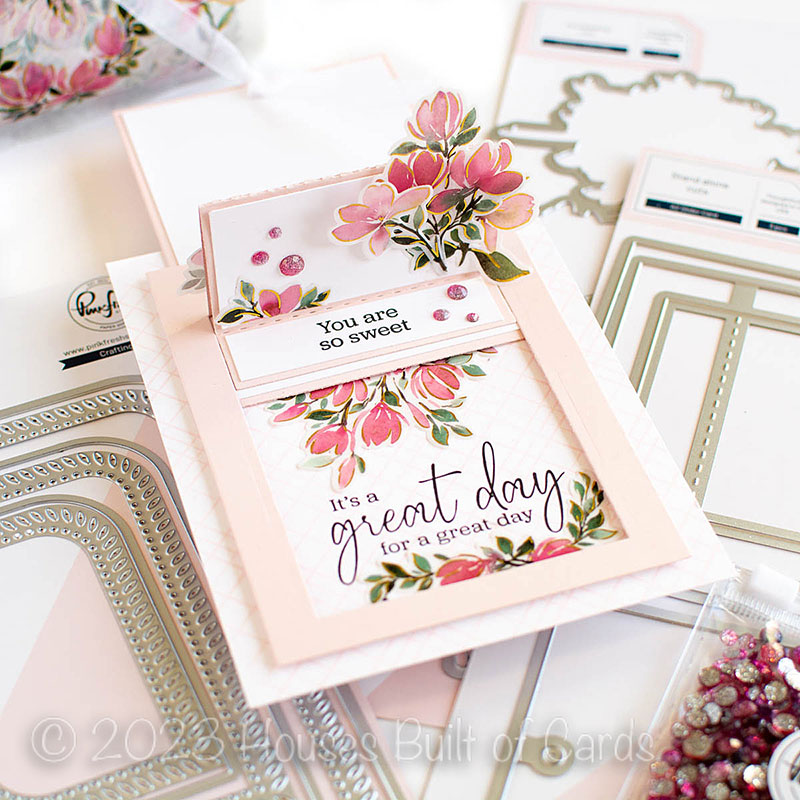
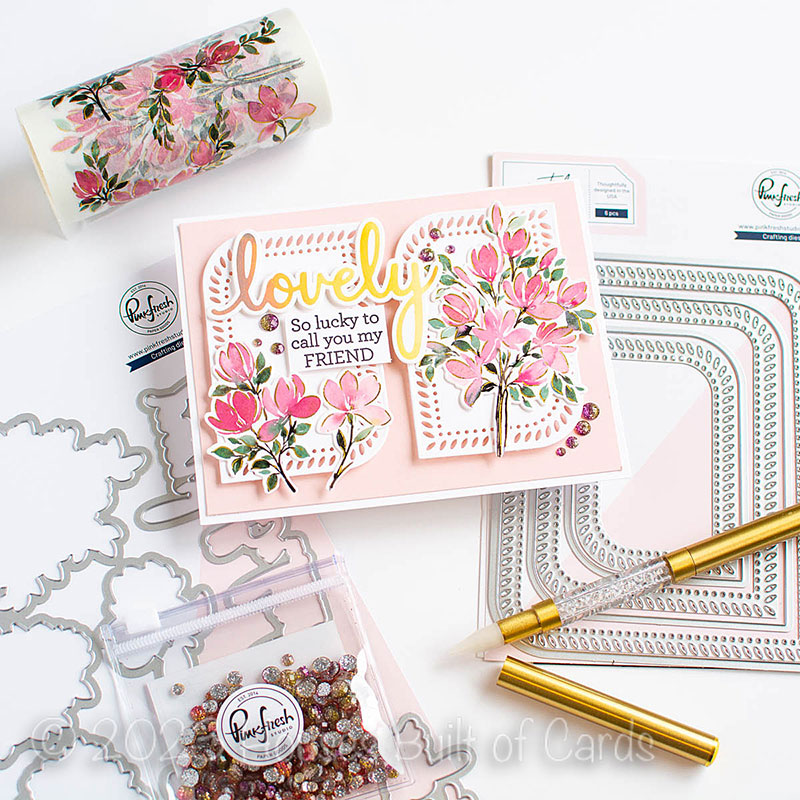
Moving on to another washi suite - Artistic Magnolias!
You might also notice I used those Rounded and Braided Rectangles again on this card - this time I used two of the smallest sizes. I thought it was such a fun arrangement on an A2 card!
I used some soft pink cardstock to back the panels, since it coordinated so well with the Artistic Magnolias floral blooms.
Sentiment was created with a hot foiled word from Phrase Builder: Hello hot foil set, and die cut with the coordinating Phrase Builder: Hello dies. I used Aura foil - which goes so perfectly with that washi!
I added a secondary sentiment from Artistic Dahlias stamp set, stamped in detail black, and trimmed into a rectangle.
I popped the two frames up with foam adhesive, then added the florals with liquid glue, leaving the edges free to float up a bit for dimension.
Sentiments were both adhered with foam adhesive, and a few Pixie Dust Ombre Glitter Drops finish this one off!
And...onto the next washi - Rainbow Daisies!
Gotta love a good rainbow color set, and when it is florals, even better!
I applied this washi to vellum before die cutting out - I love how it keeps the feel of the washi transparency a bit, and it's such a pretty and different way to use them!
Background uses the Floral & Diamond Tiles coverplate die from white cardstock, layed over another Cream colored cardbase. Again, just a bit of subtle contrast!
The frame for this was actually a leftover piece from Art Deco Frames that I cut out for two other projects. I had die cut the larger frame, then cut the smaller from the center piece. The leftover piece made it's own unique frame, so I decided to not waste it!
I added that with foam adhesive to my card, then tucked in some of those pretty florals, adhering with dots of liquid glue. Sentiment for this one is from Artistic Magnolias, tucked in the frame with foam adhesive.
Finished touch was a few Sparkle & Shine Ombre Glitter drops in the corner of the frame!
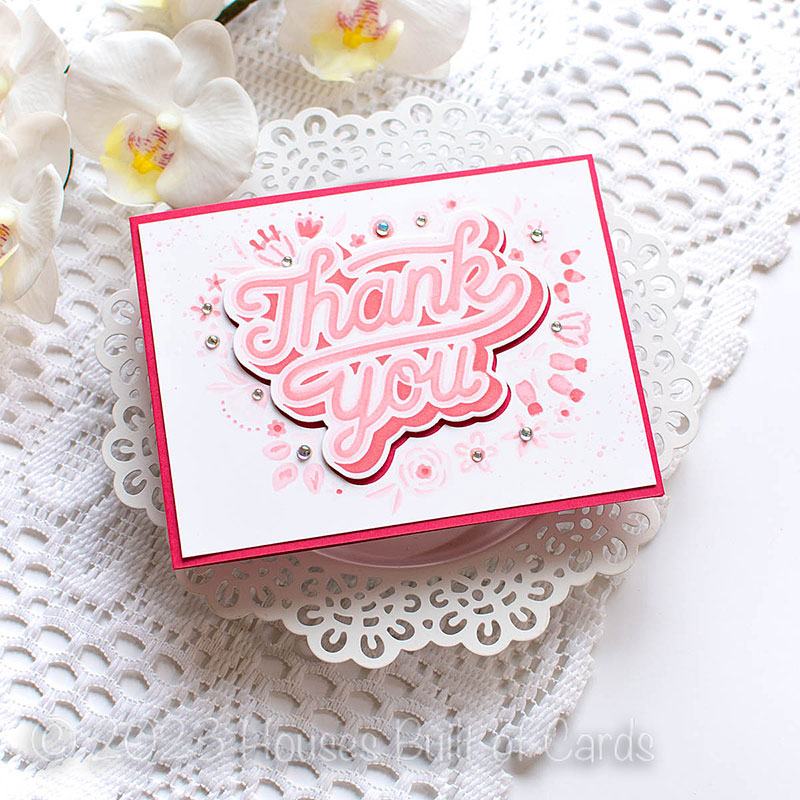
Next up - my final card to share today using the washi tape - then I move on to cards using the stamps and stencils! This is one of my favorite cards from the release, and uses the beautiful Fruitalicious washi tape suite.
The Fruitalicious washi suite was actually included in the most recent Create and Connect event in February, so if it looks familiar, you might either have it or spotted it on social media from someone else sharing projects with it.
For this card, I used many of the smaller elements on the washi for this card - they are so fun to play with and arrange!
For the background of this card, I blended a bit of soft ink on the cardbase - really, just using what I had left on my green and purple brushes, but probably mostly Olive and Candy Violet would be the closest ink colors, just super softly blended. I then layered the Dotted Lattice coverplate in white over the top of that.
The Arch is the center is using the recently released Nested Arches hot foil plate - only this card is actually using the reverse image created using the Solid Hot Foil plate, then die cut with the coordinating die.
I popped the Nested Arch up on foam, and adhered the washi pieces with liquid glue around the outer edges.
Sentiment was created using Sentiment Suite: Thank you hot foil plate, hot foiled in Red foil, then die cut with the coordinating Sentiment Suite: Thank You dies. Secondary sentiment is from Fruitalicious stamp set. Finishing touch is some of the Magic Potion Ombre Glitter drops, arranged around the frame for sparkle!
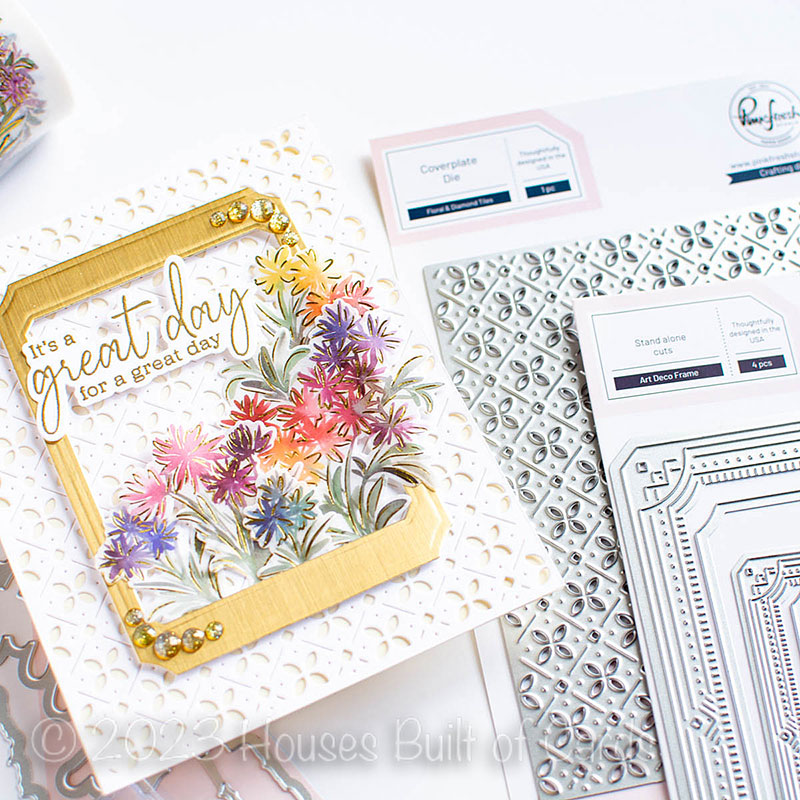
The rest of the cards I'm sharing today feature the stamps paired up with the stencils. I love how much versatility this gives - since you can use the same dies as you use for the washi tape, but stretch them to create in whatever colors your heart desires!
I used the Artistic Dahlias stamp and stencil to create the florals for this card, and actually the next one as well! And I only created one panel - so you definitely get a lot from one full panel!
I stamped and heat embossed the florals using Wow Gold Pearl embossing powder - such a pretty shade! It's sort of a soft creamy gold tone that I just love.
Then I added color to the images with the layering stencils. I used Sparkling Rose, Bubblegum, Coral Reef, Passion Fruit, Meadow, and Emerald City.
Background for this was created with Daisy Chain coverplate die, layered over a pink cardbase. I created a center focal panel using the Nested Arches hot foil and die set. I used the largest foiled arch (from the reverse one I used on that last card!), and then also added a smaller just die cut arch in the center.
The sentiment is also from the Artistic Dahlias stamp set, stamped in detail black, then I layered two additional die cut layers beneath it for dimension.
I finished off by tucking some Curvy Foliage around the card for extra detail, then embellished the florals and top of the arch with a mix of Ballet Slipper, Peach Fuzz, and Emerald City Jewels.
Now the rest of those yummy florals (most of them anyway) went on this next card - that also uses a new die from the release!
This card features the new A2 Slider die - Pinkfresh's first interactive die! I'm not usually a big interactive card kinda girl, but I love how simple this one is to use!
I used some of the florals on the front, some on the pull out tag, and a few inside the window.
The sentiment on the outside is from Artistic Magnolias, and the one on the inside is from the same as the florals, Artistic Dahlias.
I used some pattern paper from the Flower Market 6x6 paper pad for the background. I actually put all these elements on the front of a standard A2 cardbase. So it still opens to write a message on the inside!
I embellished with a few Pixie Dust Ombre Glitter drops, and added a bit of sheer ribbon to the top of the tag to make it easier to pull out as well.
The fun thing about this die is that you can also use the tag on it's own, or the A2 size rectangle that is included! And it looks sweet both closed and opened up, don't you think?
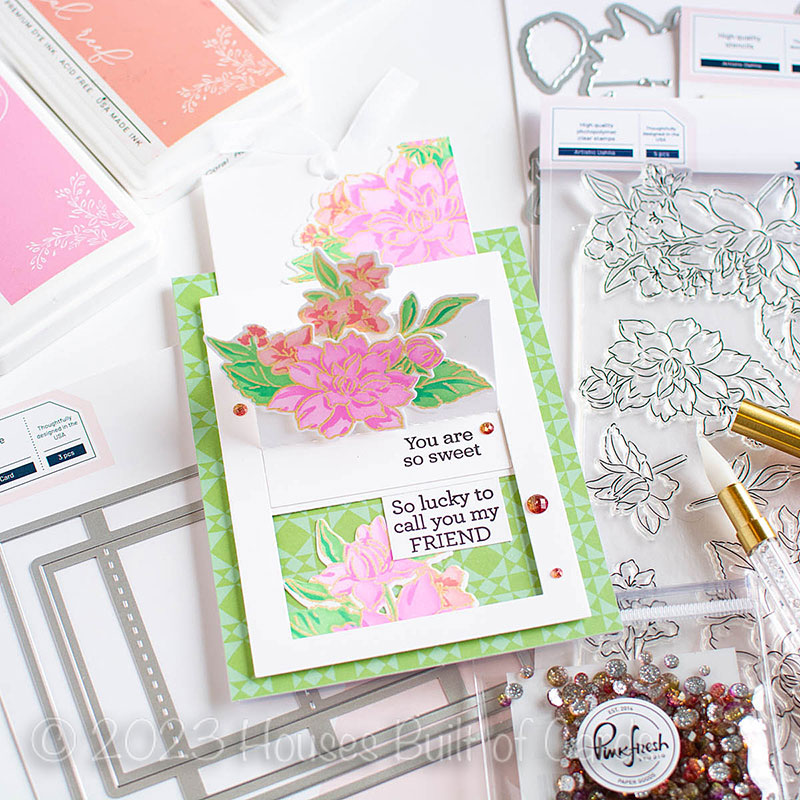
And next up, circling back to that lovely Fruitalicious set, only this time using the stamp and stencils, and using the larger cluster of fruit at the top!
I stamped out just the top of the stamp set twice to create this card. Even though it is longer than a standard MISTI, since I only needed the top of it, I just let it hang out the bottom, and didn't have any trouble at all.
I stenciled it in fun bold colors - Passion Fruit, Candy Apple, Lemon Whip, Peach Fuzz, Candy Violet, Royal Kiss, Sapphire, Meadow, and Evergreen. I also used just the little blueberry cluster on the right under the largest cluster.
Once they were all colored in, I die cut them with the coordinating die, and then added some fine white paint splatters for a bit of texture and fun. I let that dry thoroughly before I finished off my cards.
I used a bold red coordinating 4" x 9" card base, then added a panel die cut with Slim Diagonal Stitched Plaid. This provided a great background!
I adhered the sentiment in the center from the new Foiled Sentiments 5 set, using foam adhesive. Then arranged the fruit clusters around that. I might trip off the excess overhang at some point to fit it in an envelope better - but for now, I thought it looked really pretty! And if I hand deliver, then it won't matter if it hangs off and doesn't fit in an envelope, right?
I adhered those fruit clusters with foam adhesive too - of course! Then finished off with some Ombre Glitter drops in Pixie Dust, Enchanted Forest, and Sparkle and Shine.
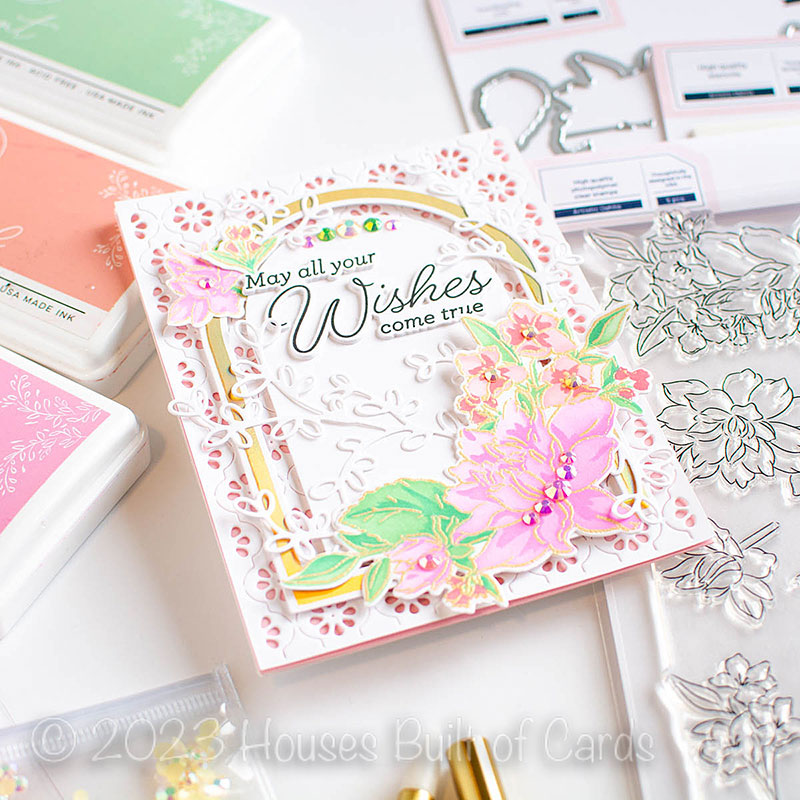
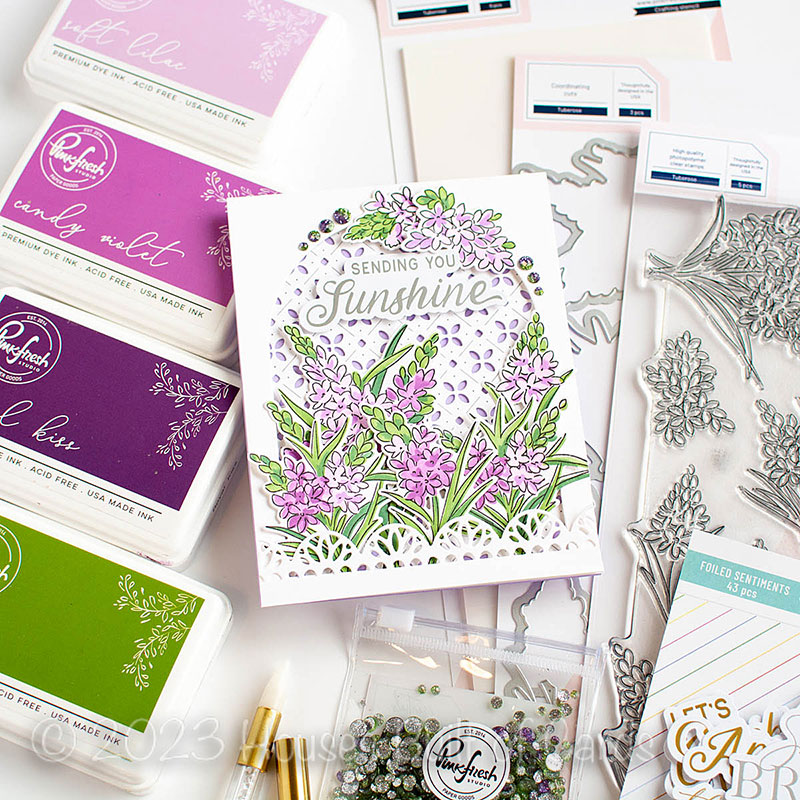
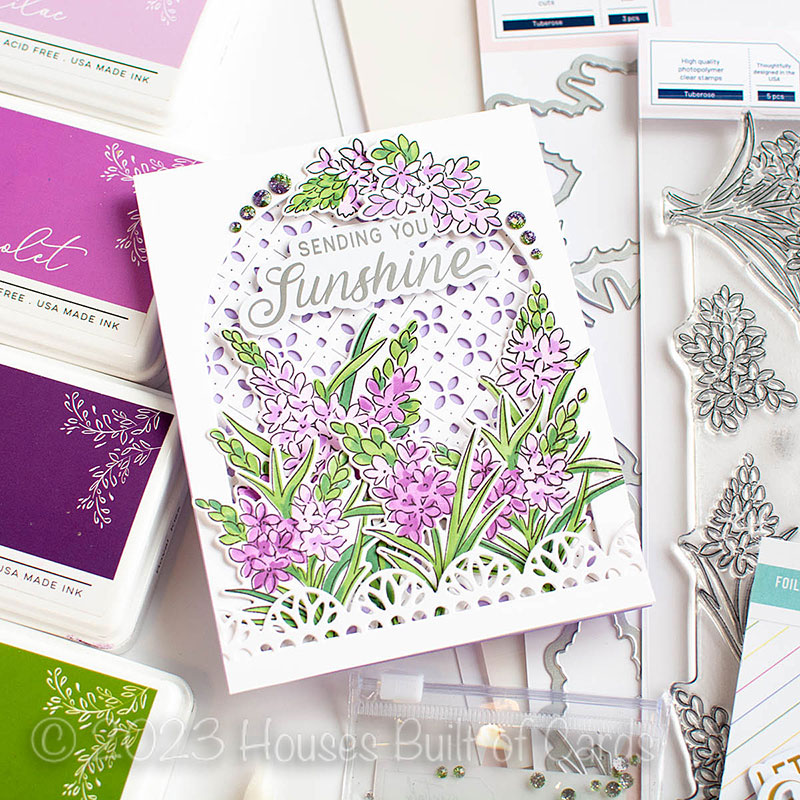
And next up - the very first card I shared in this post was using the Tuberose washi tape - can you believe how different it can look when you use the stamps and stencils?
I did this all in purples and greens - Soft Lilac, Candy Violet, Lavender, Regal Kiss, Olive, and Evergreen inks.
I used Floral and Diamonds coverplate die again, this time layered over some lavender cardstock.
I used one of the negative arches from a previous card to create a window for my florals.
I tucked and arranged the florals in the window, then die cut a border using Lacey Border 1 die, trimming it off so it fit the bottom of the card. Love this pretty edge over the bottom of the card!
I feel like this design reminds me a bit of a window box!
Sentiment for this card is another one of the Foiled Sentiments 5 from the release, this time one of the silver ones. It just went perfectly with those pretty purple tones.
A few Magic Potion Ombre Glitter Drops finish this card off!
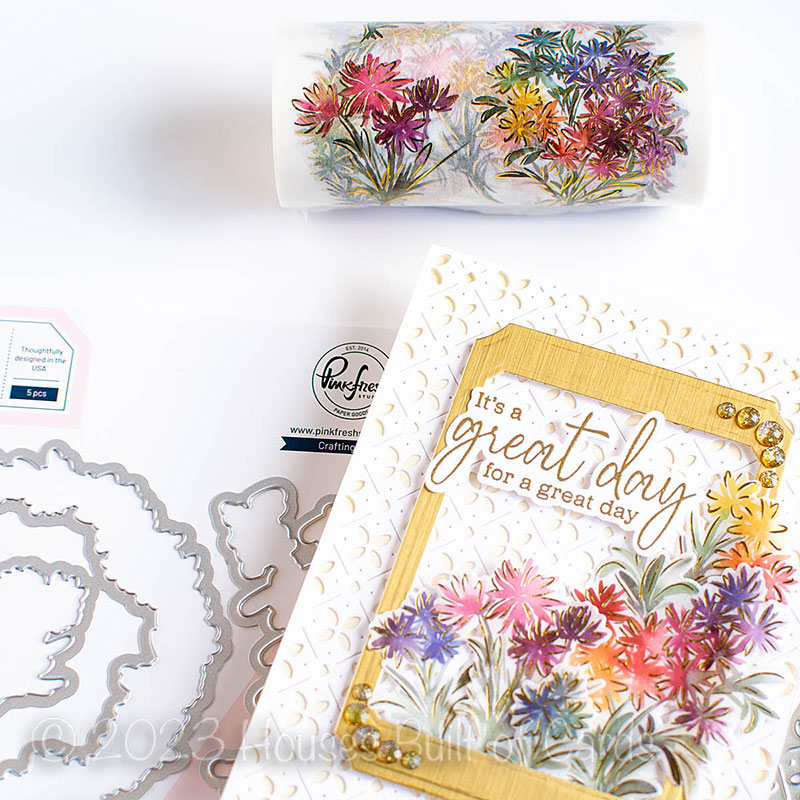
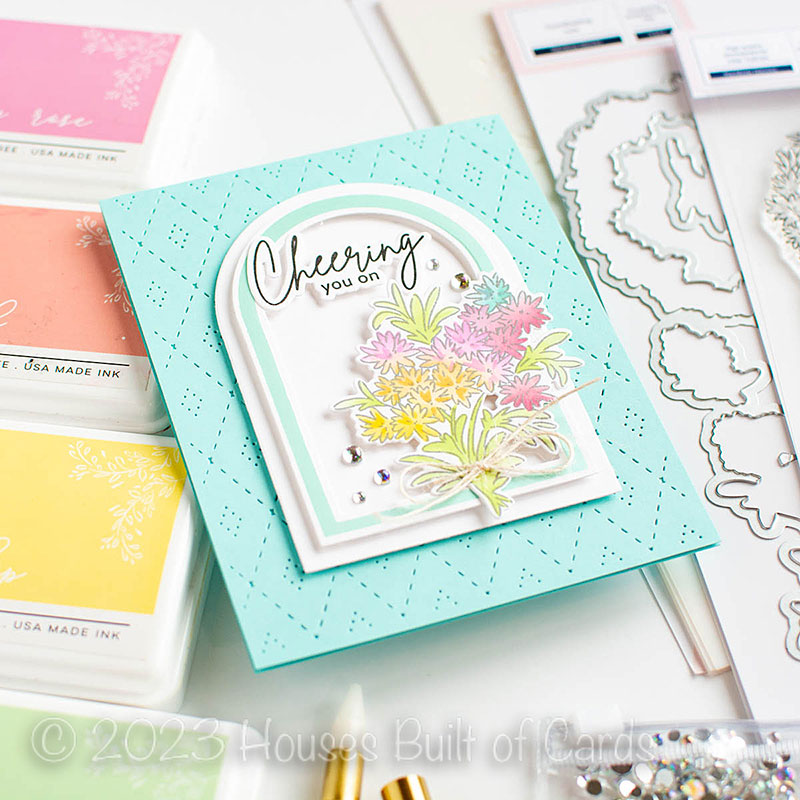
And finally, wrapping up my release cards with this cheery little card featuring the stamp and stencils from the Rainbow Daisies washi suite - I love being able to create tons of different color combos with this one!
For this one, I stamped it in Metropolitan ink, added my stenciling using soft pastels, then stamped again over the top to make that ink nice and crisp. I love the softer look that you get with gray ink as opposed to black though!
Cardbase is a pretty coordinating aqua tone, and I used the Stitched Diamonds coverplate to add texture to the front of the card. Since it doesn't have cut lines, I love that it works directly on a cardfront!
I pulled out more of those Nested Arches for this card! This time I used an arch foiled with the aqua tone in the Satin Pastels pack, and then mounted it with foam on a slighter larger arch die cut from white cardstock.
I kept trying to fit more floral son this card, but I ended up just using the one large cluster, and saving the others for another project on another day!
Sentiment for this is from the Rainbow Daisies stamp set, stamped in black and cut out with the coordinating die.
I also added a tiny twine bow to the bottom of that flower cluster. Just a fun little finishing touch!
And lastly - for sparkle on this card, I added a few Iridescent Clear Drops. They were just perfect!
GIVEAWAY INFO:
Make sure and leave a comment before you leave for a chance to win one of 10 $25 gift certificate to
Pinkfresh Studio chosen from comments left across the hop! All winners will be chosen and posted on the
Pinkfresh Blog on Wednesday, April 5, 2023 - so make sure and check back to see if you were a winner! Winners must check that page and claim their prize within 2 weeks.
Here is the entire blog hop line-up so you don't miss a single stop - and product links are below - including
affiliate links where possible, which simply means if you use one of the links below that I receive a small commission at no additional cost to you. Thanks so much for stopping by! Have a wonderful day!!!