Friday, December 31, 2010

Tree from Serenade

I have LOVED this tree from the Serenade cartridge ever since I first saw it. Since I have that cartridge, and hadn't gotten a chance to use it yet, it was pretty simple to pick what I wanted to be my first cut from the cartridge! The background shape came from Lacey Labels, then I added some Glossy Accents to the leaves. Stamped the sentiment from a stamp in my stash, added some ribbon, and finished with a little bling with my Jolee's Heat Set tool.

Have a happy and safe New Year - hard to believe it is already that time!!! I just got used to writing 2010...


Thursday, December 30, 2010

I believe in angels...

Just a quick one to share today. Made this one with one of my Unity Stamp sets. Stamped it in deep red ink (I think the color is called rhubarb - love that, it makes me hungry!), then filled it in a little with my white gel pen. Did a little faux stitching, added some ribbon with a Prima flower and button, and there it was!


Wednesday, December 29, 2010

Owl always love you

Good morning! Branched out yesterday and combined two of my favorite things: Unity stamps, and my Cricut! The banner at the top I stamped with my Unity stamp set, then cut out by hand. Added a cute owl from Straight from the Nest - with a Peachy Keen face, of course! - and a sentiment from My Pink Stamper's Tweetie Hoo Puns set. Thanks for looking!


Tuesday, December 28, 2010

Little ballerina...

Didn't plan on making a card today...it just kinda happened! I was looking at the weekly challenge on the Cricut Circle blog, and started to think about this set ofstamps by Crafty Secrets I have had in my stash for a bit that I ordered from JoAnns. Hadn't had a chance to use them, and this morning I sat down for a second, because I suddenly wondered what it would look like stamped on patterned paper. Next thing I knew I was coloring it in...just to see what it looked like...then I grabbed the blue from in front of me to mat it...before I knew it, I had my Cricut Birthday Bash cartridge out to cut the shaped card out!!! Added a little doodling, and some stick on pearls, and whether I planned it or not - I had a card!!! I am really happy with it too - double bonus!!!


Monday, December 27, 2010

More Unity Stamp cards

My hubby got me some Unity Stamps for Christmas...and they got here JUST in time for Christmas!!! He signed me up for the kit of the month club, so I can pick and choose which ones I want over the year! So I did manage to sit down for a few minutes here and there to play with them. Here is what I managed to make:

The first one used, of course, Unity Stamps, for the boots and rain, as well as the background behind it. Added a sentiment from my Pink by Design stamps, some buttons that I punched with my Martha Stewart Button punch and added Glossy Accents too, and a bit of ribbon.


Second one has a patterned paper for the background, and just added a little ribbon. The cup and sentiment are both from the Unity Stamp set.


Third one I used colored pencils to color in the stamped image, added ribbon to the top and bottom, and stamped sentiment from my stash (I think it is a Fiskars clear stamp), and some buttons and string.


Fourth and final one has Cuttlebug on the background, a bit of ribbon, and a sentiment from Pink by Design stamps. The ladybug and the flower were both from the Unity Stamp set.


Hope your Christmas was wonderful!!!

Friday, December 24, 2010

Christmas Gift Bags

First of all - I want to wish everyone a MERRY CHRISTMAS!!! Can't believe that it is Christmas Eve already! Just thought I would quickly share a couple of gift bags I made last night and finished up this morning. We are giving a couple of gift cards this year, and I wanted to make something extra special to hold them, since I always feel like I am cheating when I give gift cards!

The bags were cut from Tags, Bags, Boxes and More - one of the new free downloads that I hadn't used yet! The first two tags were cut from Very Merry Tags - with Stickles on both, and doodling on the bell one, and a Peachy Keen face on the gingerbread man. The last tag came from Inspired Heart, and has lots of Stickles and a bit of Glossy Accents around the outside. Tied all three tags on with a ribbon.

Thanks for looking - and hope you have a Wonderful Christmas tomorrow!!! Blessings to you and your family!


Tuesday, December 21, 2010

Christmas cards for our neighbors

Well...I was pretty bad this year, and didn't get my Christmas cards done, but today my two daughters and I made cookies for our 3 neighbors (they have been begging for weeks to do that for them!) and they all had to have a card to go with them. So Katie, my oldest daugher (age 7) sat down with me and helped me make cards. Boy is she picky!!! When she has an idea in her head of what they should look like, she knows what she wants, and there is no talking her out of it! But that's okay - because she usually has pretty good ideas! I definately see a future cardmaker in the future!

The cuts for all 3 cards were from Winter Frolic. The gingerbread man and snowman got a Peachy Keen face added to them, and some pearl buttons as well. The sentiments were all from my Pink by Design stamps. Just added a little doodling, ribbon, and/or inking to finish them off! Not to bad - 3 cards in under an hour! Love it when they are simple and just fly out like that!


Monday, December 20, 2010

Guest Designer for Peachy Keen!!!

I'm so excited!!! The secret is out - and I can share the news! Several weeks ago, one of my FAVORITE companies in the world - Peachy Keen Stamps - put out a call for guest designers. I really didn't think I stood a chance, but figured it was worth a try! Much too my surprise, I was selected to join on as a guest designer for 2011!!! I am very honored - and excited to join all the other wonderful talent out there! The full list is HERE - so feel free to go check out all the other lucky guest designers!!! 

So...for anyone who might be looking at my blog for the first time, here is a LINK to my very first post that explains why I set this blog up, and what I make all of my cards. In short, it became a project to build houses for widows and orphans in Burundi - and what a journey it has been! I have been so blessed to see how something that started out so small has continued to grow and help others!

And since I just finished this project for a color challenge on My Pink Stampers blog, and it just so happens to use a Peachy Keen stamp...I thought I would share this tonight as well! The challenge was to use brown, blue, and green (and I had to use a "little" yellow!). I used the Smiley Cards cartridge, added a face from Peachy Keen's Princess Face Assortment. The candle flames got a dose of Stickles, and the frosting was covered with Glossy Accents. The sentiment is from a Pink by Design stamp set that I just got, and some buttons, string, and doodling finished it all off.


Fairytale...

Well...can't say that this is my favorite, but it is finished! Ever have one of those, that you just want to like, but can't seem to? Yep...this is one of those! Oh well - guess there has to be some of those too!

Used my Unity Stamps again - I think I have finally used every stamp from that one set I got - must mean it is time to get more! Added Prima flowers with a button for the center, some ribbon, and flower border stamp done with white ink and some Stickles for the centers, some white gel pen stitching around the outside.  


Sunday, December 19, 2010

Party til the cows come home!

Needed to make a birthday card for my brother-in-law yesterday, so I broke out my trusty Birthday Bash cartridge! Guy cards are SOOO hard to make, but I think this one came out pretty good! I had just gotten my new set of Pink by Design stamps in the mail too, Take the Cake, so I used that for the sentiment. All cuts came from Birthday Bash. I added a little Cuttlebug to the background, a bit of ribbon, some doodling, and pop-dotted the cow from the background.


Saturday, December 18, 2010

Unity Stamp Birthday Card

Just a quick card that I made the other day with my Unity Stamps.

Punched the corners with a Fiskars corner embossing punch, added some ribbon, a Prima Flower with a button center, a bit of string, and some doodling around the edges. Thanks for looking!


Friday, December 17, 2010

Loving you more each day!

I just love when I picture a card in my head, and it actually comes out looking the way I imagined it! Doesn't always happen, but I got lucky on this one!

The background shape came from the tag feature on Winter Frolic, the little girl and boy shape is from A Child's Year and pop dotted from the background, used the Cuttlebug on the background, some ribbon, a Prima Flower with a button for the center, a stamped sentiment from my stash, and lots of gray inking.

Thanks for looking!


Thursday, December 16, 2010

Pink and Blue Spirit of Christmas

This card is for a color challenge over on My Pink Stamper's blog. You had to create something using two shades of blue, two shades of pink, and black. Now...this card doesn't have MUCH black, but it does have a little on the faces on the stars! And I think I used about 3 shades of blue too! The colors were pretty non-traditional for Christmas, but I was really in the mood to make a Christmas card, so this is what happened!

I used Winter Frolic's border feature for the stars and then the phrase, added some Peachy Keen Faces, topped them off with Stickles and lots of Glossy Accents, and pop-dotted them both. The picture doesn't show the colors entirely true...the pink is a little more pink thank it looks in the picture, but it is close enough to give you an idea!


Wednesday, December 15, 2010

Promise...from the heart

I'm starting to notice, that when I get something new I kind of get stuck on it for a while before moving on to something else! That is how it has been with these Unity Stamps! This is another one, from the same set. I love all the variety within just ONE set!!!

I think my favorite part about this card though, is the bow. It was kind of an accidental discovery...but I really like how it came out! I started in the back, came around front, gave it a twist, and wound it around to the back again - hooray for an easy bow!!! Also added some inking, and the sentiment at the bottom is actually a sticker - cause I couldn't find anything else that fit as perfect!


Tuesday, December 14, 2010

Sending you a little happy

If I'm not careful, I'm noticing that I might actually start to LIKE using stamps!!! Scary thought!!! This is another one I made using my Unity Stamps, lots of ink, a few stick on pearls, and a little string.

Thanks for looking!

Monday, December 13, 2010

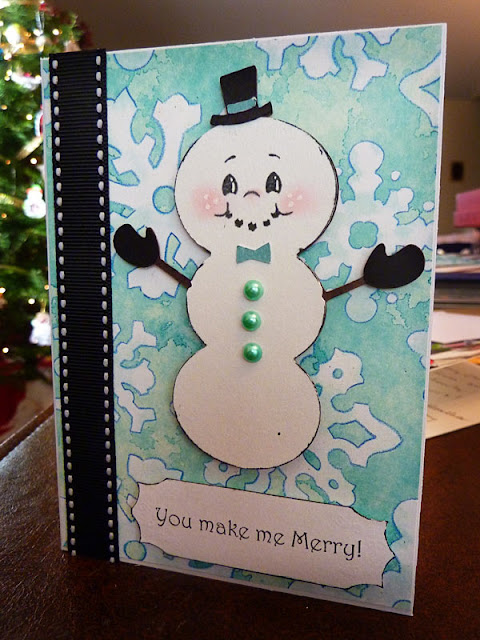
Black and White Snowman...

Needed to make a card using cuts from two different carts for a challenge, and for some reason it popped into my head that it would be fun to make a snowman card using only black and white! So...this is the result!

The cute snowman came from Gypsy Wanderings, with a Peachy Keen Face of course. The background is from Lacey Labels, used the Cuttlebug for the embossing, a Pink by Design stamped sentiment, and added a little ribbon. This took me less than 15 minutes to make! Love the fast ones!


Sunday, December 12, 2010

One more Unity Stamp card

Here is one more I made with my new set of Unity Stamps! Loved the stack of tea cups, and the sentiment was perfect with them!

I added a little lacy edge with a Martha Stewart edge punch, some ribbon, and some faux stitching with my Sakura glaze pen. Thanks for looking!


Saturday, December 11, 2010

Unity Stamps

Been reading about Unity Stamps, and how great they are, so I finally got a little set of them from their sale section. They came in the mail yesterday, so I had to try them out last night! I have gotten to really like clear stamps, so these were a little difficult for me to get used to at first, since it kind of bothered me not being able to see what I was stamping - but they are starting to really grow on me! And I really LOVE the designs and how nice and clearly they stamp! These are from the set I got called "A Little Happy." It is one of the past kits of the month.

Both stamped images on the first one came from the set -just added a little paper edged with a Fiskars Edge Punch and some ribbon, along with a little faux stitching.


The second one has Cuttlebug on the background, a sentiment from one of my Pink By Design stamps, a couple of buttons, and lots of ribbon!


Friday, December 10, 2010

Catching up on a few cards...

We were without internet the last couple of days, so I was unable to post these as I finished them! Also had an eventful couple of days! My 7 year old daughter fell on a trampoline and broke her two front teeth, and of course, her adult teeth had already come in! So we spent a day at the dentist getting those repaired. Then I spent the day at the doctor and specialist yesterday with another ear infection, fortunately a LOT less severe than the previous one I had a few months ago. Life feels a little back to normal this morning, so I thought I would post these 3 cards I got made over the last couple of days, mostly before the craziness set in!

This first one used my Peachy Keen Stamps, one of the cute snowmen from Snow Friends seasonal cartridge (which was the first time I had ever used it!), a background cut from Lacey Labels (my first Lite cartridge - and first time using it!), Cuttlebug on the background, lots of inking, some doodling, a little ribbon, and a sentiment from the Pink by Design Winter Fun set. The snowman and the sentiment are also pop-dotted from the card for dimension.


This second one was kind of a struggle to finish for some reason. I'm still not sure I'm entirely happy with it, but I don't know what else to do with it! It is for a sketch challenge on the Cricut Circle blog. Anyway, used Lacey Labels for the scallop circle and threaded some ribbon through it with a button at the top. Did a little cuttlebug on an oval to fit in the center, and cut out the ice skater from Winter Woodland cartridge. Put ribbon along the side, added a sentiment from My Pink Stamper's Winter Fun set, LOTS of inking, Glossy Accents on the ice skater and the little corner pieces, and pop-dotted the skater and the sentiment.


The last one kind of came about a little different than I planned! I had originally cut the tree and added the Peachy Keen Stamp to go on the last card, but it just didn't seem to fit - so I added Stickles and Glossy Accents, and made another card for it! The tree was cut from Joys of the Season - and this card also has a little ribbon, lots of inking, and of course, a My Pink Stamper sentiment.


Thanks for looking - and hope you are having a wonderful Christmas season so far!

Tuesday, December 7, 2010

Peachy Keen Snowman

On Black Friday, I had no intention of leaving my house, but I did manage to find a few great deals online! One of them was to order some more face stamps from Peachy Keen Stamps. Besides the great discounts, they also threw in this little stamp for free! So of course, I had to give him a try!

I colored him in with colored pencils, used my Cuttlebug to emboss the background, added LOTS of stickles (don't think the picture shows it very well - but it totally sparkles!), some bling with my Jolee's heat set tool, a little doodlin', a bit of ribbon, and a sentiment from my Pink By Design stamps.


Sunday, December 5, 2010

Warmest wishes

Funny how sometimes you sit down to make something specific, and when you are done, you have something you love, but it is NOTHING at all like what you planned on! I was going to make a card with either a snowman, gingerbread man, or Christmas lights - and this is what ended up coming from that plan! Nonetheless, I am in love with this one!

Both cuts came from Winter Frolic, with the border feature. Used, of course, some Peachy Keen stamps, these are from the Everyday Faces Assortment, added a Pink By Design sentiment from the Winter Fun set, some Glossy Accents, lots of inking, and a bit of doodling. Enjoy!


Saturday, December 4, 2010

Had a great day at the craft fair today! Met a lot of WONDERFUL people, enjoyed watching people come through, and my face hurts from smiling!!! Great day - and we came home with another $92 toward a house for a widow! That means that since we began, we have surpassed the halfway mark in building a house - $324.50 toward the $600 needed!!! YAY!!! I put a picture below of our table set up and decorated, and my oldest daughter (age 7) who stayed with me the whole 7 hours, and was a GREAT helper! We had a great time spending the day together! My youngest (age 6) stayed home with Daddy...which is good, since she doesn't have near the patience and attention span!


Friday, December 3, 2010

Shall We Dance and Peachy Keen faces

Whew! Been a busy week, and for the first time since I started this blog, I haven't been able to make anything, and therefore post anything, for several days! Anyway, I am getting ready to go do a craft fair at a local school tomorrow, and taking all of my cards over there! I have about 60 cards made, and decided to not try to cram in as many more as I could make this week - but just to use what I had. Good thing too, since I haven't been able to find any spare time! All proceeds from the cards will continue to go to Sister Connection (see HERE for my first blog post, that explains more!) so I figure it is in the Lord's hands, and I will just have fun! Taking my 7 year old daughter to help as well, so we will have a great time spending the day together!


Anyway, got my 2 new sets of Peachy Keen faces today, that I ordered on Black Friday, so I decided to try another card with the Shall We Dance cartridge. I really LOVE this cartridge, but not so fond of the faces. Peachy Keen sets are PERFECT for fixing that small flaw though! This one came from the Dolly Dumplin assortment. A little of everything on this card...doodling, stamped sentiment, inking, Prima flowers, buttons, used a Sizzix folder through my Cuttlebug (completely interchangeable, by the way!), and pop-dotted the dancer. Thanks for looking! Blessings!

Wednesday, December 1, 2010

My family...

Just wanted to share this picture we took last night at my parents house! Me and my family, my parents, my sister and her family, and my two brothers and their families! Pretty amazing to have that many people (10 adults and 8 kids) in a picture, and most of them smiling at the camera! I am so blessed to have my family live near to us, and to have our kids grow up together. 

Tuesday, November 30, 2010

Another quick card

Gotta love a quick card! Yesterday I needed a quick thank you card, so I sat down, and had this one together in about 5 minutes flat! Love it when that happens. I had stamped the trees the night before, so I guess it took a little longer, but I was also using up something I had just been playing with, so maybe it counts as recycling! Either way, it worked out great and was easy. No cricut on this one - just stamps, some simple doodling, a little ribbon, and some buttons.


Sunday, November 28, 2010

No Cricut...but I am learning to LOVE clear stamps!

I used to hate stamps. I mean, really HATE stamps! Could never figure out what to do with them! And then they came out with the new clear stamps, so that you can actually see what you are doing, and where you are putting them! I tried them, and now I am hooked! Got these yesterday at JoAnns, and had to try them out. They are from Fiskars, and they work SO well, and leave such a great impression! Definately have to get more of those!

Birthday card for a dear friend...

I made this this morning for a dear friend of mine, whose birthday was on Friday. As you might guess, she LOVES her guitar, and anything music, so this seemed like a perfect fit for her! She was probably just being nice...but she said when I gave it to her that it was her favorite card ever! At least she liked it!

The guitar was cut from the Hannah Montana cartridge (which I got for all the NON-Hannah Montanta stuff!), the sentiment was one from my Pink by Design stamps, added some bling with my Jolee's heat set tool, a little doodling, and some ribbon along the bottom. I don't always do it, but made the inside special this time too! Thanks for looking!


Saturday, November 27, 2010

Thanksgiving thank you card...

My sister hosted our family Thanksgiving dinner this year, and since I know it is a lot of work and effort, I wanted to make her a thank you card! She always does a beautiful job - setting the table and preparing everything for the day - I wanted to make sure she knew how grateful we were for her! I hope she loves it!

I used the leaves from A Child's Year, using my Gypsy to hide the different contours. I then added a Peachy Keen face stamp, lots of inking on the edges, a Cuttlebug folder for the background, some ribbon, and a stamped sentiment. Also pop-dotted the leaves from the background.

Hope you had a wonderful Thanksgiving with your family!


Thursday, November 25, 2010

Thanksgiving Place Cards...

My sister is hosting Thanksgiving this year, and she asked me if I would make some placecards for the table. Well, live has been busy enough, that last night was the first chance I got to sit down and do them. I decided to make them as simple as possible, since I needed to make about 24 of them! However, I learned...that what looks simple when you try it on one of them, still ends up being a lot of work when you multiply it by 24!!! But it's okay, it was still fun!

I hope these match her colors alright, since all I had to go on was that she was decorating with green and silver! I started off with a card from Birthday Bash cartridge, and added another shape from Birthday Bash for the name plate. Used my hole punch to put holes in the side, thread some ribbon through, and tie in a simple knot. The leaves on the bottom came from the cartridge Give a Hoot, using the border feature. Doodled with a Sakura Gelly Roll pen called Silver Star - love how glittery it is! Finished by adding some Glossy Accents over the leaves.

Hope you all have a wonderful Thanksgiving!!! I am so thankful for all the ways God has blessed me - this year, and always! I praise Him for more things than I can possibly list here! Blessings to you and your family!!!


Wednesday, November 24, 2010

Hap-Bee Birthday!

This is another easel card I made last weekend! I picked the little bee from the Pooh and Friends cartridge to cut with my Cricut, then added Glossy Accents over the whole thing. Just couldn't resist, so I added a wiggly eye to him too! The yellow flower is one from my stash I got a while ago in a big pack in the dollor section at Michael's, the white one is a Prima Flower. Added some faux stitching, some ribbon, a few brads I had hiding in my stash, and a computer generated sentiment for the inside.

Tuesday, November 23, 2010

Little girl sewing

I love this cut from Nursery Rhyme! This was another simple easel card that I made over the weekend. The centers of the flowers on the paper inspired the little button decorations on the inside. I just cut a small square of brown paper, folded all four corners to the center, and secured it with a brad. I kind of like the effect! Added some ribbon underneath those, and a Martha Stewart edge punch to add a border under that, a stamped sentiment to the front, and finally, pop-dotted the main image and the sentiment from the background. Thanks for looking!


Monday, November 22, 2010

Liquid pearls

This card kind of came out a little different than any I've made before, but it was kind of fun nonetheless! I started off with the paper, and then found the flower that matched really well. I don't have any quilling tools, but decided to try out the idea just on my own, so I made the flower center and attached it with Glossy Accents. The pretty swirl was cut from Storybook cartridge, and then I wanted to try out my new liquid pearls, so I applied that over the entire piece and let it dry. Added a Martha Stewart border punch on the bottom, some sheer ribbon, some more dots of liquid pearls, and pop-dotted the swirl cut from the card.

Saturday, November 20, 2010

Peachy Keen Faces...with a twist!

Hello! I had so much fun with the card!!! I cut out the little birds, and then realized that I only had the medium size critter faces, and all of them were MUCH too big for these little birds. So...I got a little creative! I used one of the bird faces, but only inked the beak and stamped that on each of them. Then I picked a face from the Princess faces assortment in the right size, and only inked the eyes and stamped them on! So...I kind of built my own face! Worked like a charm!

Used my Cuttlebug on the background, a stack of Prima Flowers, buttons and ribbons, some little jewels set on with my Jolee's heat set tool, and finished off with a sentiment from My Pink Stamper's Tweety Hoo Puns stamp set. Pop-dotted the birds, and the background for lots of texture.
Have a tweet day!


Friday, November 19, 2010

Vintage Style Easel Card

The new challenge this week on the Cricut Circle Blog is to make something vintage inspired. This is kind of a different stretch for me, so I figured I would tackle it right away before I lost my nerve! I am really happy with how this turned out, even though it scared me to begin with!

Used A Child's Year for the black cutouts, Cuttlebug on the blue background piece, some ribbon, Prima Flowers, buttons, string pearls, and some heart shaped brads that I snapped the back off of and glued to the buttons. Also added a computer printed sentiment. Turns out Glossy Accents works great as a glue for sticking on pearls and buttons too!

 Thanks for looking!

Yummy!

Only got one card done last night - I think I was kind of tired! I struggled a little on this one, but I like the end results. Used Birthday Bash again for all the cuts, Cuttlebug on the background shape, some more Glossy Accents, and some bling with my Jolee's heat set tool. Added some ribbon, a little inking, and a stamped sentiment. Thanks for looking!


Thursday, November 18, 2010

Birthday Bash is in the house!!!

I had been wanting this cartridge, pretty much since the day it came out. However, I like to wait until they have been out for a bit and the price comes down some. So...I set myself a price limit on what I would pay for it, and have been watching on ebay, and FINALLY got it for the price I wanted! It came yesterday, so without a doubt, I knew what I would be working on last night! Here is the results (all cuts are from Birthday Bash):

The first one is COVERED in Glossy Accents and Stickles! I also pop-dotted the candles from the background.


This second picture shows a little better the way the candles are popped off the background. 


This next one also has some Glossy Accents, and I ran part of the critter through my Cuttlebug, then popped both him and the sentiment from the background. Added some bling with my Jolee's heat set tool.