Today's card is sugary and sweet - I just love the soft color palette!
I started off by stamping the rows of hearts, using one of the fun images in the stamp set included in the kit. I used my MISTI, and staggered the hearts for each row, moving in rainbow order using Blush, Cantaloupe, Sunbean, Dublin, and Tropic Pawsitively Saturated inks.
I trimmed that panel down slightly to the size I wanted for my card, and then grabbed some other elements to stamp on there! I added the sentiment first, to make sure I had room, then added the two lollipops. I also used some of the outline hearts and circles to add some interest and movement to the design.
I popped that panel up on foam on my white cardbase, then finished off with a sparkly Aqua Glitter Drop from Pinkfresh Studio in the center of each of the lollipops! I love the touch of sparkle that adds, as well as pulling together the color from the bottom of the rows of hearts. It just helps draw the eyes all the way around the design. :)
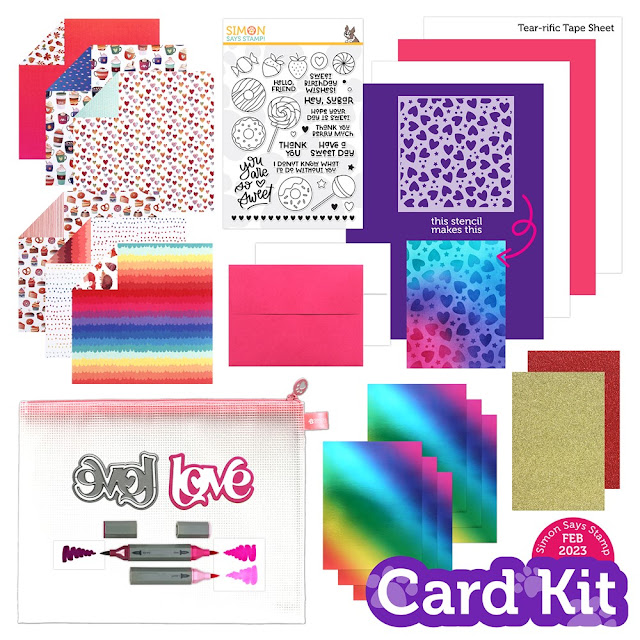
Here is a closer look at the entire kit contents - you can see it all HERE:
Product links are all below - includingaffiliate links where possible, which simply means if you use one of the links below that I receive a small commission at no additional cost to you. Thanks so much for stopping by! Have a wonderful day!!!
Good morning! It's the end of the month, so I'm once again late - this time thanks to another trip I took, then the cold I brought home as a souvenir! But, I'm finally popping in to share my first card using the (sort of) NEW February 2022 Simon Says Stamp Card Kit - Sweet Days! This month's kit is full of sweet touches! The included stamp set by the same name has sweet images and sentiments, there is a cute word die, some fun pattern paper, glitter sticker sheets and metallic cardstock, a stencil, and tri blend marker...that's all not to mention the cardstock, envelopes, and more!
I'm sharing a first card that is light, bright, and airy - with a bit of dimension and sparkly shine!
I'll come back to this later - but wanted you to see this fun shine! Have you ever put Glossy Accents over the top of glitter paper? It's such a fun and different look - extra sparkly and shiny!
Okay - back to how I created this card! I started off with a piece of some of the pattern paper in the kit. I die cut it with a Basic Rectangle die to trim it down.
Next, I die cut a window in it with the shadow portion of the Fancy Love die in the kit. I adhered one of the Adhesive Glitter sheets in the kit to white cardstock, and then die cut the main word out of that piece. Then I mounted both pieces with foam adhesive. I love the floating effect this gives to the word in the center - kind of magical!
I heat embossed a sentiment from the stamp set in the kit in white on black cardstock, trimmed it down, and adhered it at the bottom of that panel, tucking a little extra foam under the bottom edge, and using liquid glue to adhere it to the popped up panel. I added a few Pinkfresh glitter drops in aqua to add some sparkle, then coated the glittery word carefully with Glossy Accents, and let it dry thoroughly. So fun!
Here is a closer look at the entire kit contents - you can see it all HERE:
Doesn't that word just look like candy?!? And wouldn't this be a fun card to tuck a little coffee gift card into?
Product links are all below - includingaffiliate links where possible, which simply means if you use one of the links below that I receive a small commission at no additional cost to you. Thanks so much for stopping by! Have a wonderful day!!!
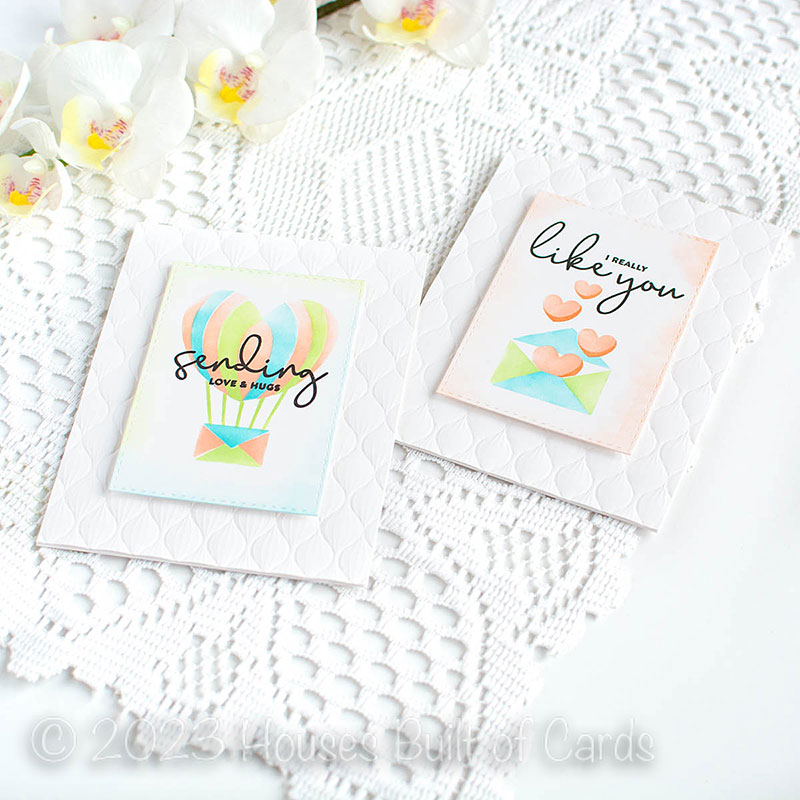
Good morning! Stopping by today to share a couple cards I created using some items from the December Kisses Release from Simon Says Stamp - I created a pair of cards! They both use a new stamp set, stencil set, and 3D embossing folder!
I actually used a couple of the stitched rectangles from inside the windows on the cards I shared earlier this week HERE - I saved them for when I needed some panels ready to go, and this was the perfect opportunity to put a couple of them to use.
For both cards, I picked one image on the stencils, and layered up the images in a bright and fresh color combo, and keeping the ink blending nice and soft.
Next, I stamped the sentiment in black over the top of each one.
I messed up and got a bit of ink on one of the corners of the panels, and since I didn't want to redo it, I decided to add a bit of soft inking around the edges. I just used the leftover ink on the brushes from the other ink blending, and added a soft bit around the edges. Mistake fixed!
I used the Spun Glass 3D embossing folder to create a textured background for the cards, then adhered that on my white cardbases.
Finally, I mounted those panels with foam adhesive on my textured backgrounds!
I thought about adding some sparkly bling, but decided I liked these just simple as they were, so I stuck with that. A rare time without added jewels, crystals, glitter drops, or pearls!
Product links are all below - includingaffiliate links where possible, which simply means if you use one of the links below that I receive a small commission at no additional cost to you. Thanks so much for stopping by! Have a wonderful day!!!
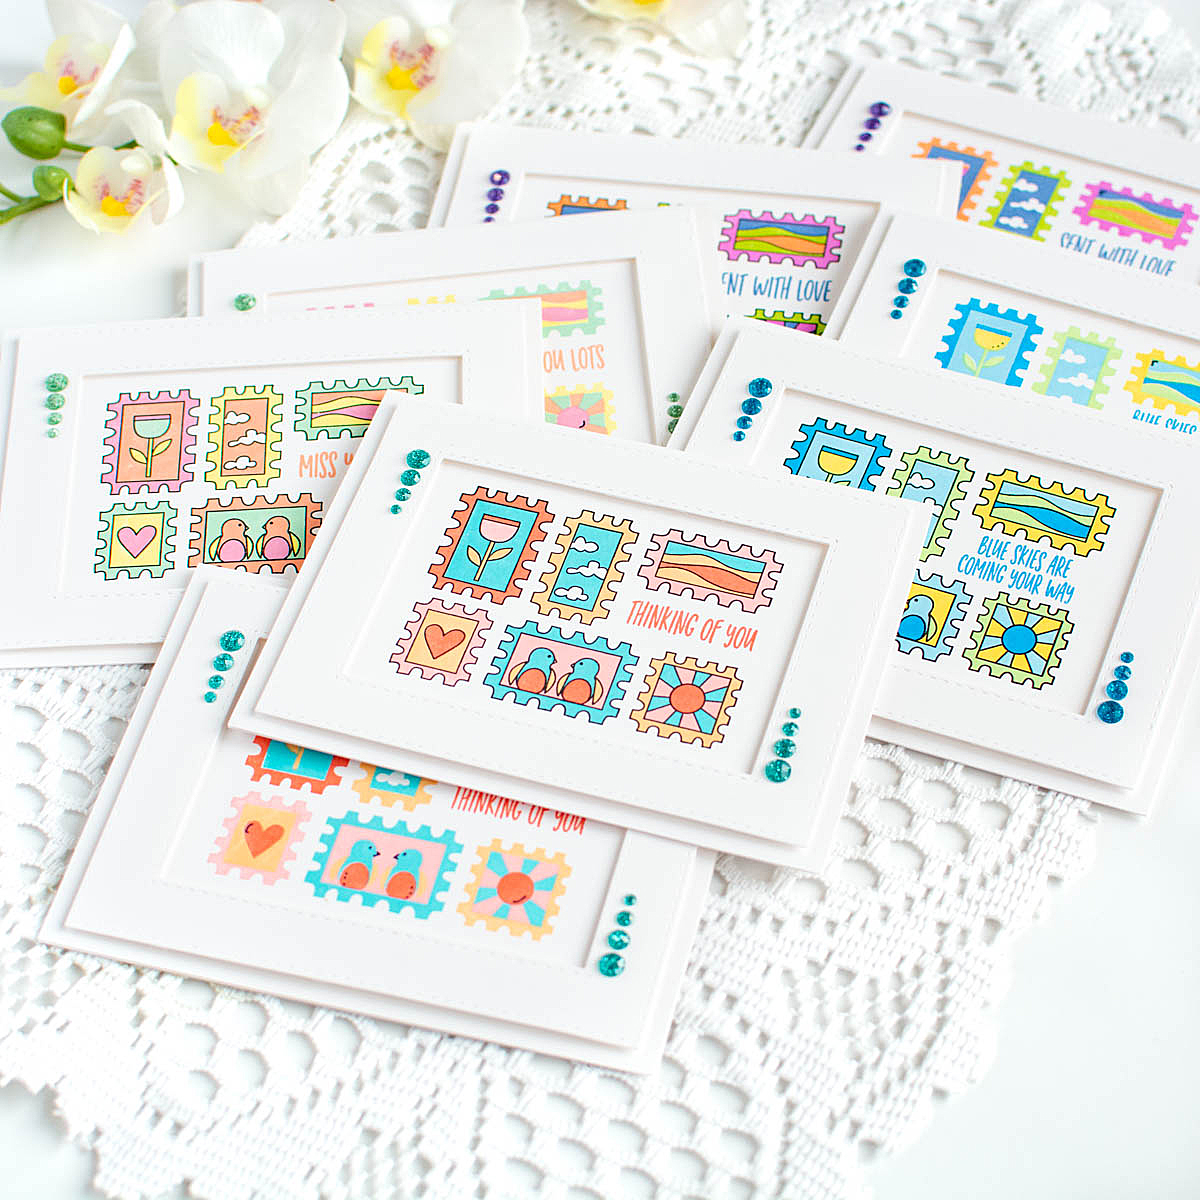
Good morning! I went a little crazy with a fun new stamp set from the recent Kisses Release from Simon Says Stamp - it was such a fun stamp set to use, and once you've lined up each layer, you may as well stamp multiples in different colors, since it is almost no additional work! I played with all the color combos for this! :)
I did two cards with each color combo. First off, I stamped several with the outline image in black ink. This was where I started for each combo, using the lines on the stamp to line up each layer with. Then I stamped that layer once in the outline image, and once on white cardstock in each color.
When I finished them all - this is the softer image you get with no outline. I did feel like the penguins needed the eyes and the beak added with a little pen - they looked a bit creepy without that to be honest! So I also added a couple more details to other places on the design, just so the black details were a bit more spread out.
Once they were all done, I stamped a sentiment from the set in the little opening in the image, and then created a white frame using Stitched Rectangles die, and popping that up with foam over them. I also added some Pinkfresh Glitter drops in coordinating colors to embellish. Here is a closer look at each color combo, both with and without the stamped outline:
First up, this Cantaloupe, Cheeky, Surf, and Pucker, along with Aqua Glitter Drops.
This color combo used Grapefruit, Guava, Lemonade, and Spring, paired up with Leaf Glitter Drops.
Next up, we have Marine, Sprout, Sunbeam, and Cadette, together with Lagoon Glitter Drops.
And finally, this one uses Twilight, Sherbet, Pearfection, and Sweets, paired up with Amethyst Glitter Drops.
I really can't decide which style I like better - with or without the stamped outline, or which color combo is my favorite! Although, the coral, pink, and aqua tones at the front may just be my favorite if I had to choose!
I love how quick and easy it was to create all these cards with this fun stamp set as well!
Product links are all below - includingaffiliate links where possible, which simply means if you use one of the links below that I receive a small commission at no additional cost to you. Thanks so much for stopping by! Have a wonderful day!!!
Good morning! I'm stopping by today to share a card I created for Pinkfresh Studio's YouTube Live yesterday. I used some of the newest release, and was inspired by several different crafters that I love! And, as I sometimes do, I took some of the leftovers from this card to create another card - if you scroll down, I share details for that later in this post! You can watch the video replay HERE if you want to see more details and watch this card come together.
Here is the replay of the live video if you'd like to watch it here:
This card was partly inspired by Laura Bassen, party by Channin Pelletier, and partly by Lea Lawson - I love getting ideas from different crafters, and then making them my own!
I used the new Floral Outline Frame die for this card, and I shared a fun trick for die cutting intricate dies, and bonus, it recycles extra bubble mailers that you may get frequently! I trimmed the design in half creatively so I could use it on a slimline card design for a totally different look.
I used the prviously released Essentials: Slim Stripes die to cut lots of white cardstock strips, then used my ink cubes to apply color directly onto them. I basically created my own custom colors of cardstock! I then layered them diagonally in rainbow order, alternating between sizes and lighter or darker shades. I used a base of cream cardstock cut from the largest Slim Stitched Rectangles die. Once I had them all in place, I trimmed off the extra, and adhered the floral frame in place over the top.
Sentiment was created by hot foiling a panel of Silver foil using the Solid Hot Foil plate, and then die cutting the sentiment included in the Floral Outline Frame die from it. You could also use whatever metallic cardstock you already have. I layered it up a couple extra times from white cardstock, and then added a shadow vellum layer underneath. Finished off with a row of Jewels in rainbow color order! I love how this came out - so out of my usual norm, but so fun!
And then...I couldn't waste the things I made and didn't use, right? I made this second card quickly and easily after the live - and I can't decide which one I like better!
For this card, I used the pink, purple, and coral reef strips leftover from the last card. I created an A2 card this time, and turned it to a portrait style instead of landscape.
I did it all on a panel of white cardstock, and layered over the Floral Outline frame that I had die cut in advance to test out and confirm worked well with the bubble wrap trick. Then I trimmed a bit off all 4 sides to create a perfect size panel to mount on my cardbase. This cut off a bit of the floral frame, but was such a fun effect!
I added some coordinating jewels in a row on these as well, alternating the color with whatever color was dominate on the side I placed them. So on the pink side, I used a larger purple, and on the purple side I used a larger pink. Then added some clear to round out the trio.
I added the foiled sentiment that I planned to add on the first card - but I ended up not loving it paired with the other sentiment. No worries though - it worked PERFECTLY for this card! Mounted that with foam adhesive too of course.
So a simple bonus card, and I didn't waste those extra pieces, or set them aside and forget about them. Win-win!
Product links are all below - including affiliate links where possible, which simply means that if you use one of the links below, I receive a small commission at no additional cost to you. Thanks so much for supporting my blog, and stopping by! Have a wonderful day!!!
Hello! Today I am part of a fun Instagram hop to celebrate the new Pinkfresh Studio release. There are giveaways up for grabs, so hop on over to check that out if you haven't yet! I have had so much fun creating with this release - yesterday was the blog hop, and I shared several cards for that! Today I'm sharing a card I created on last week's YouTube Live with Lea Lawson as a sneak peek. We used the same products in different ways to create two completely different cards. It was so fun! You can watch that video HERE if you want to see more details!
I also have added the video here if you want to watch here:
I had fun mixing and blending pinks and purples for the leaves, and aquas and blues for the greenery. Then stamped over the top with Stargazer ink, instead of Detail black. It just gives it a fun look!
I did the scary thing, and cut those florals in half! It is always worth it, but I know it can be hard!
I used the Stitched Diamonds coverplate to create a pattern on my cardbase, and then added a soft vellum shadow layer using just the outline die from the new Spiral Circles die. This just softened the background a bit behind the florals, and provided a focal point for the card.
I mounted the florals on each side of the card with foam adhesive, staggering them slightly. Isn't it pretty how it changes the whole effect of the florals?!?
I stamped the large sentiment from the kit in Bubble Gum ink, die cut with the coordinating die, and then layered a couple additional die cuts up to add dimension and sturdiness. I stamped a secondary sentiment in Stargazer ink, then hand trimmed it into a small banner shape.
Finished off with a few Iridescent Clear Drops for a bit of extra sparkle!
Product links are all below - includingaffiliate links where possible, which simply means if you use one of the links below that I receive a small commission at no additional cost to you. Thanks so much for stopping by! Have a wonderful day!!!