Tuesday, August 31, 2021

Have Hope - Simon Says Stamp STAMPtember 2021 Release

 Hello! It's time for the start of this years STAMPtember at Simon Says Stamp - and you know it always kicks off with a GIGANTIC release, and this year is no exception! So many fun new things to check out with this release - you can check it all out HERE!

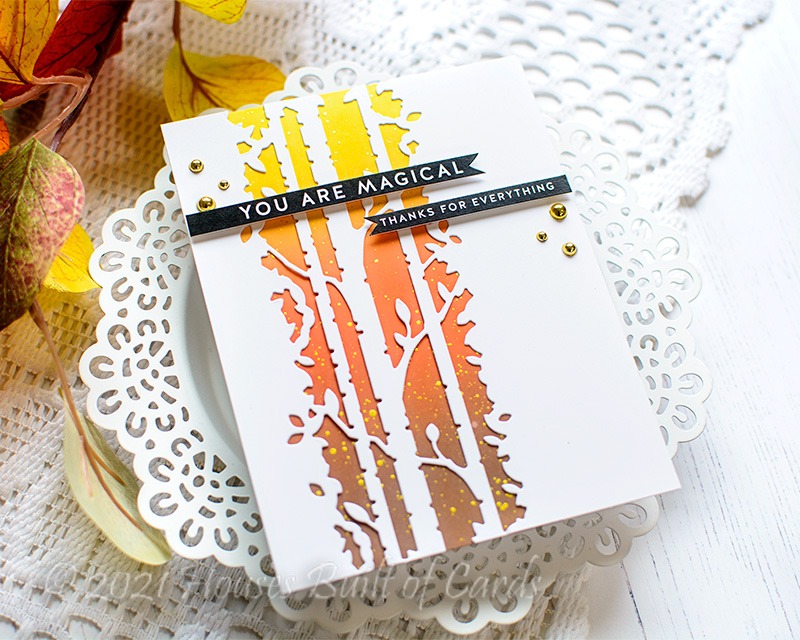
I'm kicking off tonight by sharing this simple card with lots of texture and white space - and the perfect pop of colors! Ironically, it doesn't have much stamping - just the sentiment! :)


I started off by die cutting the beautiful new Etched Layered Daisy Stem die - I love that it is in 3 pieces, so it's easy to die cut in different colors of cardstock! I used Lemon Chiffon and Banana cardstock for the two flower layers (a bit hard to see the color variation in the photos!) - and Green Apple cardstock for the stem/leaf combo.


Next up, I used the Triangle Burst Embossing folder on white cardstock to add a textured background. I trimmed that panel down, and backed it with a mat of Simon Says Stamp vellum for a subtle bit of texture between the front frame and the cardbase. It just gave it a touch of extra interest and dimension!


Finally, I adhered the flower pieces with liquid glue - adding just a bit to the center of the flower, so the petals can float free for extra dimension. I added some Nuvo Glitter drops to the center of the flower, and a few sparkly Sunshine jewels from Pinkfresh Studio. Finally, I stamped a sentiment from another new set - Printmaking Florals - trimmed it into a strip, then hand trimmed it into a banner shape and adhered it with foam adhesive.


Product links are all below - including affiliate links where possible, which simply means that if you use one of the links below, I receive a small commission at no additional cost to you. Thanks so much for supporting my blog, and stopping by! Have a wonderful day!!!


Everything Magical Narwhal - Simon Says Stamp

Good morning! This past weekend I pulled out a fun couple of sets from Simon Says Stamp, and created this magical little slimline card! I love these cute little Narwhals - so fun to stamp and color! 


I started off by die cutting 3 circles using Nested Circles dies from a slimline panel of white cardstock. I then used that to arrange where to stamp the 3 narwhals from Narwhal Friends stamp set on my white slimline cardbase.


I colored the images in with Copic markers - making sure to color the background all the way to the edges of where the circles would show, but not over the outer frame edges.


I layered the frame over the top, added a stamped sentiment from Narwhal Friends, and then a larger sentiment from Reverse Sentiments Magical Wishes - a perfect compliment to this stamp set, don't you think?!?


I also added some sparkle to the horns and tummies using Nuvo Blizzard glitter drops, and a couple of white dots with a white gel pen.


And of course, had to have a bit of sparkle! So a few Pinkfresh Ocean Breeze jewels are sprinkled around as well.


And finally - it didn't quite feel finished, so I grabbed a super fine-line black Sharpie, and added some little dots around each of the circles. That just helped everything pop, and framed those circles perfectly!


Product links are all below - including affiliate links where possible, which simply means that if you use one of the links below, I receive a small commission at no additional cost to you. Thanks so much for supporting my blog, and stopping by! Have a wonderful day!!!


Monday, August 30, 2021

Layered Stamped Leaf Frame Card - on the Unity Stamp Company Blog

 Good morning! I'm back with another card for my series on the Unity Stamp Company Blog this morning! I'm so excited to be featuring the amazing Kit of the Month on Monday's on the Unity Stamp Company Blog! Since the Kit of the Month was the first thing I purchased from Unity, and what got me hooked to begin with, they hold a special place in my heart, so I'm super excited about this opportunity to give these kits some love! You can check out all the details HERE for today's project!


Thanks for stopping by today - have a WONDERFUL day!!!


Friday, August 27, 2021

Be a Warrior - Pinkfresh Studio Facebook Live Card

 Good morning! Dropping by today to share a card I made yesterday for Pinkfresh Studio's Facebook Live. I pulled out one of the new layering stencils that was designed to coordinate with a previously released stamp/die/washi combo - and I hadn't had a chance to use it yet, so figured it was a good one to play with this week! You can watch the replay HERE if you want to see more details.


I decided to do the stenciling first with the English Garden layering stencils, then the stamping over the top. I used a nice soft color combo - and almost didn't want to add stamping with how soft and pretty the stenciling came out! I did go ahead and stamp over with the softest gray in our ink colors - Misty Coast. Because this stamp set is so large, I did use my Memory MISTI to stamp it. There are some tricks that you can use with a regular size MISTI (watch this video HERE) - but I didn't want to do that work around in a live video. :)


I die cut a panel of SSS Ivory cardstock using Slim Stitched Scallop Circle die to mount with foam over my white slimline card base. I love the soft contrast with the ivory and white colors of cardstock! I stamped a sentiment from English Garden in the center of the middle scallop - it was a perfect fit.


And speaking of perfect fit - isn't it fun how perfect that wreath fits around the circle? Made me so happy how well it worked! Added some of the florals with foam adhesive, and tucked a few more on there with liquid glue, then finished off with a few coordinating jewels!


Product links are all below - including affiliate links where possible, which simply means that if you use one of the links below, I receive a small commission at no additional cost to you. Thanks so much for supporting my blog, and stopping by! Have a wonderful day!!!


Magical Fall - Simon Says Stamp

 Good morning! As the days get shorter, the weather gets cooler, and the leaves start to give hints of color - I'm slowly beginning to transition fully into being excited about fall! Since I was feeling the fall vibes this week, I pulled out a fun die from Simon Says Stamp, some distress oxide inks, and some pre-printed sentiments to create this CAS fall card!


I started off by die cutting the gorgeous Birch Column die - it's been a while since I used this die, and I have no idea why it took me so long to pull it out again! So gorgeous - and perfectly sized for an A2 card.


I then used that to plan where to do my ink blending on my white cardbase. I masked off the sides (no sense in wasting ink, right?) and blended Fossilized Amber, Crackling Campfire, and Vintage Photo distress oxide inks over that portion.


I also added some spatters of gold with my Starry Colors palette, and allowed that to dry before adhering my die cut panel over the top of my cardbase.


Sentiments are pre-printed Reverse Magical Wishes Sentiment Strips - I trimmed them down and hand trimmed the edges into banners and mounted with foam adhesive on my card. I think fall is magical, so these sentiments felt PERFECT! Finished off with a few sparkly gold pearls to add a touch more sparkle, and this card was done!


Product links are all below - including affiliate links where possible, which simply means that if you use one of the links below, I receive a small commission at no additional cost to you. Thanks so much for supporting my blog, and stopping by! Have a wonderful day!!!


Tuesday, August 24, 2021

Rain or Shine - Simon Says Stamp

 Good morning! I'm here today to share a simple and happy card using a favorite set from Simon Says Stamp that I hadn't pulled out for a while! Sometimes a great stamped image and sentiment are all you need to make a card!


I used one of my favorite pattern papers from the Pinkfresh Studio Keeping it Real 6x6 pattern paper pad. I trimmed it in half - so I was able to create two cards with this one piece of pattern paper! I then trimmed down the length so it would fit with a decent border around 3 edges of the card.


I stamped the image from Follow the Rainbows stamp set in black ink slightly off the edge of the pattern paper, leaving room to add my sentiment on the bottom left side.


I popped the panel up with a layer of foam, and finished off with a single tiny Metallic Silver Pearl in the center of the umbrella. I wanted to add more, but restrained myself - it just felt so perfect with just that single one!


Here is the other card I created - identical, except for a different sentiment from the stamp set!


Product links are all below - including affiliate links where possible, which simply means that if you use one of the links below, I receive a small commission at no additional cost to you. Thanks so much for supporting my blog, and stopping by! Have a wonderful day!!!


Monday, August 23, 2021

Textured Trimmed Pattern Paper Layers - on the Unity Stamp Company Blog

 Good morning! I'm back with another card for my series on the Unity Stamp Company Blog this morning! I'm so excited to be featuring the amazing Kit of the Month on Monday's on the Unity Stamp Company Blog! Since the Kit of the Month was the first thing I purchased from Unity, and what got me hooked to begin with, they hold a special place in my heart, so I'm super excited about this opportunity to give these kits some love! You can check out all the details HERE for today's project!

Thanks for stopping by today - have a WONDERFUL day!!!


Saturday, August 21, 2021

Pattern Paper Birthdays - Simon Says Stamp September 2021 Card Kit

Hello! I'm here today to share my first card with the BRAND NEW September 2021 Simon Says Stamp Card Kit - Sunshine Flowers! This month's kit has such a fun vintage vibe, with some beautiful florals! The included stamp set by the same name has some lovely floral images and perfect sentiments, there is ANOTHER beautiful stamp set with a HUGE and gorgeous floral image, a great birthday word die, there is some super cute pattern papera fun set of washi tapes - that's all not to mention the cardstock, envelopes, and more! 

Today I'm sharing a couple cards that are focused on some of the gorgeous pattern paper from the kit, with a couple little touches to make them special!


For both cards, I chose a panel of the beautiful pattern paper, and die cut it with a Basic Rectangle die so it would be a nice clean, finished edge for my cardbase. I then stamped a sentiment on each of them using one of the stamp sets in the kit - this first one uses a sentiment from Sunflower Garden:


I then trimmed some thin strips of the perfectly coordinated cardstock in the kit, and adhered those in a row at an angle on my white cardbases, then adhered the stamped panels over the top with foam adhesive. Love how those strips of cardstock pop out behind and add a touch of interest! This second card has a sentiment from Sunshine Flowers:


Here is a closer look at the entire kit contents - you can find all the details HERE:


Product links are all below - including affiliate links where possible, which simply means if you use one of the links below that I receive a small commission at no additional cost to you. Thanks so much for stopping by! Have a wonderful day!!!


Friday, August 20, 2021

Big Floral Hello - Pinkfresh Studio Facebook Live Card

Good morning! Dropping by today to share a card I made day before yesterday for Pinkfresh Studio's Facebook Live. We had a request to show how to use the Floral Focus stamp set - which is a red rubber cling stamp set - along with it's coordinating stencils. You can watch the replay HERE if you want to see more details.


To begin, I used my MISTI to stamp the Floral Focus floral image on a panel of white cardstock, then left my MISTI lined up to stamp later. I used that Rocky Slope ink as an outline to line up my coordinating Floral Focus stencils - makes it super easy!


I used some pretty and bright fun colors - all linked below - and then placed it back in the MISTI to stamp again in Detail Black ink over the top. It lines up perfectly to stamp over the gray ink and cover it, and that way you don't have to worry about waiting for your black ink to dry and not smear.


I die cut the panel with the largest Stitched Rectangle die, popped it up with foam adhesive on an aqua cardbase, and then added a large die cut gold mirror cardstock Hello sentiment, and added a secondary sentiment from Sweet Friend Floral stamp set. A few sparkly Metallic Gold Pearls finish it off!


Product links are all below - including affiliate links where possible, which simply means that if you use one of the links below, I receive a small commission at no additional cost to you. Thanks so much for supporting my blog, and stopping by! Have a wonderful day!!!


Wednesday, August 18, 2021

Colorful Floral Silhouette Note Set - Simon Says Stamp

 Good morning! Today I'm popping in to share a card I created using a new set I recently got from from Simon Says Stamp and had never had a chance to use! I love a good silhouette stamp, and thought there was such a fun assortment of perfect sentiments on this set as well - no wonder it is called Silhouette Sentiments! And while I tend to gravitate to using black for silhouette images - with a colorful background of course - this time I thought it would be fun to create a pop of color with it instead!

I used sets of Pinkfresh studio inks to stamp the florals, I stamped the entire image first in the lightest shade, then partially inked with the next darker shade, then inked up even less with the next darkest shade, then finished with the deepest shade only inking up the bottom. I of course left it all lined up in my MISTI to make it easy to add each color. I've linked up all the colors below!

For this first one I used Peach Fuzz, Apricot, Clementine, and Persimmon.


Next, I used Coral Reef, Passion Fruit, Berrylicious, and Candy Apple.


Next up, Soft Lilac, Candy Violet, Lavender, and Regal Kiss.


And finally, Mint, Meadow, Emerald City, and Evergreen! Once they were all stamped, I trimmed each panel down with a basic rectangle die.


Next up, I stamped several of the larger sentiments on black cardstock and heat embossed in white before die cutting with the coordinating dies


I mounted each of those heat embossed sentiments on the background with foam adhesive, and stamped a supporting sentiment underneath in black ink.


Finally, I adhered the entire panels onto white cardbases with foam panels to help them pop from the background!


I love the blend of different colors, and the pop of black for the sentiment - all along with all that bright white space!


Which color combo is your favorite?


Product links are all below - including affiliate links where possible, which simply means that if you use one of the links below, I receive a small commission at no additional cost to you. Thanks so much for supporting my blog, and stopping by! Have a wonderful day!!!