Saturday, November 30, 2019

Obsessed Penguin - Simon Says Stamp Card

Good morning! I'm stopping by today with anther funny sentiment card, using the same stamp set I used on the funny gnome card from a couple days ago from Simon Says Stamp. This time I used a simple stamped penguin from the Snow Much stamp set!


I thought this funny little penguin was so super cute - and adding wiggly eyes was such a cute touch with that hilarious sentiment from Playful Messages stamp set!


I added some simple Copic coloring just to the nose, and stamped the heart in red ink and colored it in with Copics as well for a solid heart image.


Some pattern paper at the top and bottom of the panel - the top end die cut with Wavy Scallop Stitches - and then that front panel popped up on a kraft cardbase with foam adhesive!


Product links (or similar equivalents) are all below - including affiliate links where possible, which simply means that if you use one of the links below, I receive a small commission at no additional cost to you. Thanks so much for supporting my blog, and stopping by! Have a wonderful day!!!


Wednesday, November 27, 2019

Magical Christmas - Pinkfresh Studio Facebook Live Card

Good morning! Yesterday was our weekly Pinkfresh Studio Facebook Live! This week we did it on Tuesday instead of Thursday due to the Thanksgiving holiday here in the US. This week we made this pretty magical Christmas card! If you missed the Live video and want to take a peek, you can find it on the Pinkfresh Facebook Page - yesterday's video is available HERE. As always, there was one giveaway for someone who watched live, so make sure and pop in each week to win that live giveaway - 10 AM Pacific time on Thursday morning!

I also always try to post info here the next day on the card we make - for those that aren't on Facebook or maybe didn't see it over there.


We featured the adorable Magical Christmas stamp set and coordinating dies for this card - I showed an easy way to line up all the fun elements of this stamp set! We stamped with a combination of Licorice, Candy Violet, and Coral Reef Dye inks, then added a touch of color with some Copic markers.


The pink cloud background was created with Ballet Slipper Dye ink, and a scrap of white paper that I trimmed with scissors into a wavy pattern - super simple! A splash of Perfect Pearls mixed with water add the perfect touch of sparkle to the background as well!


Finally, the sentiment was stamped with the same Licorice Dye ink, added the unicorn with bit of foam adhesive, sprinkled on a few pink jewels from Essentials: Jewels Mix, and finished off with some Nuvo glitter drops on the mane, tail, horn, and scarf on the unicorn. You can never have too much sparkle, right? 


Also - just a reminder of the FABULOUS sale Pinkfresh has going on through Thanksgiving Day (Thursday, November 28th) this week - make sure and check it out HERE! There are some deep discounts on several items - a great time to grab a little something special!


Product links are all below - including affiliate links where possible, which simply means that if you use one of the links below, I receive a small commission at no additional cost to you. Thanks so much for supporting my blog, and stopping by! Have a wonderful day!!!


Annoying Gnome - Simon Says Stamp Card

Good morning! I'm stopping by today with a funny and quirky little gnome card! I'm using a fun Simon Says Stamp wafer thin die and sentiment stamp set to create this card. Gnomes are all the rage right now, and I thought it would be fun to pair this one up with a funny and snarky little sentiment!


I started off with the adorable little gnome die from the already SOLD OUT Simon Says Stamp December Kit of the Month - but he is also available all on his own HERE! I die cut all the layers from white cardstock, then colored him in with Copic markers. Love how this allows him to be customized!


I layered together some pattern paper from two different companies, adding a torn edge to the yellow paper on the bottom to ground my gnome. I used my Corner Chomper to round the edges of my panel.


Sentiment was added with white heat embossing from the adorable Playful Messages stamp set - one of my favorites that always makes me laugh!


Finally, I added a little coordinating yellow enamel heart, and mounted the entire panel with foam on a white cardbase.


Product links (or similar equivalents) are all below - including affiliate links where possible, which simply means that if you use one of the links below, I receive a small commission at no additional cost to you. Thanks so much for supporting my blog, and stopping by! Have a wonderful day!!!


Tuesday, November 26, 2019

Happy Birthday Flamingo - Simon Says Stamp Card

Good morning! I'm stopping by this morning with a bright and happy, but also clean and simple card to share with you! I'm using a fun Simon Says Stamp wafer thin die and sentiment stamp set to create this card. Something about this color combo just makes me feel happy - doesn't it you?


I started off with the fabulous Flamingo Wafer Die, cutting it from watercolor cardstock, then adding color with Pinkfresh Studio Bubblegum Liquid Watercolor - love how vibrant this color is!


I set that aside to dry, and pulled out a panel of white cardstock and did some ink blending along the bottom using Blueprint Sketch Distress Oxide Ink, and stamped a sentiment from CZ Designs Clean Lines Everyday Stamp set - there are some great sentiment combinations in this set, and I thought this one was perfect for that happy flamingo!


I adhered the now dry flamingo with foam adhesive, then decided to add some sparkle and dimension. I added Nuvo glitter drops to the main part of the body, and Glossy Accents to the beak and legs. Love how this makes the same pink color look a bit different on each of those parts.


Finally, I added some coordinating jewels from Pinkfresh Studio's Essentials Jewels Mix - just a little extra sparkle and shine!


Product links are all below - including affiliate links where possible, which simply means that if you use one of the links below, I receive a small commission at no additional cost to you. Thanks so much for supporting my blog, and stopping by! Have a wonderful day!!!


Monday, November 25, 2019

Ombre Block Stamping - on the Unity Stamp Company Blog

Good morning! I'm back with another card for my series on the Unity Stamp Company Blog this morning! I'm so excited to be featuring the amazing Kit of the Month on Monday's on the Unity Stamp Company Blog! Since the Kit of the Month was the first thing I purchased from Unity, and what got me hooked to begin with, they hold a special place in my heart, so I'm super excited about this opportunity to give these kits some love! You can check out all the details HERE for today's card!


Thanks for stopping by today - have a WONDERFUL day!!!


Saturday, November 23, 2019

Stenciled Tree Winter Scene - SSS December 2019 Card Kit

Good morning! I'm stopping by to share another card created with the BRAND NEW December Simon Says Stamp Card Kit - Gnome for the Holidays! This kit is SOOO much fun - the included large stamp set by the same name is absolutely ADORABLE, the pattern paper is GORGEOUS, the adorable Lil' Gnome Die is the CUTEST - not to mention fun stencil, mini action wobbles, blending brush, envelopes, and more!

I once again filmed a video for this card! I've posted it on my YouTube channel HERE, and also below so you can watch either place you prefer. :)


Here is the video - let me know what you think!


I loved how just using the tree images from the stencil, varying the heights, and switching up the colors made it so simple to create this fun scene!


And lots of splatters add to the snowy scene effect as well!


Here is a closer look at the entire kit contents - you can find all the details HERE:


Product links are all below - including affiliate links where possible, which simply means if you use one of the links below that I receive a small commission at no additional cost to you. Thanks so much for stopping by! Have a wonderful day!!!


Thank You from the Bottom of my Heart - Reverse Confetti Thankful Sale

Good morning! I'm stopping by today with a couple of simple cards, a few favorites from over the past year, AND some news about a special sale at Reverse Confetti! Read on for more info!


These cards came together so very quickly using a stamp set and some pattern paper from the new release! I started off by layering some of the pattern paper from the new Winter Wonder 6x6 Paper pad on the bottom of some white cardbases. I tore the top edge of the larger piece of paper for a bit of texture.


I stamped the sentiments on the top white space using the versatile new Thank You stamp set and coordinating ink in Abyss and Grape Soda. Finally, I added a bit of sheer white ribbon along the bottom of the card - wrapped around and tied in a knot!


Here is the info on the sale - such a great time to stock up on your favorites! Click HERE to go shop!


Part of this post today was to share our top 3 favorite Reverse Confetti projects from the year. I couldn't narrow it down any more, so I'm sharing my top 6 - haha! Here are those favorites - click on the photos or the the link below any of them for more details on each card:

Click HERE to view more info!

Click HERE to view more info!

Click HERE to view more info!

Click HERE to view more info!

Click HERE to view more info!

Click HERE to view more info!

Here are the products I used on my cards for today!


Product links are all below - including affiliate links where possible, which simply means if you use one of the links below that I receive a small commission at no additional cost to you. Thanks so much for stopping by! Have a wonderful day!!!


Friday, November 22, 2019

Modern Bloom 2 Ways - Pinkfresh Studio Facebook Live Card

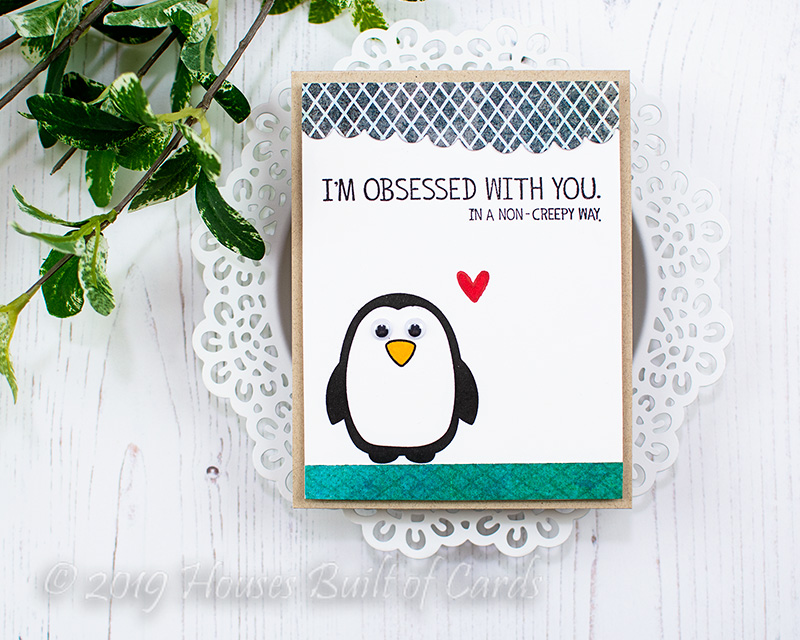
Good morning! Yesterday was our weekly Pinkfresh Studio Facebook Live! we did some ink blending to create this duo of cards - gotta love a two for one card design, right? And if you want a good laugh...this one includes the blooper reel - I spilled my entire cup of tea in the middle of the LIVE - real life happens, right?!?!? Haha! If you missed the Live video and want to take a peek, you can find it on the Pinkfresh Facebook Page - last week's video is available HERE. As always today, there was one giveaway for someone who watched live, so make sure and pop in each week to win that live giveaway - 10 AM Pacific time on Thursday morning! Next week, here is the US, is Thanksgiving, so we will be doing our weekly Live on TUESDAY - same time and same place. Hope to see you there!

I also always try to post info here the next day on the card we make - for those that aren't on Facebook or maybe didn't see it over there.


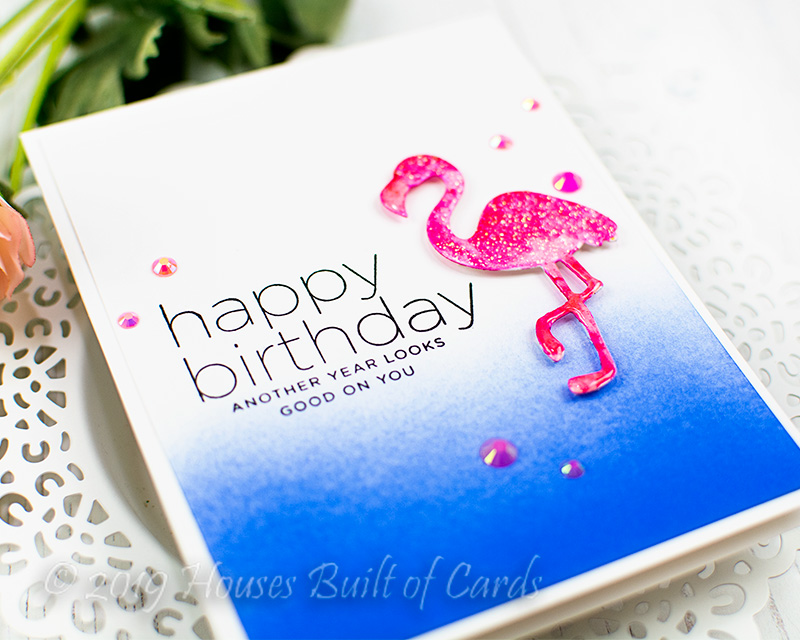
These cards started off with the beautiful Modern Bloom Die. I die cut it from white cardstock, then used that one die cut two ways on these two cards!


First up, I misted a bit of Pixie Spray on the back of the die cut, and allowed it to dry for about a minute. This allowed it to be held temporarily in place while we ink blended over the top of it, essentially using it as a stencil. The ink colored used were Lemon Whip, Clementine, Coral Reef, and Candy Violet.


When we peeled it off...not only did we have a beautiful background, but the die cut was also beautifully colored! Score!


Going back to that first background, we added some Perfect Pearl splatters for a bit of texture and shine.


The second one we adhered in place only behind the framed sentiment - leaving the rest of the die cut floating free for a bit of fun dimension. Sentiment on both cards are from My Favorite Things to Say stamp set, and die cut with the beautiful Fancy Label Frames dies.


Finished off with a few jewels from Essentials Jewels Mix for a final touch of sparkle - and these quick cards are done and ready to go!


I also wanted to mention a FABULOUS sale Pinkfresh has going on through Thanksgiving next week - make sure and check it out HERE! There are some deep discounts on several items - a great time to grab a little something special!


Product links are all below - including affiliate links where possible, which simply means that if you use one of the links below, I receive a small commission at no additional cost to you. Thanks so much for supporting my blog, and stopping by! Have a wonderful day!!!