Friday, July 30, 2021

Hope All is Well - Pinkfresh Studio Facebook Live Card

Good morning! Dropping by today to share a card I made yesterday for Pinkfresh Studio's Facebook Live. I used a newly released layering stencil and die set (and a sentiment from the coordinating stamp set) to create this fun card that has all the late summer/fall vibes for me! You can watch the replay HERE if you want to see more details.


I was excited to pull out and use one of the new release sets that I hadn't had a chance to play with yet. I started with the beautiful Just a Hello Floral layering stencils, and a bolder and deeper color combo than I usually use for my stenciling. LOVE how it feels all warm and cozy like the end of summer and beginning of fall! I originally planned to use the stamp over the top, but I loved the soft no line look to the stenciling, so I just moved on and die cut them with the coordinating dies.


I layered alternating pairs of the florals on opposite ends of a Scallop Rectangle frame die cut from navy cardstock and mounted with foam adhesive on a white cardbase. I also mounted the florals with foam adhesive, and curled up the edges of each of the floral panels. Sentiment is from the Just a Hello Floral stamp set - and is super fun since all the sentiments are a one piece stamp with a one piece coordinating die. So you get all the sentiments all at the same time! I heat embossed the sentiment for this in gold.


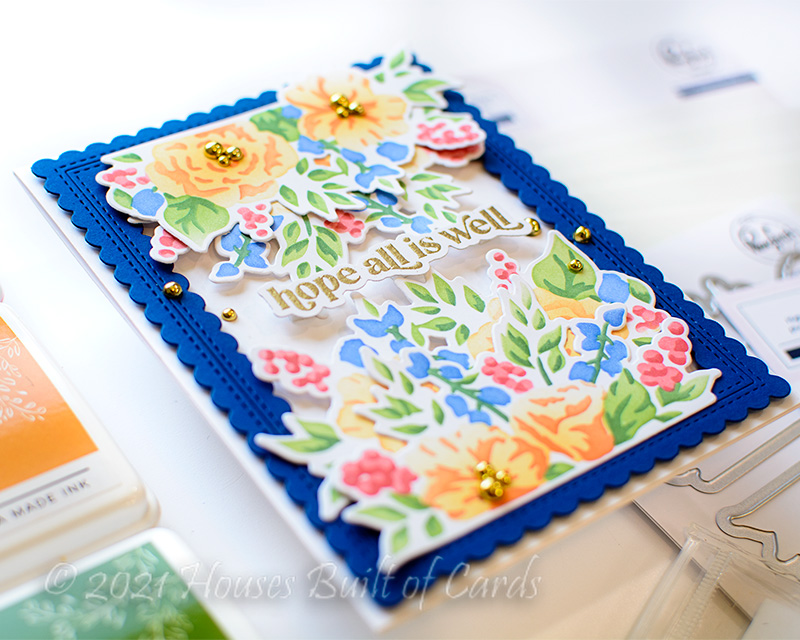
Finished off with a few of the pretty Metallic Gold Pearls clustered in the centers of some of the flowers, and tucked a little bit on each side of the sentiment!


Product links are all below - including affiliate links where possible, which simply means that if you use one of the links below, I receive a small commission at no additional cost to you. Thanks so much for supporting my blog, and stopping by! Have a wonderful day!!!

Tropical Hibiscus - Simon Says Stamp Make Magic Release

 Good morning! I'm back today to share another cards using the FABULOUS NEW Make Magic release from Simon Says Stamp - today I'm sharing anther card using the beautiful new Suzy's watercolor prints: Tropical Foliage! And full credit - the image for this one was colored by my 18 year old daughter. She wasn't happy with the finished product (bit of a perfectionist!) - and I found it in the trash in my craft room. I pulled it out and asked her if I could use it to make a card - since I loved how it turned out! Fortunately, she gave me permission! :)


She watercolored this lovely hibiscus flower image - this flower always takes me right back to Hawaii! Kind of explains the sentiment a bit, right? :)


I die cut it with a large Oval die, then mounted on a coral cardbase created from Concord and 9th cardstock, and added a layer of vellum with a torn edge between the two. I adhered the oval right to the vellum, then hid foam adhesive behind the oval, so that layer is popped up, and the vellum has a bit more space to float free for dimension.


Added this CZ Design Reverse Sentiment Miss You strip, matted with a bit of white cardstock, and mounted with foam adhesive as well. A few sparkly clear sequins are the finishing touch!


Product links are all below - including affiliate links where possible, which simply means that if you use one of the links below, I receive a small commission at no additional cost to you. Thanks so much for supporting my blog, and stopping by! Have a wonderful day!!!

Wednesday, July 28, 2021

Tropical Leaf Duo - Simon Says Stamp Make Magic Release

 Good morning! I'm back today to share two more cards using the FABULOUS NEW Make Magic release from Simon Says Stamp - today I'm sharing two cards that I created from one panel of the beautiful new Suzy's watercolor prints: Tropical Foliage!


For both cards, I used the one panel, and did a random series of ink smooshing with lots of mini distress ink cubes. I let all the colors mix and blend to get this beautiful background, added some white paint splatters, then die cut a rectangle out of the center, making sure to center it and save the frame for the second card below.


For this card, I popped that panel up with foam adhesive on a white cardbase, and added a sentiment from the fabulous Just Because Word Mix 2 stamp and die combo. I adhered it with a bit of liquid glue behind the top of the banner, allowing the lower portion to curl up for a touch of extra dimension.


Finished off with a few coordinating Pinkfresh Studio jewels in opposite corners - love the added sparkle that gives!


Now, onto that second card with the frame we saved! I trimmed down the outer edges a bit so it would leave a border around the outer edge to show off my colored cardstock.


In the center, I die cut the fun new Flipped Like You die, and backed it with gold glitter cardstock. I added a sentiment over the top from CZ Design Reverse Sentiment Strips: Happy - I foiled it with gold foil since it is printed with toner ink and will foil with toner-reactive foil. Fun!


I popped that extra sentiment up with foam adhesive, and the frame with more foam adhesive. Fun dimension, isn't it? And that finishes off these two simple cards!


Product links are all below - including affiliate links where possible, which simply means that if you use one of the links below, I receive a small commission at no additional cost to you. Thanks so much for supporting my blog, and stopping by! Have a wonderful day!!!


Tuesday, July 27, 2021

Your Heart is so Big - Pinkfresh Studio Instagram Release Hop

 Hello! Today I am part of a fun Instagram hop to celebrate the new Pinkfresh Studio release! Make sure and head over to Instagram to hop along and see all the giveaway details! This card features one of the new layering stencils that coordinates with the stamp and die combos, that also coordinate with some previously released washi tapes! So much fun to use your own color combos with these sets, and also have the ease of simple coloring with layered stencils!


I started off by stamping the Indigo Vines stamp set in Tidal Pond ink, then I moved on and used the layering stencils to add color to it all with Ocean Breeze, Aquamarine, Sparkling Rose, and Bubble Gum inks.


Once everything was stenciled, I used the fabulous one piece die set to die cut out all the images in one pass through my die cut machine, and then arranged all the little elements around the wreath, some behind, and some in front. Love the nice full feel this gives the wreath!


I finished off with a sentiment from the new Just a Hello stamp and die set, and a few sparkly Metallic Silver Pearls for a bit of sparkle!


Product links are all below - including affiliate links where possible, which simply means if you use one of the links below that I receive a small commission at no additional cost to you. Thanks so much for stopping by! Have a wonderful day!!!


Monday, July 26, 2021

Color Blocked Circles Card - on the Unity Stamp Company Blog

 Good morning! I'm back with another card for my series on the Unity Stamp Company Blog this morning! I'm so excited to be featuring the amazing Kit of the Month on Monday's on the Unity Stamp Company Blog! Since the Kit of the Month was the first thing I purchased from Unity, and what got me hooked to begin with, they hold a special place in my heart, so I'm super excited about this opportunity to give these kits some love! You can check out all the details HERE for today's project!


Thanks for stopping by today - have a WONDERFUL day!!!


Pinkfresh Studio July Stamp, Die, Stencil, and Hot Foil Release

Good morning! Today is an amazing blog hop to celebrate Pinkfresh Studio's July Stamp, Die, Stencil, and Hot Foil Release! Whew - so many fun things! You aren't going to want to miss a stop along the way - TONS of inspiration and prizes up for grabs! YAY!  


As always, there is also a shipping promo - FREE US Shipping with $50 purchase, or discounted shipping for our international friends. Details and coupon codes are on this graphic:


There is also a beautiful free die available with all purchase of $50 or more - no code needed, and it won't show up in your cart, but will automatically be added to qualifying orders while supplies last!


It's summer - and you know how busy the schedule can get, so I have only two cards to share with you today - although I will also be sharing another card tomorrow for the Instagram hop, so make sure and check that out as well, as there will also be lots of giveaways up for grabs then!


My first card uses one of my favorite new sets from the release called Sweet Friend Floral. It has a gorgeous stamp set, beautiful coordinating hot foil plate, easy to use layering stencils, and of course, a one piece coordinating die that works seamlessly to make the entire thing nice and easy!


I used the hot foil plate for my florals, colored them with the layering stencils, then die cut them with the coordinating dies. I also used another new item from the release - Slimline Hearts Builder layering stencils - to create a simple background for them. LOVE this stencil - the hearts are the perfect shape!


I added a Stitched Scallop Rectangle, color blocking with white and gold mirror cardstock for the inner and outer layers, and tucked the bottom of each of the florals under the bottom of the rectangles that were popped up with foam tape.


I stamped a sentiment with the Sweet Friends stamp set in detail black ink, added some jute string, and finished off with a few coordinating Ballet Slipper jewels for a touch of sparkle!


Next up - I'm sharing the card I created for Facebook Live last week (you can view the replay HERE if you want to see it come together!). It used a couple of the new items as a sneak peek for today's release.


For this card I used the new Joyful Bouquet layering stencils - they are one of the new layering stencils released to coordinate with the washi/stamp/die combos that released earlier this year. SUPER excited for the new life this breaths into these beautiful sets - and the additional options it gives with the stamp set and limitless color options!


I used yellows and greens to put together my stenciling. I also used the new Slimline Skinny Plaid layering stencil to create a soft and pretty backdrop for my florals.


Ornate Ovals die was the perfect frame for the large floral in this layering stencil set, and I added a sentiment underneath from Anemone Magic stamp set, and a few sparkly yellow Crystals to finish this card off.


I also used the smaller floral elements from this panel to embellish a custom envelope to coordinate with my card! I used Slimline Envelope die, and the center of that Ornate Oval makes the perfect spot to add the address or name of who you are giving it to, don't you think?


GIVEAWAY INFO:
Make sure and leave a comment before you leave for a chance to win one of 10 $25 gift certificate to Pinkfresh Studio chosen from comments left across the hop! All winners will be chosen and posted on the Pinkfresh Blog on Tuesday, August 3, 2020 - so make sure and check back to see if you were a winner! Winners must check that page and claim their prize within 2 weeks.

Here is the entire blog hop line-up so you don't miss a single stop - and product links are below - including affiliate links where possible, which simply means if you use one of the links below that I receive a small commission at no additional cost to you. Thanks so much for stopping by! Have a wonderful day!!!

You are invited to the Inlinkz link party!

Click here to enter

Friday, July 23, 2021

Sun, Moon, and Stars - Simon Says Stamp Make Magic Release Blog Hop

 Good morning! Excited today to be joining in on Day 1 of an incredible blog hop to celebrate the BRAND NEW Make Magic Release from Simon Says Stamp! Make sure and check out all the inspiration with this new release AND link up your creations as you receive your orders HERE in the Gallery created just for this release! And check out the graphic below to receive a FREE Art Supplies die set with the coupon code below through July 25, 2021 as well - while supplies last (code expires at 11:59 PM EDT)!!!


Today I'm sharing a card that is out of my usual creative zone - lots of layering and interesting things happening, and oddly enough, I am super thrilled with how it came out!


I started off using the new Mod Layering Leaves stencil to create a background. I used 3 colors of distress ink for the first layer - Rusty Hinge, Mustard Seed, and Speckled Egg. I then added the second layer of the stencil, and used the coordinating oxide inks over the top! Love mixing these together - and they both have a different look and tone and texture, so it made the background super fun!


Next, I used the new Sun and Moon Mandala stamp set. This is a fun red rubber set, that separates into separate pieces. I stamped the outer portion directly over my stenciled backgroundI stamped and heat embossed the moon in gold on black cardstock, then carefully fussy cut that image out to mount with foam tape on the background. I then stamped the sentiment directly on the cardbase as well.


To add some more interest to the design, I added some pretty Metallic Gold Pearls in two sizes around the edges of the circle, lining up with the pattern on the background. Love the extra dimension, and how it pulls out the gold heat embossing on the moon as well!


While I usually tend more toward clean and simple cards, it was fun using so many layers all together on this one card!


GIVEAWAY INFO:
Simon Says will be giving a $25 gift certificate to their online store at each stop along the hop - so make sure and leave a comment before you leave for a chance to win! Winners will be announced next Wednesday on the Simon Says Stamp Blog.

Simon Says Stamp Blog   

Nina-Marie Trapani

Caly Person

Nichol Spohr

Jennifer McGuire

Cathy Zielske

Lisa Addesa

Amy Rysavy

Sidnie Des Jardins

Amanda Korotkova

Heather Ruwe

Suzy Plantamura

Yana Smakula

Heather Hoffman (you are here)

Lea Lawson

Product links are all below - including affiliate links where possible, which simply means that if you use one of the links below, I receive a small commission at no additional cost to you. Thanks so much for supporting my blog, and stopping by! Have a wonderful day!!!


Wednesday, July 21, 2021

You Take the Cake - Simon Says Stamp Make Magic Release

 Hello! I'm here to share my first card with the FABULOUS NEW Make Magic release from Simon Says Stamp - I'll be sharing more on Friday for Day 1 of the 2 day release hop as well! The first card I'm sharing uses the Do What It Cakes stamp set for a nearly one layer card:

You can find the entire new release HERE


Today I'm sharing this fun masked, stamped, and colored happy birthday card! I always love a good birthday stamp set, since I never seem to be able to keep enough of them on hand, so when I saw the Do What It Cakes stamp set - I knew I would be in love. And it is versatile enough to use for other occasions too - like wedding and baby showers among other things. Even better!


I did some quick masking and stamping with my MISTI to get my image in one layer. SO I lined up the stamp where I wanted it on my background, then arranged the flowers and candles where I wanted them over that image. I stamped the flowers and candles first, masked off what was necessary to stamp the cake image, and then added that tiny bow in the top half of the cake as well.


I stamped the sentiment, then it was just a simple matter of pulling out my Copics to color the image, then trim that panel down and pop it onto a Cream Cardbase for a soft color difference! Love the pretty and soft colors, with the extra soft background too. I refrained (just barely!) from adding any bling. I know it would have been good with it - but there was something just perfect about the simple design that I didn't want to take away from!


Product links are all below - including affiliate links where possible, which simply means that if you use one of the links below, I receive a small commission at no additional cost to you. Thanks so much for supporting my blog, and stopping by! Have a wonderful day!!!