Good morning! Today is the blog hop to celebrate Pinkfresh Studio's October 2022 Washi, Stamp, Die, and Stencil Release! I always go a bit crazy for the washi releases - there are so many fun things to play with that make cardmaking so quick and easy! You aren't going to want to miss a stop along the way - TONS of inspiration and prizes up for grabs! YAY! You can find links to all of the new release items I used on today's cards at the bottom of this post!
I may have gone even more crazy with today's post - I have 9 cards to share - and tons of photos to go with them all! First up - can I just say how excited I am to be adding balloons to the Pinkfresh line? We have had so many requests for that - and these are totally Pinkfresh style!
For my first two cards, I used the stamp, layering stencils, and dies to create my cards. I used one panel to create both cards, and STILL have a couple elements left to use on another card!
I heat embossed the image in gold, then blended soft color tones on the panel. I used a rainbow of colors - these balloons ended up with Lemon Whip and Peach Fuzz for the background.
I added a die cut from using Ornate Banner die and gold glitter cardstock, and then die cut the inner window from white cardstock to heat emboss my sentiment from Indigo Roses stamp set, also heat embossed in gold.
I popped the frame up with foam adhesive, and added the white center with liquid glue. I also added the balloons with foam adhesive, and let them fall off the edge of the card a bit.
I tied a bit of gold thread around the balloons in a loose bow - love how that steps the design up a bit and enhances the sparkle! Everything is mounted on an Ivory cardbase to add some subtle contrast with the white cardstock, but still keep it more neutral with all that gold sparkle.
And finally, a few of the fabulous new Gold Glitter Drops finishes this design off!
Now onto the second card using more items from the same stamped and stenciled panel!
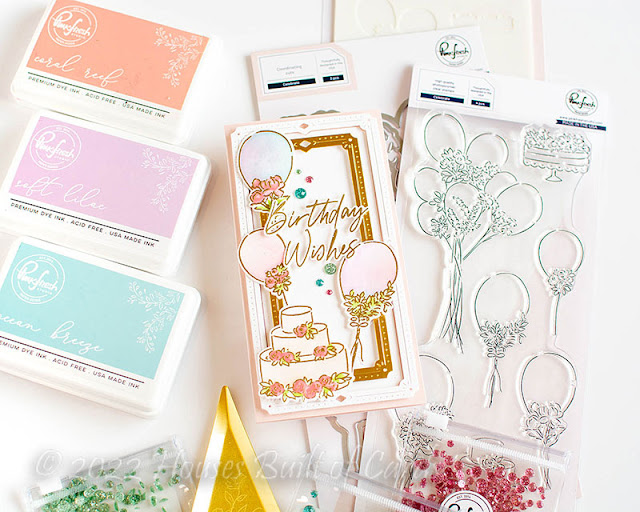
Since I blended across the panel in a rainbow, this part of the panel was blended with Coral Reef, Soft Lilac, and Ocean Breeze. I used a bit of Warm Buff for the base of the cake as well.
I decided to create a mini slimline card with these pieces, so I added some framing using the Mini Slimline Frames die. I die cut the largest window from white cardstock, kept the inner white panel to lay inside, and then cut the smaller frame from matte gold cardstock. Both frames are popped up with foam adhesive for dimension.
I tucked the balloon and cake elements around, adding foam adhesive to support where necessary, and liquid glue to attach to the frames.
Sentiment is from the stamp set, heat embossed in gold, and did I mention it has a coordinating die for that sentiment? Yep - love that! I added that one with more tiny bits of foam adhesive to adhere it down in the center.
Finally, a few sparkly new Glitter Drops in Blossom, Aqua, and Leaf - the colors just felt like the perfect match on this card!
I love that I was able to so easily create two cards from one panel - and still have a bit left to use later!
Okay - next up, the Chrysanthemum set! I also have two cards to share using the stamp, layering stencils, and die for this one!
I absolutely adore the washi tape for this set - the beautiful watercolor is stunning. But I also love how fun it is to color with my own palette - and I chose bright, juicy, fresh colors for this set! I used Sparkling Rose, Bubble Gum, Apricot, Clementine, Grassy Knoll, and Key Lime - all over gold heat embossed images.
I also added some hot foiled frames - for this first card, I used Nested Diamonds, and some of the new Satin glimmer hot foil rolls. For this card I used the gold version.
I also used a sentiment from Phrase Builder: Hello - for this one I used the reverse foiled image using the Solid Hot Foil plate.
As always, plenty of dimension between layers - because you can never have too much, right?
Secondary sentiment is from Whimsical Blooms, stamped in detail black, and hand trimmed into a little banner shape.
Background for this card is the Floral Backdrop coverplate die. And a few Glitter Drops in Blossom are the finishing touches!
And then, of course, since I had more blooms from this panel, I had to make a second card as well!
For this one, I used the one larger main bloom, which is perfect for a focal point like this on a card.
I tucked it into the reverse foiling from the second largest circle on Nested Circles, which helped accent those blooms as my focal point on my card.
The background was created with Ornate Medallions coverplate die, layered white on white over my cardbase. Love the texture that adds!
I popped the floral and circle up with foam adhesive, adding an extra layer of foam behind the flowers, to help give it extra dimension.
Sentiment is again from Phrase Builder: Hello - and this time I foiled both that and the circle using the Rose Gold tone in the Satin foils mix.
I finished off with another secondary sentiment from Whimsical Blooms, and a few Butterscotch Glitter Drops that seemed to coordinate perfectly!
And now that I've shared a couple cards using sentiments from Whimsical Blooms, let's move on to a couple cards using the stamps, layering stencils, and dies from that set!
I absolutely love the colors on this washi set - the pinks, purples, and yellows that are such perfect spring tones. But of course, since I can mix those colors up with the dies, I decided to go a different direction!
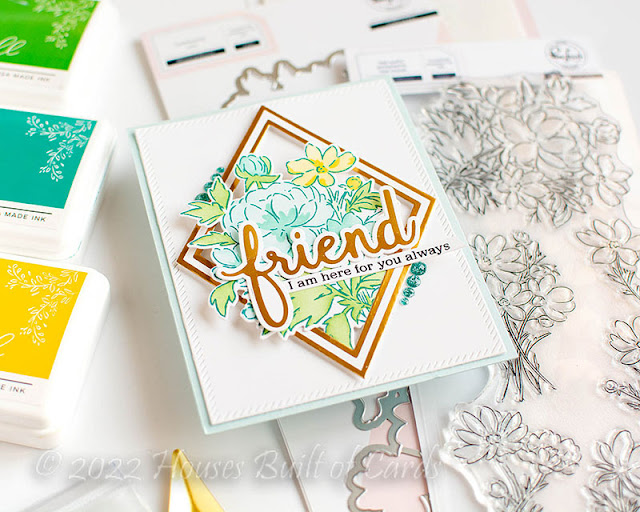
I used aquas and yellows for my flowers, and then stuck with traditional greens for the leaves. I used Ocean Breeze, Aquamarine, Mermaid Cove, Lemon Whip, Sweet Mustard, Fresh Pear, and Grassy Knoll to stencil with - and stamped the outline in Tidal Pond.
Notice that diamond on there? Yep - that is the reverse foil of the diamond I used a couple cards back. I foiled it with the Solid Hot Foil plate. Love that there is no waste - and I get another card out of the deal as well!
I popped the frame up with foam adhesive, and again used a double layer of foam adhesive for the flowers in the center, tucked behind on the bottom, and coming over in the upper portions.
I used a Diagonal Stitched Rectangle for the base of those elements, and mounted it on a very soft blue cardbase to coordinate with the flowers. And I added some Aqua Glitter Drops in a fun arrangement to enhance the framing of the diamond and florals.
Used another foiled sentiment from Phrase Builder: Hello, and a secondary sentiment again from Whimsical Blooms (there are so many perfect secondary sentiments on that set if you couldn't tell!).
The next card uses all the other little elements on the bottom of the panel - and I love how fun they are to create a cluster of wildflowers!
I used a negative panel from one of the Nested Circles that I die cut as a window for the florals to all tuck into.
I stamped a sentiment from Enchanting Flora in detail black ink at the bottom, before mounting with foam on a Cream colored cardbase for subtle contrast.
Then I just tucked the florals around, adding bits of foam adhesive or liquid glue as needed. Love all the little bits of dimension from that!
I think this design would be so easy to recreate in different colors to create a card set as a gift, or bulk create thank you notes!
Have you ever tried stamping the outline of a stamp in a different color like this? Instead of the expected black or heat embossed outline. I think it's super fun!
I also added some Champagne Glitter Drops to finish this one off - it was the perfect kind of soft neutral that just set off the design perfectly!
Here is one more look at that super clean and simple dimension:
Okay - moving on to a favorite of mine from this release - and finally sharing a card using the washi, not the coordinating stamp/stencil/die combos!
I love how easy the washi is to use, so I often use it more often than the rest of the sets - so I challenged myself to use the others a bit more in this release. However, I could NOT resist using this washi - it is just SOOO pretty! I will also be sharing more with this set tomorrow for the Instagram hop - so you won't want to miss that!
For this card I used lots of the tiny little floral elements - and I die cut two panels and used some duplicates to have enough for this card design.
I used the Stained Glass die for my background, and added a bit of soft stenciling on the card base mixing Ballet Slipper and Soft Lilac to match the shade of the flowers in the washi tape.
I mounted the die cut background over the top with liquid glue, and then used that to tuck all my little elements into. I used liquid glue at the base of each one, and then foam to pop up the top of each one for dimension.
Sentiment is stamped in Olive ink from the Enchanting Flora stamp set, and I used the coordinating die to cut it out, as well as a couple extra times to build up some dimension to adhere it to my card. I also used a secondary sentiment from the set, stamped in Detail Black and trimmed into a small banner to mount with foam adhesive.
Finishing touch is some Blush Glitter Drops sprinkled around - I can't get over how perfectly they coordinate with this washi, and the perfect sparkle they add!
The last two cards use the same set, but I started with the stamp, layering stencils, and dies - then created a card with the washi tape. They look completely different, and I love that!
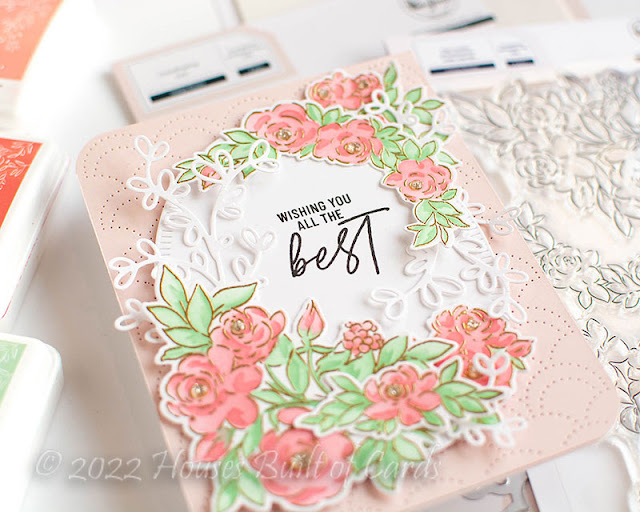
This first card, I heat embossed in gold, then used a pretty combo of Coral Reef, Passion Fruit, Mint, and Meadow ink to stencil in the layers.
I used Dotted Scallops coverplate on a panel of soft pink cardstock to use as my background, then popped up a Blanket Stitched Oval on that background (with my sentiment from the Chrysanthemum stamp set stamped on it).
I then arranged the florals around the frame, adhering with liquid glue and curling up the edges for dimension.
It felt like it needed a bit extra, so I die cut some Curvy Foliage from white cardstock, and tucked pieces of it around here and there on my card front.
I finished off with some sparkly Champagne Glitter drops in the centers of the flowers to add a touch of sparkle, but not overwhelm and make the design too busy.
Don't you love those dreamy pinks all together?
And finally - perhaps one of my favorite cards from the release!
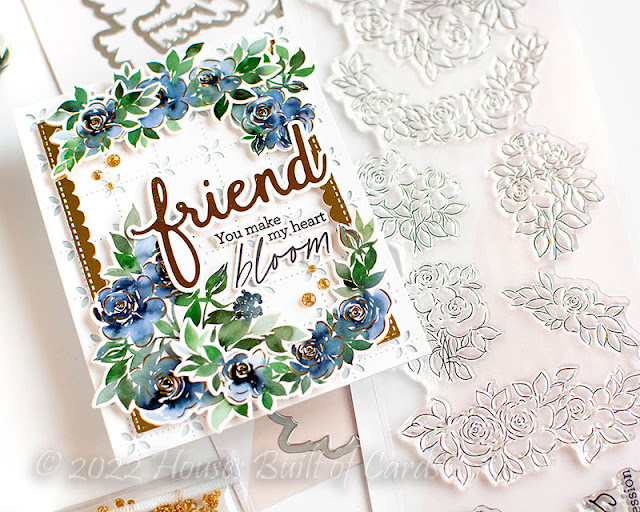
The Indigo Roses washi tape is gorgeous - and I mean, GORGEOUS! The deep blues and greens with the gold foiling is stunning!
So - to begin this card, I die cut the Floral Grid coverplate from white cardstock, and mounted over a soft blue cardbase. This gave a subtle coordinating effect of the blue tones, but without being overwhelming. Still plenty of white space!
I added a frame from Stitched Scallop Rectangles, die cut from mirror gold foil cardstock. Then, I just started arranging those florals around it, tucking in foam where needed, and liquid glue in certain spots as well.
I added a hot foiled word from Phrase Builder: Hello using standard gold foil to coordinate with the frame, and popping it up with foam adhesive.
The secondary sentiment is from the Indigo Roses stamp set, stamped in Detail Black, and then die cut with the coordinating die. I also die cut it a couple additional times to layer up for easy dimension. Finally, a few Gold Glitter Drops finish this card off!
Whew! If you made it all the way through those cards - congratulations! If you just skimmed the photos quickly, I don't blame you. I just add all the details and info for those that want it, and it's always there as a reference. :)
GIVEAWAY INFO:
Make sure and leave a comment before you leave for a chance to win one of 10 $25 gift certificate to Pinkfresh Studio chosen from comments left across the hop! All winners will be chosen and posted on the Pinkfresh Blog on Tuesday, November 1, 2022 - so make sure and check back to see if you were a winner! Winners must check that page and claim their prize within 2 weeks.
Here is the entire blog hop line-up so you don't miss a single stop - and product links are below - including affiliate links where possible, which simply means if you use one of the links below that I receive a small commission at no additional cost to you. Thanks so much for stopping by! Have a wonderful day!!!


