Thursday, May 31, 2018

Technique Tuesday Countdown Day 2 - Duck Swan Goose

Good morning! Welcome to Day 2 of sneak peeks for the June Release from Technique Tuesday! Woohoo!!! So much sweetness in this release - you are going to love it! Make sure and check out the Technique Tuesday Blog to find links to all the Design Team's projects for today!


Today's card uses a super funny new stamp set called Duck Swan Goose - and it has the most hilarious sentiments!


I kept my card fairly bright, clean, and simple by stamping all the birds in the set, coloring just the beaks and feet, then cutting out with the Coordinating Dies. I also added wiggly eyes - because, WIGGLY eyes! :)


I did a soft distress ink colored background, mounted them with foam adhesive, then stamped some fun sentiments around the images. Finished off by mounting that on a soft green cardbase!


Product links are all below - including affiliate links where possible, which simply means if you use one of the links below that I receive a small commission at no additional cost to you. Thanks so much for stopping by! Have a wonderful day!!!


Wednesday, May 30, 2018

Watercolor Galaxy Background - on the Reverse Confetti Blog

Good morning! Wanna see how to use watercolors to create a galaxy background like this one? Pop on over to the Reverse Confetti Blog HERE for this week's edition of Wednesday in the Works! You can also see this video on the Reverse Confetti YouTube Channel HERE!


Thanks so much for stopping by! Have a wonderful day!!!

Technique Tuesday Countdown Day 1 - Sweet Strawberries

Good morning! It's that time to start sharing sneak peek projects for the June Release from Technique Tuesday! Woohoo!!! So much sweetness in this release - you are going to love it! Make sure and check out the Technique Tuesday Blog to find links to all the Design Team's projects for today!


Today's card is full of strawberry sweetness using the new Strawberry Stamp Set!


For my card today, I used my MISTI to line up and stamp my image on two corners of my card base. I lined it up in a way that allowed me to rotate the card base 180 degrees and not have to reposition it. I stamped it in a soft cover, then colored the images in with Copic markers. Then...I restamped over it with my MISTI in embossing ink and heat embossed in gold over the top!


Hard to see in the photos - but such a fun effect in real life! I die cut the "thanks" from gold glitter cardstock using the coordinating Strawberry Dies, and heat embossed a little add on sentiment from a set that will be revealed tomorrow!


Here is a closer look revealing that gold shine a little better - isn't it pretty?!?!?


Product links are all below - including affiliate links where possible, which simply means if you use one of the links below that I receive a small commission at no additional cost to you. Thanks so much for stopping by! Have a wonderful day!!!


Monday, May 28, 2018

Layered Turtle Scene Card on the Unity Stamp Blog

Good morning! I love this sweet little older stamp set from Unity Stamp Company - I used it to create this fun one layer card today! There is a process video as well sharing how it all came together - you can check it out on the Unity Stamp Company Blog HERE!


Thanks for stopping by - have a beautiful day!!!

Underwater Birthday Scene on the Heffy Doodle Blog

Good morning! Popping in this morning with a peek at a little card I made using lots of the ADORABLE new Heffy Doodle Stamps June release! I combined several different sets to build my little underwater birthday scene - and that shark is on an action wobble too! So he looks like he is about to take a big chomp out of that cake! You can check out the details and more photos HERE! :)


Thanks for dropping by! Have a fabulous day!

Saturday, May 26, 2018

Studio Katia 2nd Anniversary Blog Hop - Day 2

Good morning! I'm happy this morning to be joining in a on Day 2 of the HUGE Hop for Studio Katia's 2nd Anniversary Celebration and Release! You should have arrived here from Ilina Crouse - and your next stop is Tracy Freeman. If you get lost, the entire blog hop line-up is at the bottom of this post. You can check out the entire new release HERE!


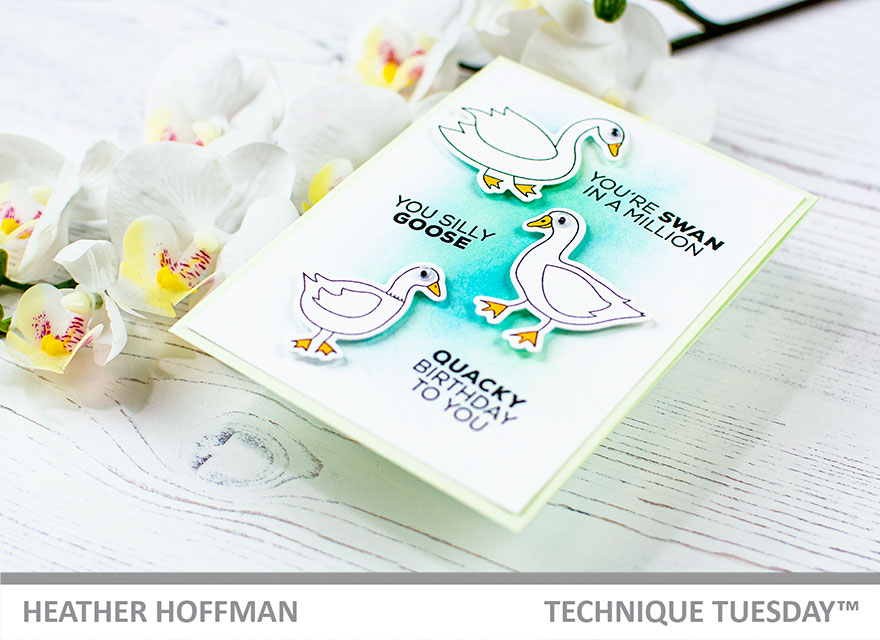
I actually ended up with a total of FOUR cards to share with you today! Totally wasn't planning on doing that many, but just kind of worked out that way with all the new release goodies I got in my package. So be prepared for lots of photos - you've been warned! :)


My first card uses the gorgeous new Lovely Floral Stamp set - such a gorgeous floral image - and so fun to watercolor! I used my Daniel Smith watercolors to color in the vibrant blooms, then added a splatter of white paint over the top for extra texture.


I added a sentiment from Birthday Greetings, trimmed the panel slightly smaller than my white A2 cardbase before attaching it, so it left a slight border.


Second card uses the same Lovely Blooms stamp set - but this time with colored pencils! It is equally fun to color this way!


This time, I stamped it on kraft cardstock with a soft colored ink, then slowly colored in with my Chameleon Double Ended Colored Pencils. This was perfect for me to take with my on the go (actually, I took this one AND the previously watercolored one with my to my parents house and colored them there). Once I arrived home, I restamped the image (since I left it in my MISTI after the first stamping) with clear embossing ink, and heat embossed with gold. 


I trimmed it down, matted with black cardstock, then added a heat embossed sentiment from Birthday Greetings on a thin strip of black cardstock. Finished off with a sprinkling of Nuvo Drops around the image in similar vibrant tones.


Next up, I paired up the Kobi Bearing Gifts, Bubbles Stencil, and Birthday Greetings for a simple birthday card - LOVE that sentiment!


I started off by blending Twisted Citron Distress Oxide ink using the Bubbles Stencil over white cardstock and my new Ranger Blending Brushes (LOVE them). I then stamped Kobi Bearing Gifts, colored to blend with my background, and cut out with the coordinating dies.


Finished off by stamping my sentiment, mounting the image with foam adhesive, and then mounting the entire thing on a Sea Glass cardbase.


And finally...a shaker card featuring the Scallop Window Dies!


For this one, I chose some fun pattern paper from a Crate Paper 6x6 pad, and die cut the Scallop Window Die from the center. See that thin strip of white? The die cuts that as well, so I fit that back into the window to add a bit of a frame as I built my shaker.


I filled it with Sparkling Butterfly Chunky Glitter and added a sentiment, again from Birthday Greetings, stamped in a coordinating color. Mounted the entire thing on some new Peacock Cardstock from Simon Says Stamp.


GIVEAWAY INFO:
Studio Katia is giving away 2 $100 Gift Certificates on EACH day of the blog hop, chosen from comments left across the entire hop. So the more comments you leave, the better your chances of winning! Comments must be left by Saturday, June 2, 2018 at 11:59 PM EST. Winners will be announced on the Studio Katia Blog on Sunday, June 3, 2018.

Here is the entire blog hop line-up:

Heather Hoffman (you are here)


Product links are all below - including affiliate links where possible, which simply means if you use one of the links below that I receive a small commission at no additional cost to you. Thanks so much for stopping by! Have a wonderful day!!!


Friday, May 25, 2018

I Think I'll Keep You - Simon Says Stamp Sending Sunshine

Hello! Dropping by with another card using the BRAND NEW Sending Sunshine Release from Simon Says Stamp! For this card, I used a new die, a favorite new sentiment stamp set, and did some distress ink blending!


I started off by blending a background with Broken China Distress ink and my new Ranger Blending Brushes that I'm in love with! I also flicked on some more color by pressing the ink pad on a clear stamp block, wetting with a waterbrush, then splattering that over my blended background. I stamped my sentiment from Playful Messages over that once it dried, after planning where I was going to add the star banners.


Finally, I die cut from gold cardstock several star banners using Star Stream Wafer Die, and arranged them around my sentiment in a whimsical design. Finished off by trimming that panel, adding a thin mat of gold cardstock on the sides, then mounting on a white cardbase.


Product links are all below - including affiliate links where possible, which simply means if you use one of the links below that I receive a small commission at no additional cost to you. Thanks so much for stopping by! Have a wonderful day!!!


Pretty Pink Posh Memorial Day Animal Sale

Hello! Stopping by to let you know of a FABULOUS weekend SALE going on at Pretty Pink Posh to celebrate Memorial Day this weekend! All of the stamps - AND dies - in the "Animals Category" HERE are 20% off! Woohoo! That even includes some of the new sets like the Playful Puppies stamp set that is absolutely DARLING! You can find all the sale items HERE!


Here is a peek at a few of my favorites cards using items in the sale category - CLICK on any of the PHOTOS to go directly to the sale set that I used on that card!


Thanks for dropping by! Have fun shopping!

Wednesday, May 23, 2018

Dual Layer Embossing on the Reverse Confetti Blog

Hello! Dropping by to share a peek at a couple cards with a fun technique video tutorial I have on the Reverse Confetti Blog today - so much fun, please check out the video to see how it's done! You can see it HERE or on the Reverse Confetti YouTube Channel HERE!


Thanks for stopping by! Have a fabulous day!

Chibitronics and Winnie and Walter Co-hop

Good morning! Excited today to be part of a fun co-hop with Winnie and Walter and Chibitronics! You are going to find loads of inspiration, and there are two great prizes up for grabs too! You should have arrived here from Gayatri Murali - if you just happened along, make sure and start at the Chibitronics Blog or W&W blog so you don't miss a stop. You can find a complete list of the blog hop line-up at the bottom of this post as well.


Here is the card I made for the hop - these light-up cards are notoriously difficult to photograph! I had fun combining different Winnie and Walter products with my Chibi Lights LED Circuit Starter Kit!


And here it is lit up - you may notice the outside houses have a white light, and the inside one has yellow lights? Yeah...that's what happens when you peel the stickers off to soon and stick them in the wrong place. They do lose their stickiness and ability to get a good connection. So my advice is to read the directions all the way through before you stick them down! Haha - oops! My daughters just said the outside houses have LED lights and the middle doesn't! :)


I used My Town for my row of houses, stamped in Catherine Pooler inks in the colors of Aquatini, Party Dress, and Lime Rickey. Isn't it a bright and happy color combo? I used a tiny hole punch to punch holes in the windows so the light would shine through. Then after building the circuit to fit behind the windows, it allowed the light through better.


I added some details to the sky with the same stamp set, added a sentiment from Party On with Evelin T Designs, and then die cut the panel on the front with Essentials: Katharine Cutaways. I also die cut the tiny tag from that set, then just hand wrote on the "press here" so that whoever got it would see it was an interactive card!


Your next stop along the hop is Jessica Lin - make sure and head that way next to see what she has in store for you!

GIVEAWAY INFO:
There are two gift certificates up for grabs today - one for $30 to the Winnie and Walter Store, and one for $30 to the Chibitronics Store. Make sure and leave comments along the hop for your chance to win! Comments must be left by 11:59 PM CST on Tuesday 5-28-18.

Here is the entire blog hop line-up in case you get lost along the way:

Heather Hoffman (you are here)

Product links are all below - including affiliate links where possible, which simply means if you use one of the links below that I receive a small commission at no additional cost to you. Thanks so much for stopping by! Have a wonderful day!!!


Monday, May 21, 2018

Stacked Farm Animals on the Unity Stamp Company Blog

Good morning! Just stopping by with a look at a card I have posted today on the Unity Stamp Company Blog! You can find all the details HERE!


Thanks for stopping by! Have a wonderful day!

Sea Friends Card and Sale - on the Pretty Pink Posh Blog

Good morning! Stopping by to share a look at a card and tutorial I have posted on the Pretty Pink Posh Blog this morning - you can view the post HERE if you're interested - but also to let you know about a SPECIAL 3 day SALE on the adorable Sea Friends Stamp Set and Coordinating Dies


Thanks for stopping by - have a great week, and happy shopping!