Tuesday, May 31, 2022

Pattern Paper Scene Cards - Simon Says Stamp June 2022 Card Kit

Good morning! I'm popping in to share a few more cards using the June 2022 Simon Says Stamp Card Kit - Happiest Wishes! This month's kit bright, happy, and so fun for spring! The included stamp set by the same name has some adorable little images and great sentiments that are focused on birthdays and celebrations, there is a fun little word die, of course some sweet pattern paper, card size T-ruler...that's all not to mention the cardstock, envelope, and more!

I have 3 cards to share today. I planned on breaking out the stamp set and focusing on those images, but I couldn't resist using up more of that darling pattern paper! I did use the stamp set on the first couple cards as well, and I know I will break it out more. I never seem to be able to have enough birthday cards, and that one is perfect for that!


I was so excited to be able to use nearly ALL the pattern paper in the kit to finish these cards. And these cute little squares were so cute, I didn't want to waste a bit of them. I trimmed the paper in half, then trimmed the outer edges to make thin strip panels.


For both cards, I lined them up on my white cardbases, and stamped the clouds over the pattern paper and cardbase at the same time. I then removed the pattern paper, then restamped again in my MISTI with perfect placement. Then I was able to adhere the pattern paper to my card with the clouds perfectly lined up, and no missing bit on the edge of the paper.


I trimmed one of the pieces of pattern paper down with the adorable little scenes on it, matted it with black cardstock, and mounted over the clouds with foam adhesive. I also heat embossed the sentiment in white on black cardstock, fussy cut it out, and adhered with foam adhesive as well.


Finally, I added a few of the tiny stars from the stamp set, stamped around to fill in the holes around the scene!


And...I still had one more piece of pattern paper, not to mention a bunch of these cute little scenes - so it was time for a slimline!


I did some creating piecing of the pattern paper, since it was obviously 6x6. I thought it was fun to flip the design to add a small strip to the top and bottom with a bit of a border for fun in between.


These little scenes I matted with white paper to help them stand out, and then mounted with foam adhesive at fun angles, and with some pieces overlapping.


I built from more daytime scenes at the top, going down to nighttime, and alternating horizontal and vertical scenes to keep them from getting boring.


And finally, a heavy sprinkling of playful enamel dots help add a fun element and bring the entire design together!


Here is a closer look at the entire kit contents - you can see it all HERE:


Product links are all below - including affiliate links where possible, which simply means if you use one of the links below that I receive a small commission at no additional cost to you. Thanks so much for stopping by! Have a wonderful day!!!


Monday, May 30, 2022

So Happy Floral Duo - Simon Says Stamp

 Good morning! I'm stopping by this morning to share a couple cards using some newer to me and older supplies from Simon Says Stamp that I played with the other day and had so much fun combining onto these cards! 

I love how the Stylized Flower Die works along with the Stylized Flower stencil for a unique design. I did some ink blending with the stencils, then die cut the flower from gold mirror cardstock to layer over the top.

For each flower I used three different shades of SSS Pawsitively Saturated inks. This allowed me to get some fun variation in the colors. For this first one, I gradiated the color from right to left, leaving the lightest color on the left and building darker as I went.


When I adhered the die cut, I purposely added it slightly offset. I like how it enhances the petal details, and adds a crisp bit of a white shadow layer. I also adhered the dies down with dots of liquid glue just in the center areas of the flowers, leaving the outer edges free to float up for dimension.


For this second card, I concentrated the deepest color around the outer edges, and the softest in the center. Once both flowers were stenciled, I die cut them with a Nested Circle to fit my cardfront size.


I used Detail Bohemian Coverplate to add detail to the front of my card, ,and then used the leftover ink on my blending brushes to add a soft wash of color just to the top of each panel. I also added some gold splatters to each background to help enhance the gold from the die cut flowers. I originally was going to match the panel to the flower color - but since these colors complimented each other so well, I thought it would be fun to switch them up a bit, so I reversed them. :)


I finished off with some pre-printed sentiments from All Things Happy Reverse Sentiment Strips. I trimmed them into strips, then into banner shapes on the edges, then adhered them with liquid glue in center, curling up the edges for a bit of extra dimension again.


I did adhere the circle shapes with foam adhesive, otherwise the dimension on these cards mostly comes from layers not glued entirely down firmly and allowed to float slightly free!


Product links are all below - including affiliate links where possible, which simply means that if you use one of the links below, I receive a small commission at no additional cost to you. Thanks so much for supporting my blog, and stopping by! Have a wonderful day!!!


Hope you feel better soon - on the Unity Stamp Company Blog

 Good morning! I'm back with another card for my series on the Unity Stamp Company Blog this morning! I'm so excited to be featuring the amazing Kit of the Month on Monday's on the Unity Stamp Company Blog! Since the Kit of the Month was the first thing I purchased from Unity, and what got me hooked to begin with, they hold a special place in my heart, so I'm super excited about this opportunity to give these kits some love! You can check out all the details HERE for today's project!


Thanks for stopping by today - have a WONDERFUL day!!!


Friday, May 27, 2022

You're the Best - Pinkfresh Studio Instagram Release Hop

Hello! Today I am part of a fun Instagram hop to celebrate the new Pinkfresh Studio release! I have had so much fun creating with this release - yesterday was the blog hop, and I shared several cards for that! I have a floral card I'm sharing today that I created on last week's Facebook Live for Pinkfresh Studio as a sneak peek with Lea Lawson - our new usual plan is to do one sneak peek on release weeks, so we can show one suite of products two different ways. You can watch that video HERE if you want to see more details!


I love this gorgeous Grow in Grace stamp set - and it has some beautiful sentiments too! I heat embossed it in gold, then used the layering stencils to line up and add color to the image. That gold embossing is so shiny and pretty!


I also used the new Stitched Diamonds Coverplate Die for the background. These coverplate dies are so fun for simple texture - and not tiny pieces to pop out either! I layered an Ornate Oval on top with foam adhesive, then arranged the florals around it.


Sentiment was created with one of the new Modern Script Sentiments hot foiled and die cut, and then a stamped sentiment from Give Yourself Grace stamped in Regal Kiss and trimmed into a small strip. Both mounted with foam adhesive of course!


I used a cardbase created with Hero Arts Plum cardstock to layer everything on - love how it sets off that rich deep purple! Finally, a few Peach Fuzz jewels to finish it off!


Product links are all below - including affiliate links where possible, which simply means if you use one of the links below that I receive a small commission at no additional cost to you. Thanks so much for stopping by! Have a wonderful day!!!


Thursday, May 26, 2022

Pinkfresh Studio May 2022 Stamp, Die, Stencil, and Hot Foil Release

 Good morning! Today is an amazing blog hop to celebrate Pinkfresh Studio's May 2022 Stamp, Die, Stencil, and Hot Foil Release! This release was supposed to happen earlier this month (again), but shipping delays pushed it a bit later again! Hopefully you find it worth the wait! You aren't going to want to miss a stop along the way - TONS of inspiration and prizes up for grabs! YAY! You can find links to all of the new release items I used on today's cards at the bottom of this post!


As always, I have lots of cards to share today! I love how well this first card ended up coordinating with the release graphics - and it is the only card I made before I saw that!


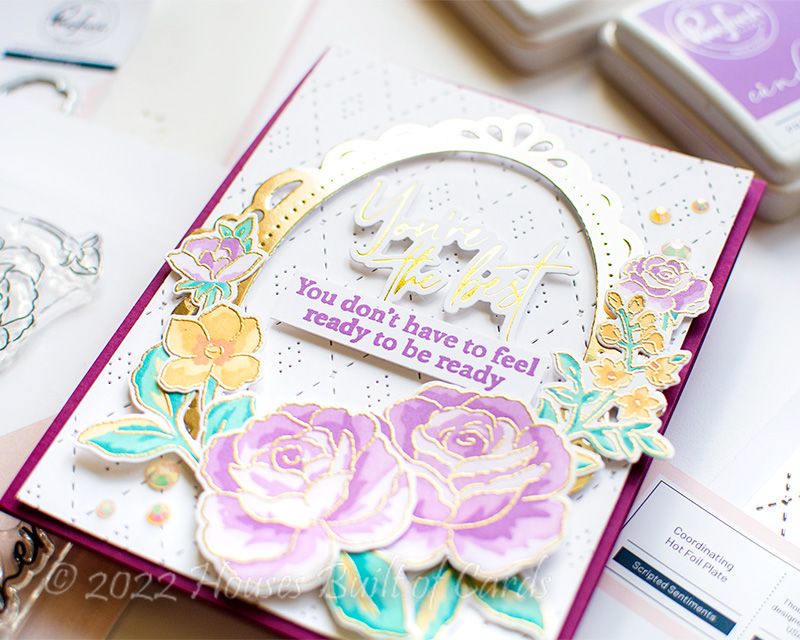
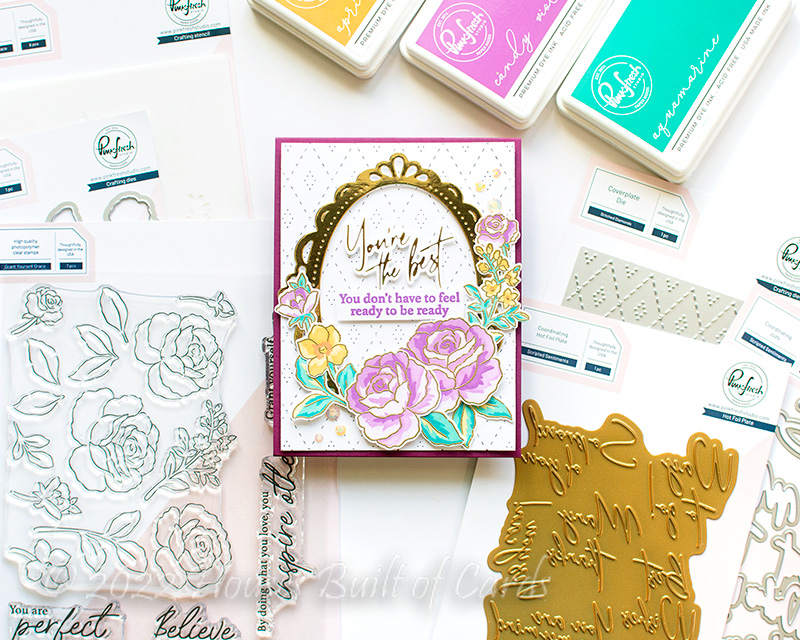
For this card I started off with the beautiful new Painted Daisies set. I stamped it in a different color than I normally use for outlines - Evergreen. And then blended the colors over using the layering stencils, before stamping again with the stamp set (still lined up in my MISTI) to get a super crisp top stamped image. Finally, I die cut it with the coordinating dies - love all the details those cut out!


I decided to shake things up a little on this and cut in in half, so I could use it on the top and bottom of my cardfront. I used a coordinating pink cardbase, and layered over the new Stained Glass die for some texture before mounting the florals with foam adhesive.


Sentiment is from another fabulous new set - Modern Script Sentiments hot foil - a one piece hot foil plate with lots of sentiments in a fabulous font, and with a coordinating one piece die. I also embellished with a few sparkly Glacier jewels to add an extra touch of sparkle!


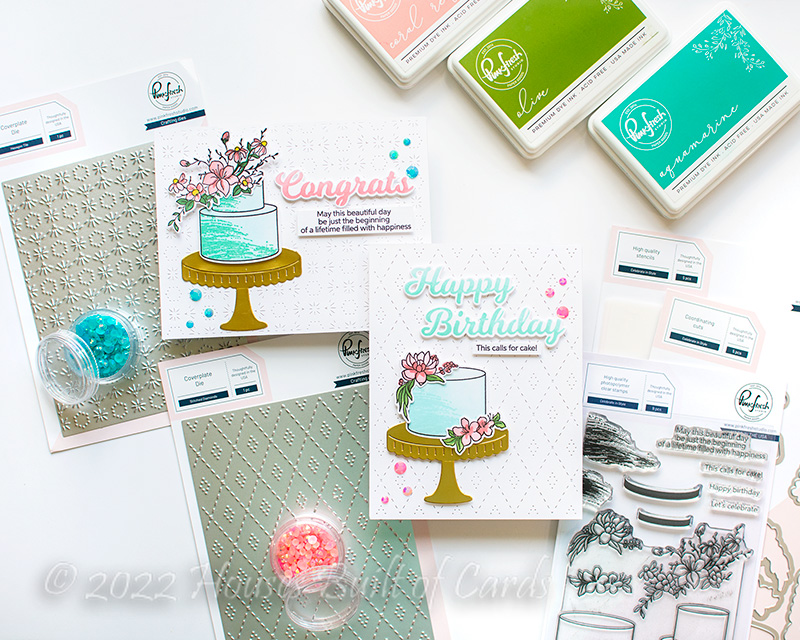
Next up, this set called Celebrate in Style may be one of my very favorite new sets! I find myself constantly needing birthday cards, not to mention needing a family wedding this summer that this set is perfect for!


This set was part of last November's Create and Connect event, but we discovered a couple things that we took and improved, so it took a while to finally be able to release it. I never even used the set from last year - but I can tell you, it was totally worth the wait! I love that it follows the Pinkfresh concept of one piece stamp, die, and stencil - so I got both of these gorgeous cakes and their floral embellishments from one panel!


I ended up not using the cake stand stencil - instead cutting both cake stands with the coordinating die from matte gold cardstock. I love that you can also use the stencils just to ink blend for a more one layer design, or ink blend on the die cut, or just die cut from colored or specialty cardstock!


And those coordinating large word stencils?!? Be still my heart! And they have coordinating dies - eek! I used two different words for these cards, and stamped some of the great supporting sentiments from the stamp set to add underneath.


These cards each use one of the new coverplate dies. The first card uses Stitched Diamonds and the next card here uses Hexagon Tiles - I love that both of these are stitched dies, so they have a great texture, but don't cut out any tiny pieces, so they are super quick and easy to use!


I popped various pieces up with foam adhesive on the background, this second card I adhered the cake stand directly on the background, then popped everything up with foam adhesive. The first card, it is all popped up with foam! And finally, a few coordinating jewels on each of these finish them off!


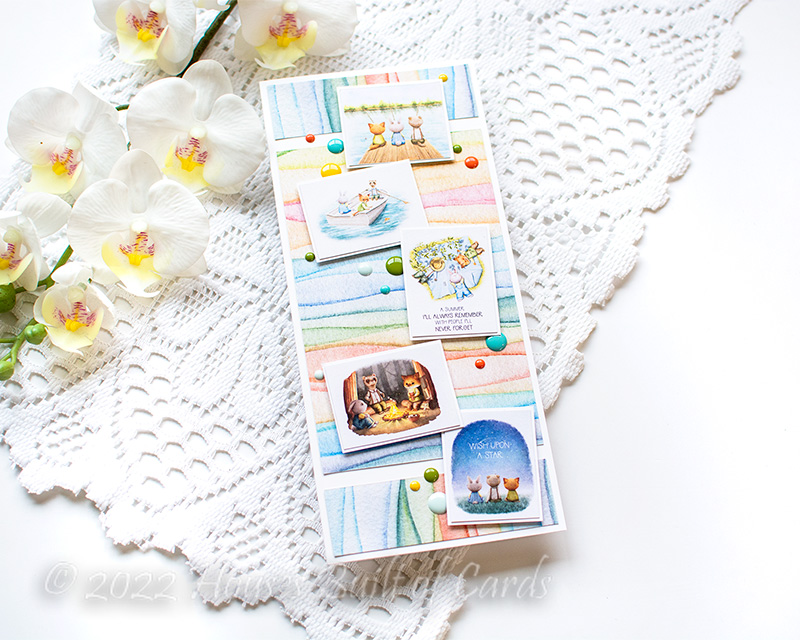
Next up, I love the bright spring feel to the new Wildflower Slimline set - such a happy and cheerful design!


While this design works super well for various card sizes, I loved using it on this smaller sized slimline card! It is just slightly larger than 3" x 8" - just large enough to add a thin border to the smaller sized Slim Diagonal Stitched Rectangles die, which made a great backdrop for my card design.


I did some simple masking to add lots of fresh spring colors on this set, and die cut it with the coordinating dies. I added a background to the card using the smallest of the Slim Stitched Scallop Rectangles die. For some reason, it is the size I never seem to use, so I had 3 of them I was able to stack up for a nice dimensional center embellishment. I also added some happy yellow cardstock behind it!


I carefully adhered my stamped, stenciled, and die cut floral piece over my popped up frame in the middle, just adding glue to the parts that would touch the frame, and leaving the rest to float free for a very whimsical feel. I love it! Then finished off with a hot foiled sentiment from the new Modern Script Sentiments, and a few Metallic Gold Pearls!


And finally, a card using the fun new Botanical Bunch set - super detailed and intricate, but so pretty!


I stenciled it all up in soft peach and happy pinks, with a bit of soft green for the leaves, and die cut it with the coordinating dies.


I created a frame with a piece of the largest Nested Hexagons that I had reverse foiled in silver some time back, and used that to create a window to tuck those florals in at the bottom. I used the new Hexagon Tiles die on some soft green cardstock, and cut a window from it, then added the hot foiled frame around it.


I adhered the front window down directly on my white cardbase, and popped the upper part of the florals up with foam adhesive. It feels like they are growing out of the frame - so fun! Finally, I added a simple hexagon die cut from vellum to add my sentiment, partly from the Modern Script Sentiments stamp set, and then the additional sentiment stamped in pink from Wildflower Slimline stamp set - which happens to have some fabulous sentiments! I also added a few Metallic Silver Pearls to finish this one off!


GIVEAWAY INFO:

Make sure and leave a comment before you leave for a chance to win one of 10 $25 gift certificate to Pinkfresh Studio chosen from comments left across the hop! All winners will be chosen and posted on the Pinkfresh Blog on Friday, June 3, 2022 - so make sure and check back to see if you were a winner! Winners must check that page and claim their prize within 2 weeks.

Here is the entire blog hop line-up so you don't miss a single stop - and product links are below - including affiliate links where possible, which simply means if you use one of the links below that I receive a small commission at no additional cost to you. Thanks so much for stopping by! Have a wonderful day!!!

You are invited to the Inlinkz link party!

Click here to enter

Wednesday, May 25, 2022

You Have Worked So Hard - Graduation Card - Simon Says Stamp

  Good morning! I'm stopping by with a card using a favorite background die from the newest release from Simon Says Stamp - Yay You paired up with a die and stamp set that released last year. I've used this background stamp several times already (and probably will use it several more!) I have one week until my youngest daughter's graduation, so you can easily guess what my mind is on right now! Time to rebuild the graduation card supply, right?


For this card, I stamped the gorgeous Arches Background just simply in black on white cardstock, then trimmed it down and matted it with black cardstock. This created the basic frame that I started with to add my layers onto.


I die cut the fun previously released Cap and Gown wafer die from black cardstock, and layered the pieces of the cap together to make them fun and dimensional.


Finally, I added a sentiment from the previously released Love That Student - not technically a graduation stamp set, but this sentiment was a perfect fit! I stamped it in black, hand trimmed to a banner, and mounted with foam adhesive over the gown. Kept this simple and classy - perfect for a masculine card, and didn't even add any bling!


Product links are all below - including affiliate links where possible, which simply means if you use one of the links below that I receive a small commission at no additional cost to you. Thanks so much for stopping by! Have a wonderful day!!!