Showing posts with label pearls. Show all posts

Wednesday, May 7, 2025

Cup of Thanks - Pretty Pink Posh May Release

 Good morning! Today I have a card to share using some of the newest release from Pretty Pink Posh! It's such a fun release - and I fell in love with the lovely tea theme - and couldn't wait to use that adorable background layering stencil. I was inspired by some vintage tea cups that my mom had, and went with a classic blue and white combo!


I started off by using the Layered Teacups stencils, using Marine, Cadette, and Royal inks. I also added a soft shadow to the edges with the lightest of those inks, just to soften the white edges a bit and make it look more cohesive. Next, I die cut part of the new Shadow Box die from white and navy cardstock - love those scalloped and stitched edges! So perfect for a focal point frame! I added some florals from Floral Wreath Builder cut from more shades of blue cardstock, and a touch of white.  I grabbed a sentiment from Friend Greetings, and heat embossed in white on some more of that navy carstock, then paired it with a secondary sentiment from Tea Time stamp set. Finished off with a heavy dose of Marshmallow pearls in the flower centers, and on each of the stenciled tea cups. Here are more photos of this finished card:


Product links are all below - including affiliate links where possible, which simply means if you use one of the links below that I receive a small commission at no additional cost to you. Thanks so much for stopping by! Have a wonderful day!!!


Sunday, March 23, 2025

Spring Cards with Pretty Pink Posh - YouTube Live

 Hello! Yesterday I had the fun of doing a YouTube live with my crafty friend Lea Lawson! We streamed on Lea's YT Channel, and both used some recently released items from Pretty Pink Posh that are available at Simon Says Stamp!


Here is the live video if you want to see these cards come together, or you can watch it directly on YouTube HERE:


I started off just planning to make the one tulip shaker card - and when I ended up with a little extra time, I put together the second card using the background that I had leftover from the first card! After the live finished, I ended up adding the Ivory Pearls to both cards, and then added the twine at the top of the second card. If you want to see more details of how they were created, check out the video! Here are more photos of the finished cards:


Product links are all below - including affiliate links where possible, which simply means if you use one of the links below that I receive a small commission at no additional cost to you. Thanks so much for stopping by! Have a wonderful day!!!


Monday, January 27, 2025

Leftover Embossing Folder Fun - Simon Says Stamp

 Good morning! Last Friday I did a YouTube live and created 3 cards using embossing folders and supplies from Simon Says Stamp - you can check those out HERE if you want to see them. But since I had some leftover pieces, you KNOW I had to use them on another card! I ended up going with a fun graphic design, and then used a snarky sentiment in honor of my dad. Several years ago I made some cards with sarcastic/snarky sentiments, and he still talks about them, and grabbed one of those and still displays it by his computer. He always asks me when I'm going to make more funny ones - so I pulled out another set from my stash to use on this card!


On my first cards, I used 3 different embossing folders - KaleidoscopeCriss Cross Floral, and Floating Flowers, and 3 colors of newer Simon Says Stamp colored cardstock from the DieCember release - SteelSage, and Honey. Each of these circles was cut out of those using Nested Circles die. I layered them on my cardbase with foam adhesive, overlapping the edges in a couple places, and trimming off the excess along the edges. I added a die cut Privet Branch cut from Champagne glitter cardstock with liquid glue, then stamped that sentiment in the upper corner. Finished off with a few Honey Bee True Pearls to embellish! Here are more photos of this finished card:


Product links are all below - including affiliate links where possible, which simply means if you use one of the links below that I receive a small commission at no additional cost to you. Thanks so much for stopping by! Have a wonderful day!!!


Thursday, January 16, 2025

Love Love Love - Pretty Pink Posh January Release Instagram Hop

Good morning! I'm excited today to be hopping along for Day 4 of a Four day Instagram Release Hop to celebrate the BRAND NEW January Release from Pretty Pink Posh! This release is full of hearts, love, and Valentines Day of course! You can head over to Instagram to join that hop, and enter to win today's giveaways! I thought I would share more details here on my blog on my card - since it is always tough to put enough info in an Instagram post! 

I love the colors on these cards! For both cards, I featured pattern paper from the Carta Bella 6x6 Fruit Stand paper pad. On the top card, I used it to die cut the Fringe Heart Die layers, and on the second card, I used them to die cut the Love Script word die 4 times. For the background on the first card, I used the XOXO Pierced Plate die - I love the texture that gives! The second die uses the Diamond Grid stencil with a mix of Bubblegum, Seafoam, Zest, and Melon inks blended on it. I then used the new Doily Borders die to cut both sides of a panel of white cardstock to adhere over the top. Added some white hemp twine to the top, and then added the love words overlapping on the bottom. For all of the "love" word, I die cut a couple extra times from plain white cardstock to layer up for more dimension. On the first card, I added some Tonic Glitter Drops in Blizzard over the entire word for extra sparkle! Finished off with some Ivory Pearls on both cards for an elegant finishing touch! Here are more photos of these cards:


Product links are all below - including affiliate links where possible, which simply means that if you use one of the links below, I receive a small commission at no additional cost to you. Thanks so much for supporting my blog, and stopping by! Have a wonderful day!!!


Monday, December 2, 2024

Holiday Cheer - Simon Says Stamp/Tim Holtz DieCember Limited Edition Surprise Set

 Good morning! Today I'm sharing a couple cards using a fun little bonus surprise for DieCember at Simon Says Stamp! The adorable little snowman and Santa on my cards below are from a new Tim Holtz limited edition surprise set. This die set will be available for FREE with $25 or greater purchase of Tim Holtz product. So fun!


 They are so cute and fun to die cut and layer up, and paired together so fun for these two cards. I used colored cardstock and white glitter cardstock for most of the layers, and a few elements with the same pattern paper I used for the background. These plaid pattern papers are some that I've been loving lately! I trimmed those down, added some distressing to the edges, then added some torn white paper underneath the edges of that. Layered over a bit of vellum, also with a torn edge, to soften the background a bit and provide a base for my images and sentiments. I also added a couple wraps of Black and White Baker's Twine tied around. Sentiments were cut from Luxe glitter cardstock, then layered with white cardstock behind that. I added some Nuvo glitter drops on parts of the images for added sparkle, and finished off with a few coordinating Metallic pearls! Here are more photos of these cards and those adorable images:


Product links are all below - including affiliate links where possible, which simply means if you use one of the links below that I receive a small commission at no additional cost to you. Thanks so much for stopping by! Have a wonderful day!!!


Tuesday, November 5, 2024

Pinkfresh Studio “Essentials” Release Blog Hop

Good morning! Today is the blog hop to celebrate Pinkfresh Studio's "Essentials" Release! You aren't going to want to miss a stop along the way - TONS of inspiration and prizes up for grabs! YAY! Click HERE to shop the new release!

As usual - I have quite a few cards to share today with the new release! First up this pair of cards that uses a grand total of 5 of the 8 new Essential die sets that are releasing today!

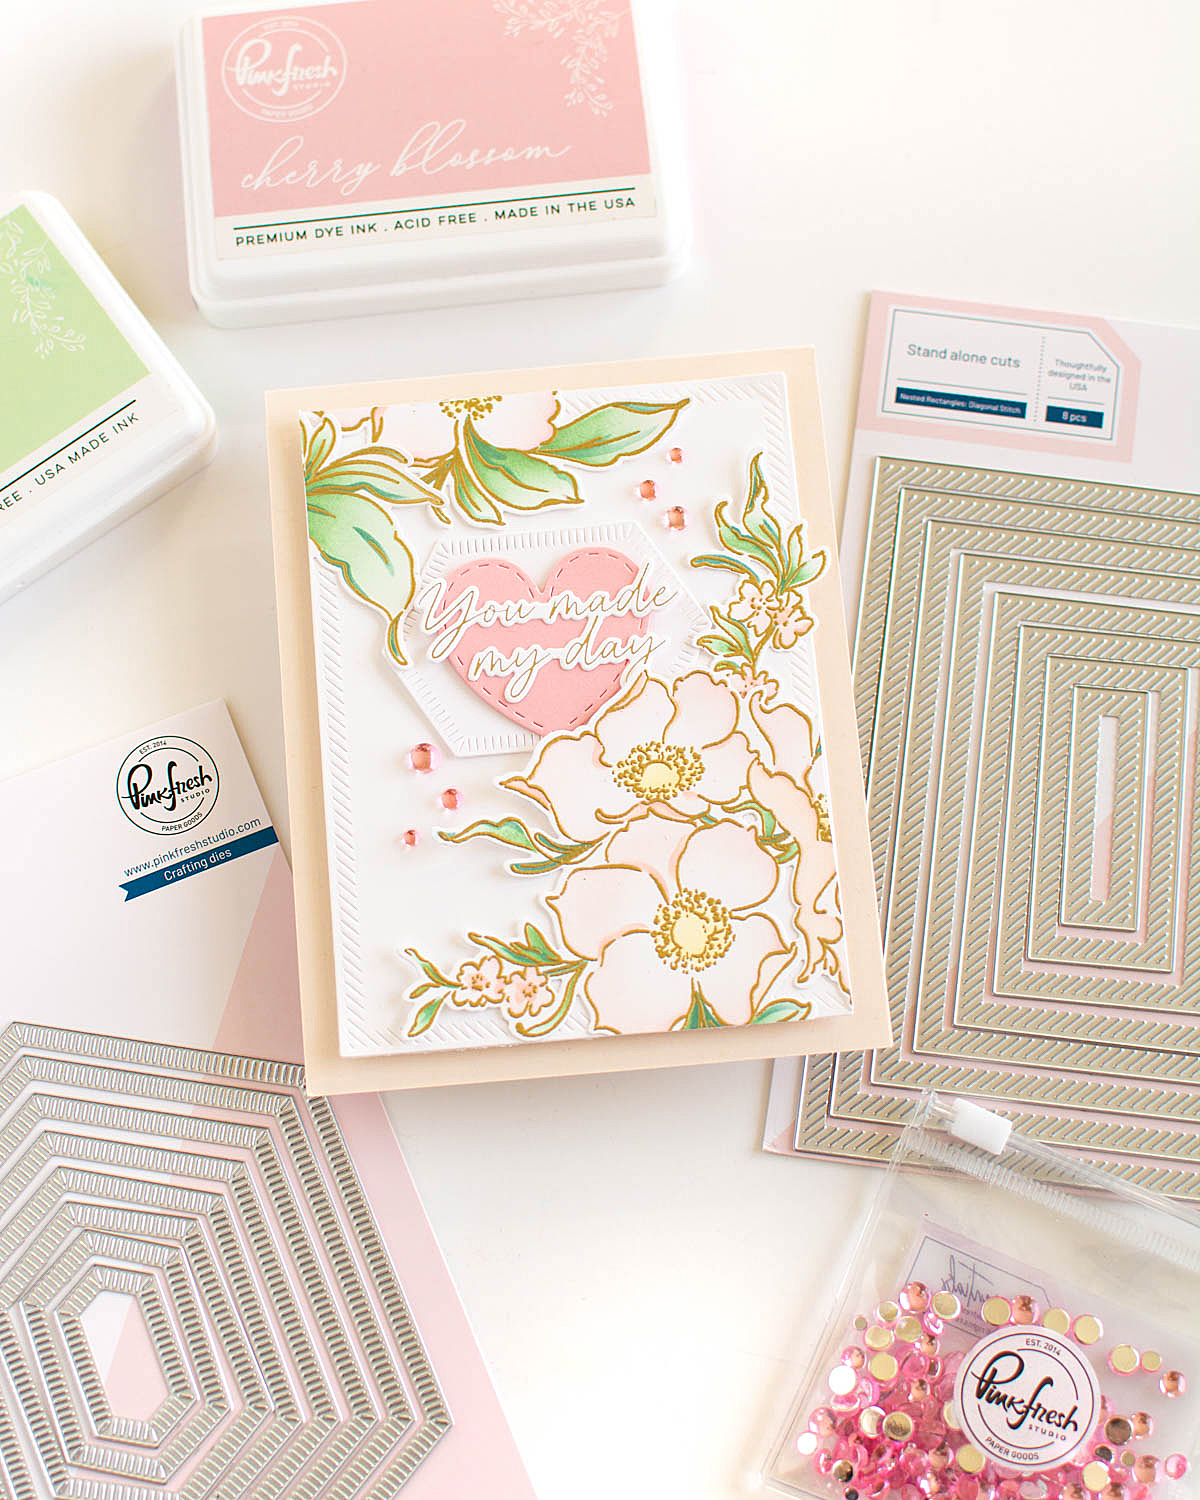
For the first of these two cards, I layered up the Fancy Edgers die with some colored cardstock, and used one of the new Nested Rectangles Diagonal Stitch dies. I added a sentiment from Here for You Sentiments in hot foil, and some florals cut with Garden Party dies from colored and white cardstock. A few Iridescent Dew Drops finish this card off. Here are a few photos of this card:


The next card in this set also uses the Nested Rectangles Diagonal Stitch dies, tucked inside one of the Nested Rectangles Postage Edge cut from Ivory glitter cardstock. I used the Charming Stitched Florals coverplate on the background, and then added one of the Nested Hexagons Double Stitch die and one of the Nested Elongated Ovals Blanket Stitch, topped with a banner from Basic Banners also cut from the same glitter cardstock. I also used the Garden Party dies on this card, and the same Iridescent Dew Drops. Here are more photos of this card:


I love mixing and matching the different edges in this release! The next card does the same thing - using the Nested Rectangles Diagonal Stitch dies with the Nested Elongated Ovals Blanket Stitch. Those ovals work perfectly with the Nested Elongated Ovals press plate and die - for this one I used the Reverse foiled image done with the Solid Hot Foil plate. I added some florals with Artsy Florals stamped and stenciled with some white greenery cut from Garden Party die. A few Clear Drops finish this card off! Here is a closer look at this card:


Next up, I mixed and matched the Double Stitch Hexagons with one of the Fancy Edgers dies. I had a panel of pink cardstock that I had used the Beautiful Branch press plate on, and a white panel that I had used the Dotted Petals press plate on. This gave me great texture to build on and layer on my deeper pink card base. I added a foiled sentiment, some die cut Sakura washi pieces, and a few bits of greenery cut from white cardstock with the Garden Party die. Finally, a few metallic gold pearls finish it off! Here is a closer look at this finished card:


This next card features just one of the new dies - with less mixing and matching. I used the new Nested Rectangles die to cut a panel of Ivory Glitter cardstock the perfect width to tuck horizontally on my card front. I used Stippled Plaid press plate to add some texture to the background, layered over an Ivory cardbase, and then added Garden Tapestry stamped, stenciled, and die cut over the top. I used a die cut and ink blended Shaker Heart to mount my foiled sentiment, added a few Clear with Gold Dust Gems, and a white faux silk bow to finish off. Here is a closer look at this card:


I love the Postage Edge dies - they are such a fun and different shape for us! I used one of the Diagonal Stitch rectangles to cut the center out to create a frame shape from white cardstock, added some simple ink blending to my white cardbase, and layered on some Artistic Florals washi tape pieces. A few clear drops in coordinating Amber, Lilac, and Leaf, and a sentiment with a Basic Banner layer over the top finish this card off. Here are more photos of this card:


Finally, I created one additional card to use up a few things I had finished and sitting near my desk, just waiting for a home. New Essential dies are the perfect way to use those up, don't you think? 


GIVEAWAY INFO:

Make sure and leave a comment before you leave for a chance to win one of 10 $25 gift certificate to Pinkfresh Studio chosen from comments left across the hop! All winners will be chosen and posted on the Pinkfresh Blog on Wednesday, November 13, 2024 - so make sure and check back to see if you were a winner! Winners must check that page and claim their prize within 2 weeks.

Here is the entire blog hop line-up so you don't miss a single stop! Thanks so much for stopping by! Have a wonderful day!!!

You are invited to the Inlinkz link party!

Click here to enter