Thursday, January 30, 2025

Stenciled Heart Backgrounds YT Live- Simon Says Stamp

 Hello! Today I had the fun of doing a YouTube live with my crafty friend Lea Lawson! We streamed both on on my own personal YouTube channel as well as Lea's YT Channel, and both used some recently released items from Simon Says Stamp! If you hop over to one or both of those livestream replays and leave a comment, we are each picking a winner that we will announce Monday to receive a crafty parcel of destash goodies from each of us!


Here is the live video if you want to see these cards come together, or you can watch it directly on YouTube HERE:


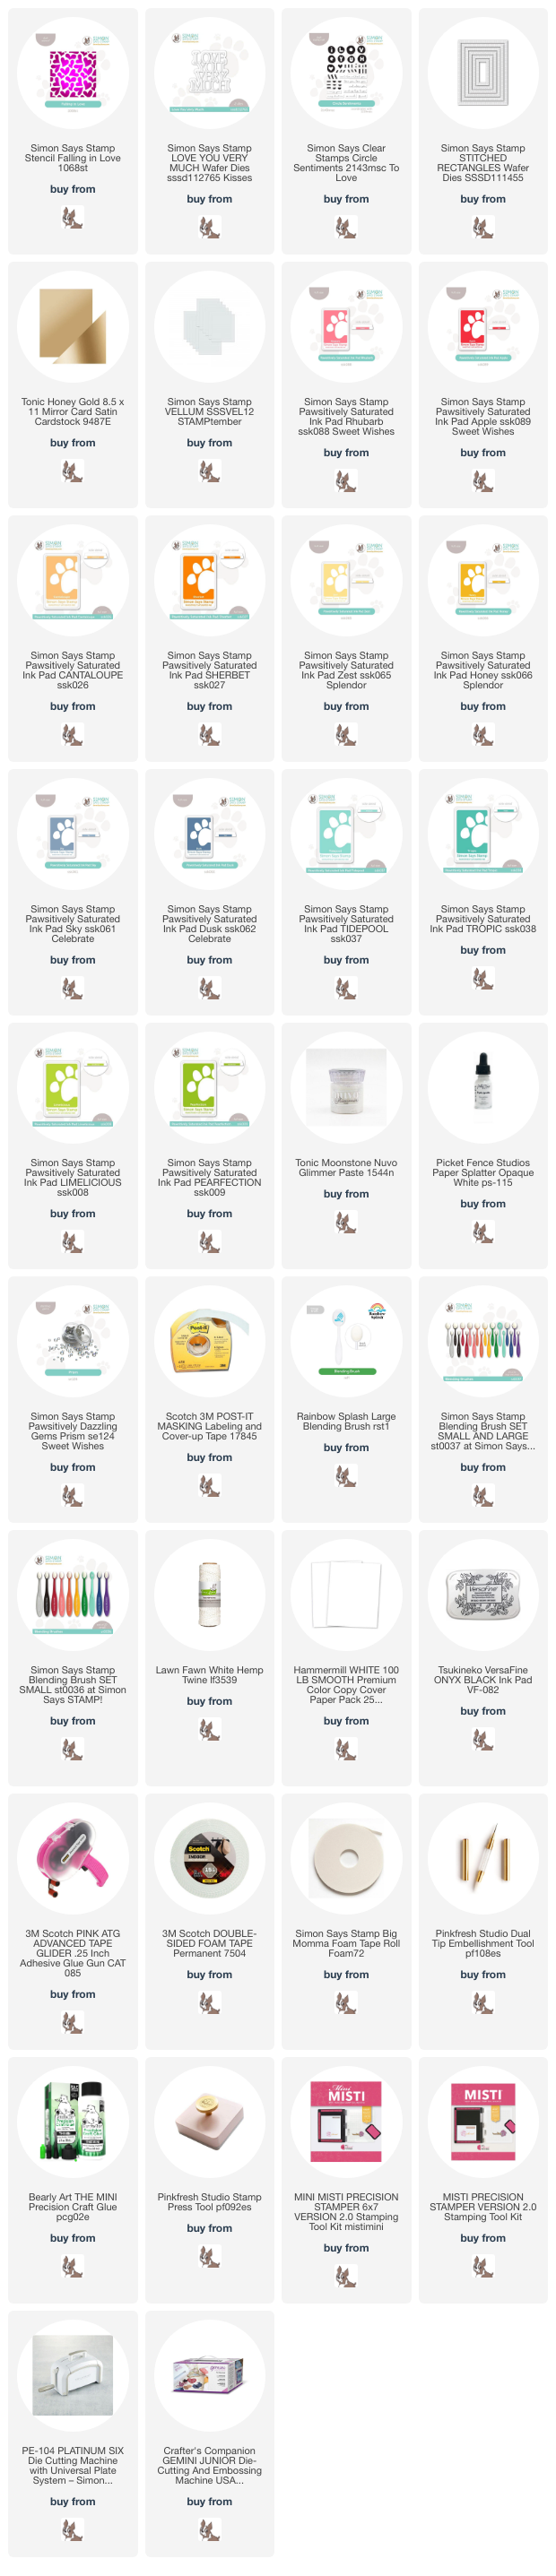
For my cards, I created two heart stenciled backgrounds using the Falling in Love stencil, and a rainbow of inks (all linked below!) - I created one in warmer tones, and one in cooler tones. The warmer tone one I added some Paper Splatter in Opaque white, and the cooler tone one I added some Nuvo Moonstone Glitter paste over the top of - it didn't dry completely before the live, but it is SOOOOO pretty now that it has dried! I love it! I used the Love You Very Much die set for the sentiments, cut from Satin Honey Gold cardstock, and vellum for the shadow layer, then added a secondary sentiment from the Circle Sentiments stamp set, hand trimmed into a little banner. The panels were die cut with Stitched Rectangles, and I finished off by embellishing with a few Prism Dazzling Gems, and a tiny bow from Lawn Fawn white hemp twine. Here are more photos of these finished cards:


Product links are all below - including affiliate links where possible, which simply means if you use one of the links below that I receive a small commission at no additional cost to you. Thanks so much for stopping by! Have a wonderful day!!!


Wednesday, January 29, 2025

Pattern Paper Layers and Die Cuts - Simon Says Stamp

 Good morning! Yesterday I shared some cards featuring lots of lovely pattern paper layers and some additional dies and stamps from Simon Says Stamp - since I had them sitting out, I was still feeling inspired, so I went ahead and created another set of cards using some similar supplies, but used them in different ways.  

This time I layered up my pattern papers from my Picture Perfect 6x6 paper pad from Pinkfresh with a torn edge on them - I love the texture that gives! I also die cut the sentiments from Cheering for You die set from the pattern paper, and the shadow layer from white cardstock. Love the different look it gives to that same sentiment die! I added a die cut frame using Daisy Oval Frame die from white cardstock, and adhered it just on the outer edges, leaving the rest floating free. Added secondary sentiments from the Cheering for You stamp set, and finished off with a few sparkly Dazzling Gems in Clear for the perfect sparkle! Here are more photos of these finished cards: 


Product links are all below - including affiliate links where possible, which simply means if you use one of the links below that I receive a small commission at no additional cost to you. Thanks so much for stopping by! Have a wonderful day!!!


Tuesday, January 28, 2025

Scallop Pattern Paper Layers - Simon Says Stamp

Good morning! Today is all about the layers and pattern papers, using some supplies from Simon Says Stamp. I'm always a sucker for pretty pattern paper, and love mixing and matching them in all their layered glory! 


For these cards I used the Simon Says Stamp Wavy Scallop Stitches die in all 3 sizes, paired with the Picture Perfect 6x6 paper pad from Pinkfresh. I started with the largest scallop for the bottom layer, then moved up to the smaller ones for each consecutive layer. I adhered them to my cardbase, using just thin foam adhesive strips along the bottom edge of each one. That way the total thickness was never more than one foam tape layer, but each layer is popped up with some dimension. I wrapped some Lawn Fawn white twine around the entire card and tied in a bow, then added the large sentiment using Cheering for You die set cut from Champagne glitter cardstock and vellum. I layered secondary sentiments from the Cheering for You stamp set over the top, hand trimmed into a small banner and adhered with liquid glue, I rounded off the top left corner of the cards, and then arranged some greenery die cut from more Champagne glitter cardstock using Winsom Branch and Privet Branch. I trimmed them into smaller pieces, and then adhered them down, trimming any extra overlap with scissors. Finished off with a few Trinity Stamps Glossy Holographic enamel dots - so shiny and fun! Here is a closer look at these cards:


Product links are all below - including affiliate links where possible, which simply means if you use one of the links below that I receive a small commission at no additional cost to you. Thanks so much for stopping by! Have a wonderful day!!!


Monday, January 27, 2025

Leftover Embossing Folder Fun - Simon Says Stamp

 Good morning! Last Friday I did a YouTube live and created 3 cards using embossing folders and supplies from Simon Says Stamp - you can check those out HERE if you want to see them. But since I had some leftover pieces, you KNOW I had to use them on another card! I ended up going with a fun graphic design, and then used a snarky sentiment in honor of my dad. Several years ago I made some cards with sarcastic/snarky sentiments, and he still talks about them, and grabbed one of those and still displays it by his computer. He always asks me when I'm going to make more funny ones - so I pulled out another set from my stash to use on this card!


On my first cards, I used 3 different embossing folders - KaleidoscopeCriss Cross Floral, and Floating Flowers, and 3 colors of newer Simon Says Stamp colored cardstock from the DieCember release - SteelSage, and Honey. Each of these circles was cut out of those using Nested Circles die. I layered them on my cardbase with foam adhesive, overlapping the edges in a couple places, and trimming off the excess along the edges. I added a die cut Privet Branch cut from Champagne glitter cardstock with liquid glue, then stamped that sentiment in the upper corner. Finished off with a few Honey Bee True Pearls to embellish! Here are more photos of this finished card:


Product links are all below - including affiliate links where possible, which simply means if you use one of the links below that I receive a small commission at no additional cost to you. Thanks so much for stopping by! Have a wonderful day!!!


Saturday, January 25, 2025

Embossing Folder Fun - Simon Says Stamp

Good morning! Yesterday I did my first YouTube live on my own personal YouTube channel, using some supplies from Simon Says Stamp. It was fun to add something fresh to my long neglected channel, and flex those live muscles that were feeling a bit rusty after a long break! As a bonus, I used 3 different embossing folders, which happen to be 20% off right now at Simon Says Stamp using code EMBSF - you can check them all out here if you are interested in building your embossing folder stash! I share my favorite tips for using these embossing folders, and great ways to get a fabulous impression when using them!


Here is the live video if you want to see these cards come together, or you can watch it directly on YouTube HERE:


I used 3 different embossing folders - Kaleidoscope, Criss Cross Floral, and Floating Flowers. I used 3 colors of newer Simon Says Stamp colored cardstock from the DieCember release - Steel, Sage, and Honey. Each one had a circle cut in it using Nested Circles die, and then sentiments were added with an older release - Hello You - which is such a fun and classy set that I enjoyed pulling out again! I created an ombre shiny sentiment (watch the live video if you want to see how to create it!), and tucked in a few die cut greenery pieces from Winsome Branch and Privet Branch from Champagne glitter cardstock on two of the cards. To each card I added a bit of metallic thread - Vivant Silver, Vivant Rose Gold, and May Arts gold cord. Finished off with some Dazzling Gems in Rainbow for the yellow card, and Prism for the other two cards! Here are more photos of these finished cards:


Product links are all below - including affiliate links where possible, which simply means if you use one of the links below that I receive a small commission at no additional cost to you. Thanks so much for stopping by! Have a wonderful day!!!