Monday, December 31, 2012

Year Wrap Up #4 - Peachy Keen Love

And...one of my favorite things about 2012 was my term on the Peachy Keen Design Team! So...I have one last card that I made, and since today is the official end of the year - I thought I would post one last card from my Design term year! The new team looks fabulous - and I can't WAIT to see what inspiration they bring us this next year! Anyway - I had been dying to use this sweet little deer, and decided to make a little birthday card with it:
I used two of the most recent monthly kits - the November one for the deer, and the second half of the sentiment:

And the December Kit for the Happy Birthday part of the sentiment:

I stamped the sweet little deer on some PTI Rustic cream cardstock, paper pieced the bow, and added a bit of color with my Copic markers - and used my white gel pen for freckles and some shine on the nose.
I used some pattern paper from Basic Grey's Lucille 6x6 paper pads (one of my current FAVS!), and made a lace border with a Martha Stewart edge punch. 
Edges of everything were inked with Tim Holtz distress ink in Antique Linen, and vintage photo for the background darker layer. 
I hand trimmed a banner for the sentiment, then stamped the happy birthday, and selectively inked just the "sweet lil' deer" to place underneath.
Used foam adhesive to attach the panel with the deer, as well as the sentiment banner, slightly overlapping. 
Finished off with some jute twine, and a heart button from my stash, as well as a bit of bling.
Thanks so much! I think that will be all for today - but I will plan on stopping by tomorrow with one final un-posted card from 2012 - as well as a giveaway to welcome the new year!!! 

Year Wrap Up Post #3 - Guy and Girl Card!

My next post to share today, is another couple of cards that I have had finished for quite a while as well - and sadly just never got around to posting! They are using some of my favorite My Creative Time Stamps and Dies! SOOOO fun and cute! Here is the first one - the guy card:
For both cards, I used the Tag Dies to cut a background shape. Then I used What's Growing On stamp and Die set to embellish. 
My pattern papers are all from a Studio Calico 6x6 paper pad. (Been so long I can't remember which one right now! Sorry!)
I used my Cuttlebug and Swiss Dots folder to emboss the background, then inked the white edges with Tim Holtz distress ink. The sentiment is stamped with some PTI ink. The mustaches are attached with foam adhesive, and I added a jute twine bow at the top.
And here is the second one - the girl version!
Same Tag Dies, and same stamp and die set - only I cut out the glasses instead of the mustaches. 
The papers are from the same Studio Calico 6x6 paper pad, and the sentiment is also stamped with PTI ink - just a different color.
The glasses are attached with some teeny tiny foam adhesive dots I had in my stash, and I finished off this one with a crinkle ribbon bow, and a tiny bit of jute twine with an October Afternoon button.
There you go! A couple of fun cards, that for no particular reason hadn't had their turn to get posted!


Year Wrap Up Post #2

So I know I posted one card this morning, and have been planning on posting a few more today! So...here is the first one I have. I made this one ages ago...but for some reason just didn't love it. I wasn't even going to post it, but decided: Why not end the year posting one of my least favorites? So...here you have it!
I think I originally made it for a Papertrey Ink Made it Monday Challenge, and didn't get it posted in time...so there it sat. 
I used some PTI cardstock, and the Hexagon Cover Plate. 
A PTI Mover's and Shaker's Sentiments stamp, and split in half with some Thicker letters for the word happy.
I cut the doily in half to make it stretch long enough for my red panel, and finished off with some jute twine and white faux stitching with my gel pen.
I've got two or three more posts coming up here shortly!

You Inspire Me - Year Wrap Up Post #1

Seems strange to be ending the year already! I will be posting just a couple of cards today though, wrapping up a few that I wanted to get posted before the end of the year. This one is a super simple and quick one that I made quite a while ago actually and never got posted. Just some pretty pattern paper...
...a My Favorite Things big sentiment stamp...
...a bit of jute twine... 
...and some bling. Love those easy ones! And there are so many people I could give this too!

Saturday, December 29, 2012

Thank You for your kindness

Hello! For those of you who didn't know, this year we moved away from all our family and friends  - about 1,000 miles away! So this year was our first Christmas on our own. Until the evening of Christmas Eve, we thought we would just be home by ourselves on Christmas Day - which would have been a bit strange since we both have a rather large family and have never spent that day away from them. But when we were at our church Christmas Eve service, another family invited us over to share Christmas Dinner with them. It was such an incredible gift - and a huge blessing! So I wanted to make a thank you card for them - to let them know how blessed and thankful we were for their kindness.
I got my color inspiration from this weeks Play Date Cafe challenge:


I started by pulling out some Paper from Basic Grey that seemed to go well with the challenge colors. Then I dusted off some older sets of Craft Secret stamps that I haven't used in forever!
I cut out a circle and lacy oval with some Spellbinder's Dies, and stamped and colored the image with my Copic Markers. Added some sparkly snow with Diamond Glaze and some fine glitter. 
The sentiment banner is hand trimmed, and I stamped those beautiful sentiment stamps from My Craft Spot using PTI ink in coordinating colors. 
Added a tiny Tim Holtz paper clip and some self adhesive pearls. 
Finished off by attaching the frame a little off center, trimming the edges, and adding some jute twine tied in a pretty bow.
Thanks for stopping by today! Hope you continue to have a wonderful weekend!

Friday, December 28, 2012

De-LIGHT-ful Birthday Wishes - Unity FWF

Good Friday morning! Is anyone else confused on what day it is? With Christmas, I think my Wednesday felt a lot like a Monday, so it seems kind of strange to have it be Friday already! But I don't mind in the least - especially since it also means it is time for Unity Friends with Flair! Always a fun part of the week for me! Here is what I made this week:
I drew some of my inspiration this week from the Runway Inspired Challenge:


I pretty much was dying to use that awesome light bulb stamp from the new December KOTM, so I started there, then started looking for colors and such from the inspiration photo.
I used some older Cosmo Cricket papers from my stash, and paper pieced the light bulb on a frame cut with a Spellbinders Die. Added some touches with a Copic marker, and inked the edges with Tim Holtz distress ink in Antique Linen. 
Used another Spellbinder's Die for the frame behind, also inked with the same distress ink.
Ran some Chevron Washi Tape along the card, before attaching the frame with the light bulb with foam adhesive. 
For the sentiment, I hand trimmed a banner, then inked most of it with black ink, and colored in "LIGHT" with a Tim Holtz distress marker. Also inked the edges before attaching with foam adhesive.
Finished off with some green self adhesive pearls for the final touch. I LOVE this fun stamp - and know I will be using it lots in the future! Thanks for stopping by - have a wonderful weekend!!!

Thursday, December 27, 2012

Moxie Fab/Paper Smooches Baby Elephant

Hello! I had a super fun and productive day yesterday - and managed to get 3 different cards made! I plan on sitting down in a few minutes to hopefully play a little more, but first thought I would share the first of the three I made yesterday:
I made this for two challenges that fit PERFECTLY together! The first is this weeks Paper Smooches SPARKS Picture Perfect Challenge. Here is the photo inspiration for that one:


And the other was for the Moxie Fab Tuesday Trigger - Sweet Dreams. Here is that inspiration photo:


I love the few Paper Smooches stamps that I have! So for this, I got my layout from the first photo, as well as a bit of the colors - and pulled my colors a lot from the second photo.
I used my Paper Smooches stamps to create the word art background using PTI ink in two different colors. 
Next, I stamped and paper pieced the elephants with some scraps from my stash, adding a bit of Copic marker for rosy cheeks. Also used a white gel pen for the tiny tusk and toes.
Attached the paper pieced elephants with foam adhesive so they pop off the card a bit. 
Finished off with some wood grain washi tape under them to ground them a bit. 
Thanks for visiting today! Hope you are having a beautiful day!

Wednesday, December 26, 2012

Papertrey December Blog Hop Challenge - White Inspiration

Good morning! I hope you all had a wonderful Christmas! I am joining in today for the first time with the Papertrey Ink December Blog Hop Challenge. Something about the challenge of white on white called out to me. I have to apologize for a picture heavy post though! I got on Pinterest to browse ideas...and boy did I end up inspired! I ended up making two cards for the challenge - so I will show you three of the pictures that helped inspire each one! (I have never posted a picture from Pinterest to my blog before, so if they don't link correctly, you can click HERE to go to my "white" board on Pinterest and find the proper credits) Anyway, here are the first three inspiring photos:


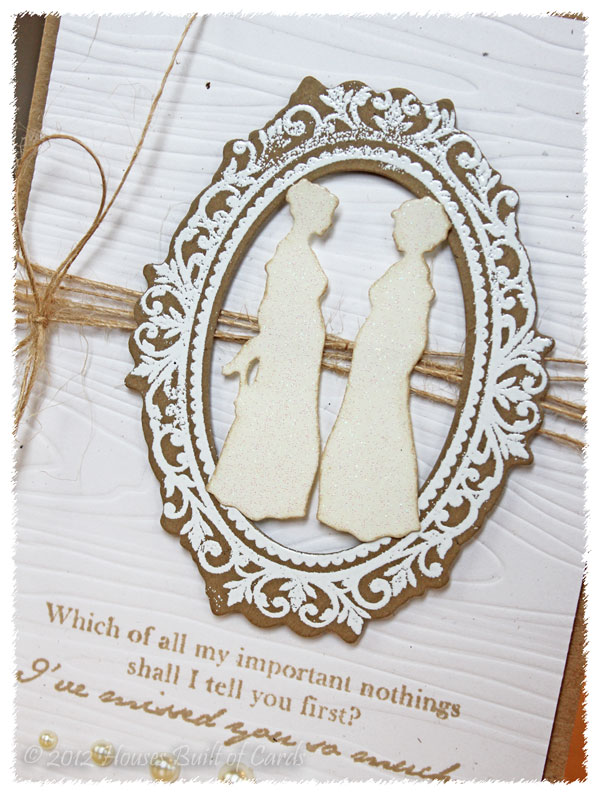
And from those, this is what I made:
Can you see the frame, the texture, and the colors? I used the matching dies and stamps to create the frame, and heat embossed the white ornate part. 
Cut the silhouettes out of glitter paper, then inked the edges a bit with kraft ink. 
Used the Woodgrain Impression Plate on some rustic white PI cardstock for the background, then stamped the sentiment with kraft ink. 
Finished off by adding some jute twine, attaching the frame and silhouettes with foam adhesive, and adding a few self adhesive pearls.
Next up - here are my inspiration photos for my second card:


White just makes me think winter and snow - so this was a no brainer! Here is what I made:
The background is also Rustic White cardstock, and I used the Linen Impression Plate. I then used the Button Bit Dies, stamped the tree trunks with kraft ink, then added some PI buttons with a bit of jute twine.
Added some tiny dots of Diamond Glaze, then sprinkled with tinsel glitter. 
Made the snowbank by tearing a scrap of rustic white cardstock, then coating with Diamond Glaze and Tinsel glitter as well.
Finished off with some crinkle ribbon, jute twine, another pearl, and a sentiment with kraft ink, before matting on kraft paper on a white cardbase. 
Thanks for stopping by today! Make sure and check out the rest of the challenge participants and hop along! I'm sure it will be fabulous and fun!