Friday, August 12, 2022

Best Wishes Modern Mosaic - SB dot com Exclusive set

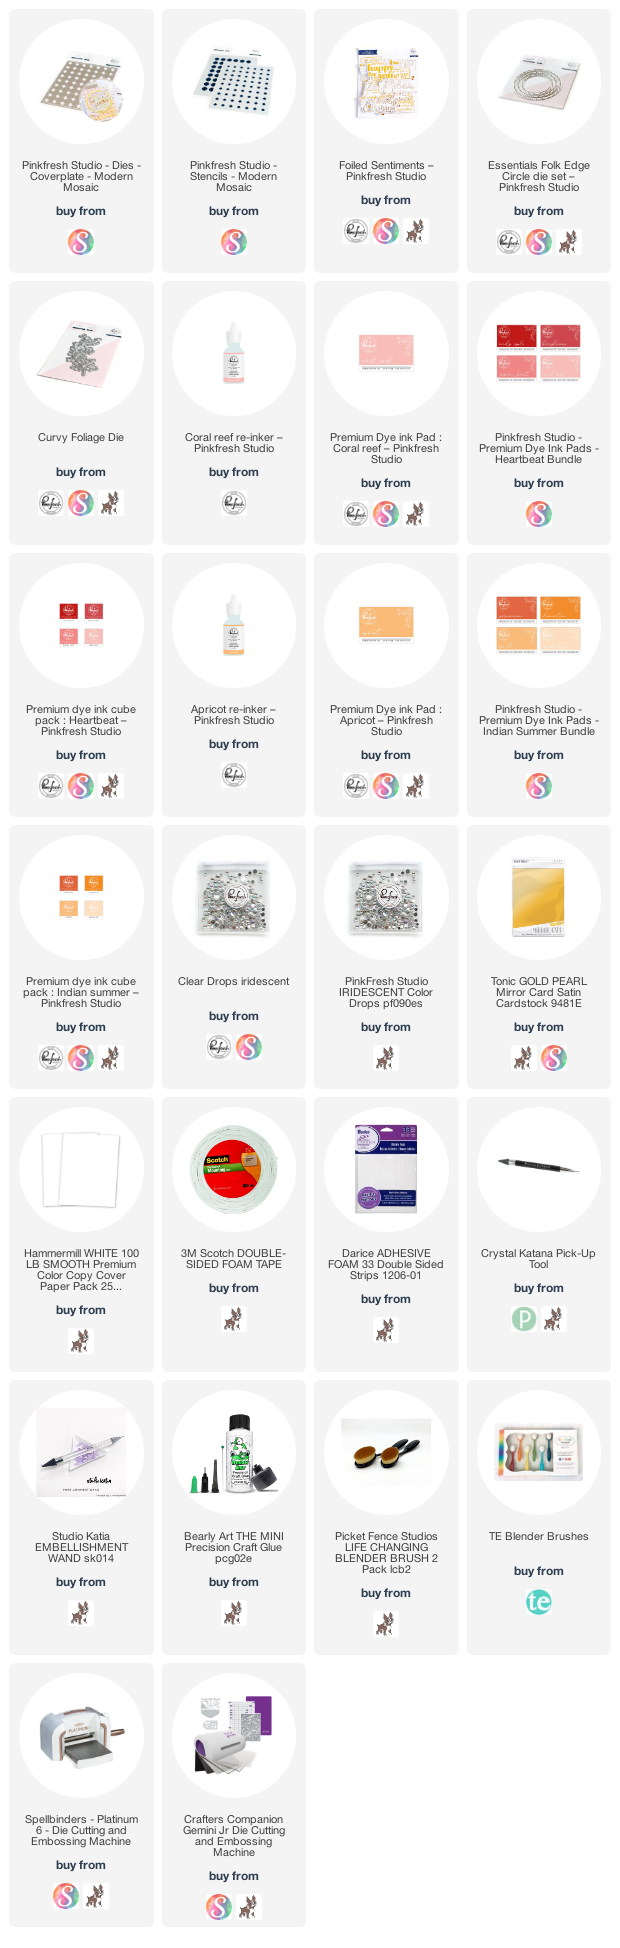
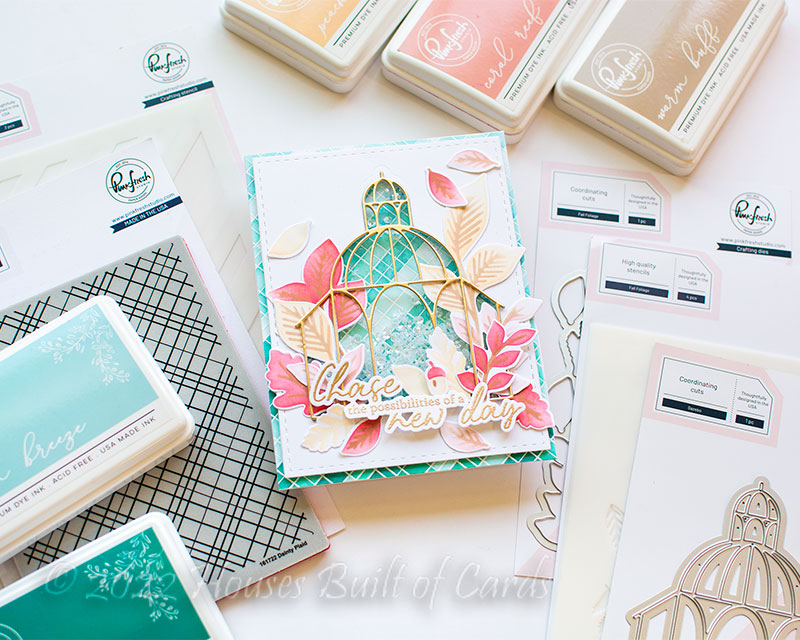
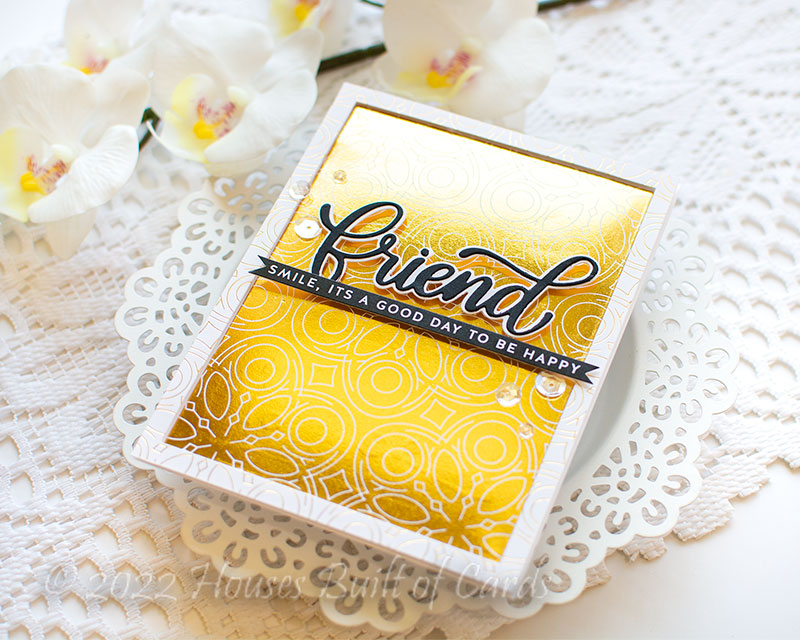
 Good morning! Dropping by to share a card using some Pinkfresh Studio supplies - including the special new Modern Mosaic Coverplate die that was designed exclusively for Scrapbook.com - and is available today as a free gift with any $25 purchase while supplies last! You can click HERE for more details! There is also a coordinating Layering Stencil that you can grab - which will help you fill your cart for that $25 minimum - you can grab it HERE. That stencil will work with the coverplate die, but is also fun to use all on it's own - in typical Pinkfresh versatile fashion! I used both new items on my card I'm sharing today!


I chose one of my favorite soft color combos - Coral Reef and Apricot! I die cut the Modern Mosaic die from white cardstock, then went to work with my stenciling.


Next up, I used the stencils! For my cardbase, I stenciled Apricot on the top area of the card, then blended from the bottom with Coral Reef. I allowed them to mix in the center, which gives a yummy sunset color!


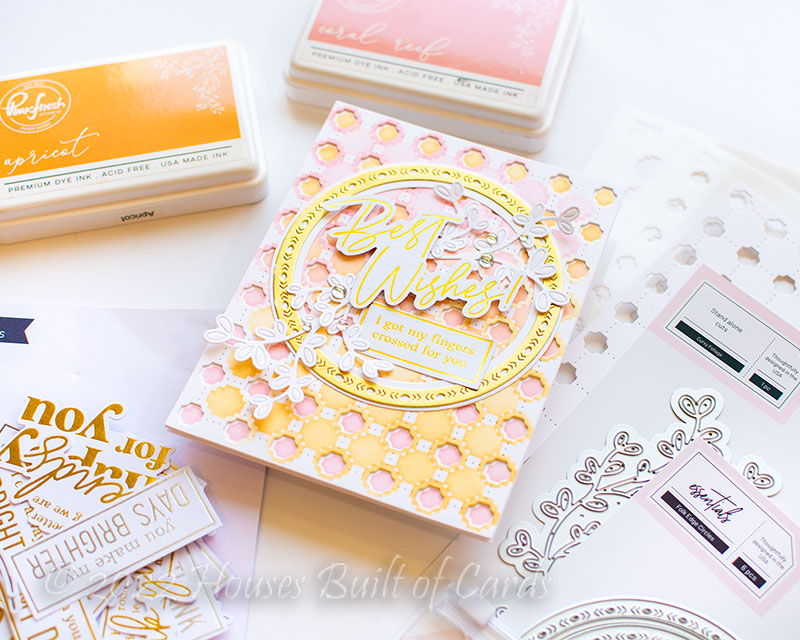
I did the same for the top, die cut layer, only I reversed the colors, so when it overlayed, I would have opposite colors next to each other. For a bit of interest, I also took the stencil for the die cut layer, and offset it so that it framed the holes cut with the dies, and added a bit of heavier handed ink blending. It just added a fun touch of interest to that layer that I loved!


I added a sentiment from Foiled Sentiments, framed by a soft gold Folk Edge Die, and tucked a few white die cut Curvy Foliage around it. Finished off with a few Iridescent Clear Drops!


Product links are all below - including affiliate links where possible, which simply means if you use one of the links below that I receive a small commission at no additional cost to you. Thanks so much for stopping by! Have a wonderful day!!!


Thursday, August 11, 2022

Stamped Leftovers Cards - Simon Says Stamp

 Hello! I'm stopping by today to share a couple more cards I made right before leaving on vacation - using a mix of brand new products at the time, and some older ones - all from Simon Says Stamp! You may remember the cards I posted earlier this week (you can see them HERE) - and I mentioned that I had some leftover pieces that I decided to use on more cards instead of tossing. These are those cards - and I'm so glad I kept them - I love how these turned out!


When I die cut the rectangles from the stamped panels using Talavery Vine background stamp on the other cards, I had some thin strips on each side. I trimmed those down, and mounted them on panels of white cardstock, lining them up with a slight space between each strip.


Once I had them adhered down, I die cut the entire thing with one of those Basic Rectangle dies to give a nice clean edge and perfectly sized panel. I stamped my secondary sentiments from Well Wishes stamp set, then mounted the panels with foam adhesive on white cardbases.


I added a large sentiment sentiment, also stamped from Well Wishes stamp set, stamped and die cut with the coordinating dies, and adhered those with foam adhesive over the front panels, leaving them hanging slightly over the edges.


I finished off with a few more of those Clear Iridescent Drops from Pinkfresh Studios to add a bit of sparkle!


Product links are all below - including affiliate links where possible, which simply means if you use one of the links below that I receive a small commission at no additional cost to you. Thanks so much for stopping by! Have a wonderful day!!!


Monday, August 8, 2022

Vines and Butterflies Card Set - Simon Says Stamp

 Hello! I'm stopping by today to share some cards I made right before leaving on vacation - using a mix of brand new products at the time, and some older ones - all from Simon Says Stamp! As you probably know well by now, when I get started sometimes, it's hard for me to make just one card. I often end up with a set - like these ones I'm sharing today!


For each of these cards, I started off by stamping the gorgeous new Talavera Vine cling background stamp in different colors of Pawsitively Saturated inks. I stamped on larger pieces of cardstock, and then die cut out panels using the Basic Rectangles dies. I had some scraps leftover - stay tuned to see the cards I ended up making with those! Love when I can put those to use and get even more cards from one crafting session, not to mention not wasting! For this first card, I used Peachy ink.


Once I had each panel trimmed out, I stamped a butterfly from Beautiful Butterflies stamp set directly over the top of the background using my MISTI to line up the first one, then just stamping them all assembly line style. Made it quick and easy to get perfect placement on all of them. For this next card, the background ink color is Aspen.


Once I had that done, I mounted the panels with foam adhesive on white cardbases to give them a bit of dimension from the background, and then added sentiments from Reverse Bold Birthday Sentiment Strips. I also mounted those with foam adhesive, because is it even possible to have too much dimension? Haha! This card uses Bubblegum ink for the background.


Finally, I needed a bit of sparkle, so I added a few Clear Iridescent drops from Pinkfresh Studio to each card, clustering them in groups of 3 around the butterflies. Love the sparkle that adds! This final card uses Tropic for the background image.


And there you go - a nice easy set of cards that are great to build up your stash! And when you can't decide which ink color to use, use several! You never know which one might be your favorite!


Would love to hear what you think - and which background color is your favorite?!?!?


Product links are all below - including affiliate links where possible, which simply means if you use one of the links below that I receive a small commission at no additional cost to you. Thanks so much for stopping by! Have a wonderful day!!!


Friday, August 5, 2022

Soft Fall Gazebo Shaker Card - Pinkfresh Studio YouTube Live Card

 Good morning! Dropping by today to share a card made a little over a week ago for Pinkfresh Studio's YouTube Live - this was a sneak peek live that Lea Lawson and I did together before the release! There was a lot of fun as we created ENTIRELY different cards with the release, and started off totally flying by the seat of our pants. So fun! You can watch the video replay HERE if you want to see more details and watch these cards come together. 


I started off this card by creating the background with the newly released Dainty Plaid stamp and stencil combo. I heat embossed the Dainty Plaid stamp in white, then ink blended in aqua tones with the Dainty Plaid layering stencils over the top, so that it magically revealed the stamped white lines since they resisted the ink.


I decided to create a shaker card using the new Gazebo die - I die cut a window from a panel of white cardstock, that also was die cut with Stitched Rectangles. I then cut out an additional Gazebo from gold cardstock, and white cardstock again, and layered them together to add a bit of sturdiness and dimension to it.


Next, I stenciled the new Fall Foliage stencil with soft and fresh colors. This is a stand alone stencil set - no stamp for this one, and has a coordinating one piece die that cuts all the pieces out at once, so quick and fun!


I arranged all the florals around the Gazebo, some on the inside, some on the outside (I did add a couple more after the live finished - just to use up a couple more pieces of foliage.) I filled the shaker with some Pretty Pink Posh 3mm clear sequins - one of my favorites for shaker cards. I love the small size, and how perfectly they shake around in a shaker card!


To finish off, I added a sentiment from the Pears and Pomegranates stamp set, heat embossed in gold, and die cut with the coordinating dies. Such a pretty sentiment, and I love that it even has coordinating dies!


Product links are all below - including affiliate links where possible, which simply means that if you use one of the links below, I receive a small commission at no additional cost to you. Thanks so much for supporting my blog, and stopping by! Have a wonderful day!!!


Saturday, July 30, 2022

Bohemian Background hot foil Take 2 - Simon Says Stamp Dream Big Release

Hello! I'm back to share a couple more cards using the BRAND NEW Simon Says Stamp Dream Big Release! Do these look slightly familiar? Well, they are another take on a similar card I shared last week, so they should! You can find those cards HERE if you want to compare them! But while these cards use the same main items, they have a twist or two different to them!

While the other cards I shared used Aura foil for a softer look, for these I used Polished Brass for a more bold and shiny gold foiling look.


Much the same as last week, I foiled the new Bohemian Background on white cardstock, then used the Pinkfresh Studio Solid Hot Foil plate to foil the reverse image with the leftover foil.


I trimmed both panels down, and then used a Basic Rectangle to die cut the center out. Now, originally, I only planned to use the center portion, but I started looking at the outer frame, and figured there was no reason to waste it! It might be fun to pair them together!


So, I reversed the frames on each of these cards to get a fun inset look. I popped the frames up on foam adhesive strips around the edges of my white cardbase, then tucked the die cut portion on the inside. This created a fun shadowbox effect!


Once I had the bases done, I used the same Big Friend shadow wafer die as the previous cards, and different sentiments from the Reverse All Things Happy sentiment strips.


The friend word was die cut from black cardstock, then white cardstock for the shadow layer, and popped up with foam on the cards. Also added the sentiment strips with foam adhesive.


And, to round out all the sparkle, a few Pretty Pink Posh Sparkling Clear sequins!


Product links are all below - including affiliate links where possible, which simply means if you use one of the links below that I receive a small commission at no additional cost to you. Thanks so much for stopping by! Have a wonderful day!!!


Friday, July 29, 2022

Diamonds, Washi, and Birthday Wishes Cards - Pinkfresh Studio

Good morning! I'm sharing some cards today that I actually made several months ago when the Sparkling Diamonds coverplate die first came out at Pinkfresh Studio. I paired it with some older washi tapes, as well as the Brushed Sentiments hot foil and stamp set to create some needed birthday cards. I took some photos, and some of the items went out of stock, so I waited to share. And then things slipped by and I forgot to share! 

And...since this week's promo at Pinkfresh Studio is the original 5 designs of washi tape at 25% off, I remembered these cards, and figured it was a good time to share! You can find the discount information at the end of my post today!


For this first card, I used the English Garden washi tape - one of my favorites! As with all of Pinkfresh's washi tapes, I also love that it has coordinating dies. Makes for super quick and easy cards!


I arranged them over the Sparkling Diamonds coverplate, and used a sentiment from Brushed Sentiments hot foil plate - this is actually the reverse image foiled with the Solid Hot Foil plate.


I finished off with a few Sparkling Champagne pearls. This was such a quick and easy card to make!


Next up, I have a slightly more masculine version - or at least, a bit less girly! :)


This second card uses the Indigo Vines washi tape. Such a pretty and subtle blue - this one doesn't have any foil on it, but is so pretty.


I added a sentiment to this one from Brushed Sentiment stamp set, stamped in Detail Black. A totally different and beautiful look!


Finished this one off with some Matte Silver Metallic Pearls - the perfect slight bit of sparkle for this washi. :)


Isn't it so pretty together?!?


Here is a peek at the items on sale - click HERE to check them all out!


Product links are all below - including affiliate links where possible, which simply means if you use one of the links below that I receive a small commission at no additional cost to you. Thanks so much for stopping by! Have a wonderful day!!!


Thursday, July 28, 2022

Warm Fall Washi Cards - Pinkfresh Studio Instagram Release Hop

 Hello! Today I am part of a fun Instagram hop to celebrate the new Pinkfresh Studio release! I have had so much fun creating with this release - yesterday was the blog hop, and I shared several cards for that! I'm sharing a slimline card I created on last week's Facebook Live for Pinkfresh Studio as a sneak peek as well as a second card I made with some leftover bits after the live. You can watch that video HERE if you want to see more details!  


For this first card, I matched my cardstock to the warm cozy tones in the Pears and Pomegranates washi that I used. I die cut the Slim Stitched Scallop Circle die from soft pink cardstock, added some olive green cardstock behind those circles, and then a white Slim Stitched Scallop around the front of the panel.


I die cut all the washi, trimmed the largest piece in half, then just tucked and arranged all the pieces around the frame using a mix of liquid glue and foam adhesive where needed. So fun to play with it!


I used one of the new hot foil sentiments - Sentiment Suite: Happy Birthday, foiled in Blush hot foil, and then die cut with the coordinating and previously released dies. I tucked that on there with a bit of foam adhesive, just on the spots it needed it.


I finished off with just a few Sparkling Champagne Pearls tucked around parts of the washi. It had the perfect color tones to match this card!


And then...I had an extra panel of this washi that I had prepared in advance for the sneak peek photo, as well as some other leftover bits and pieces, so I just had to create one more card!


I used the other part of the Slim Stitched Rectangle leftover from the previous card, and then used the center negative space as well. But I added something to that center negative space first! I used the new Dainty Plaid stamp and stencil set, heat embossing the stamp image in whit on each end of the panel. There is a bit where it doesn't connect in the middle, but not a problem! I then ink blended with the coordinating stencils in Ballet Slipper and Coral Reef, using only two of the stencil layers, and leaving part of the space white. And I only blended on the outer edges, fading it in as I moved towards the center portion. A fun way to mix things up!


I tucked all those fun washi pieces in, added another of the new hot foil words, Sentiment Suite: Hello, hot foiled in Aura foil. I popped that up with foam adhesive, and added a few more of the Sparkling Champagne pearls, and mounting it all on a soft pink cardbase!


Product links are all below - including affiliate links where possible, which simply means if you use one of the links below that I receive a small commission at no additional cost to you. Thanks so much for stopping by! Have a wonderful day!!!