Good morning! Today is the blog hop to celebrate Pinkfresh Studio's September 2022 HOLIDAY Stamp, Die, Stencil, and Hot Foil Release! Our holiday releases are always one of our largest, and this release is no exception! It's always so hard to narrow down our choices, so we love having lots to choose from! You aren't going to want to miss a stop along the way - TONS of inspiration and prizes up for grabs! YAY! You can find links to all of the new release items I used on today's cards at the bottom of this post!
I have LOTS of cards to share with you today - I hope you are humming Christmas songs by the time you finish this hop! Starting off with my one of my favorite cards so far from the release - love a holiday card all in pinks!

For this first card I did the fun new Festive Leaves background stencil in a soft palette of pinks, with a hint of Warm Buff over the top to add a slightly vintage feel to the colors.

I die cut with the coordinating dies, and layered them around the edges of a panel die cut with the previously released Stitched Diamonds die, using liquid adhesive, and curling up the edges for dimension.

I trimmed that panel down, then mounted with foam on a coordinating pink cardbase. This trimmed any excess edges off as well.

I added a sentiment using the new Joy hot foil plate, foiled in Magenta hot foil, then die cut with the coordinating Joy dies.

I mounted that with foam adhesive, then added a secondary sentiment from the Ornaments stamp set, stamped in detail black, and trimmed into a thin strip with angled edges. Finished off with a few Clear Iridescent Drops!

The next card also has some pink, but brings in some bolder greens and aquas as well!
The fun new Tidings of Great Joy set is perfect for shaker cards - but I just used it to create a simple window on my card.

I love how the main sentiment has coordinating dies as well - I heat embossed it in white on pink cardstock to pop up over the center.

I die cut the outer panel using Folk Edge Rectangles, and popped it up with foam adhesive on an aqua cardbase, tucking in my secondary sentiment from the same stamp set, also stamped in Detail Black ink.

A few sparkly Glacier jewels finish this card off!

Next up - I did create a shaker with this set! I had only made an edge to edge shaker one time, and it was super fun to do on this card!

The new Holiday City View set is SOOO fun! I love the red rubber stamp image, and the coordinating stencils make it SUPER fun!

I heat embossed my stamped image in gold, then blended a fun color combo of inks over the image. I love how the ink settles into the heat embossing and adds even more dimension!

I created my shaker, then added a frame created with Blanket Stitched Rectangles die cut from gold foil cardstock.

Another favorite from this release is the Brushed Sentiments: Holiday set - and of course, the hot foil plates are one of my favs! I LOVE how big and beautiful they are, and the font is perfection! This sentiment was foiled in Aura hot foil.

I also used the new Snowflake Background set, heat embossed in gold, and die cut with the coordinating die. This gave me lots of little snowflakes to embellish this card with. Finally, I added some Metallic Gold Pearls to the centers of the snowflakes to finish it off!

And when I talk about those sentiments - here is a peek at how lovely and fun they are! I foiled them in Aura, Red, and Viridian Green foil, and then foiled the reverse foil with the Solid Hot Foil Plate. I have SOOO many Christmas sentiments now - it's awesome!

And...now that we are talking about hot foiling, let me tell you about another amazing hot foil plate in this release, especially if you love snowflakes!

The new Snowflakes hot foil plate with coordinating dies is so fun! I hot foiled it in Cobalt foil for this card.

I paired it with another new release - Foiled Sentiments 4: Holiday. This is a huge pack of prefoiled sentiments in a mix of gold and silver, that is perfect for super quick cardmaking!

I also used more of the Snowflake Background set, this time heat embossed in silver to match with my silver foiled sentiment. Something about silver and blue together is so much fun!

The background of this card was created with the Sparkling Diamonds coverplate die. I also utilized a lot of white space on this card for a bright and airy look.

Foil is hard to photograph and show the shine really well, so I have lots of photos of this card!
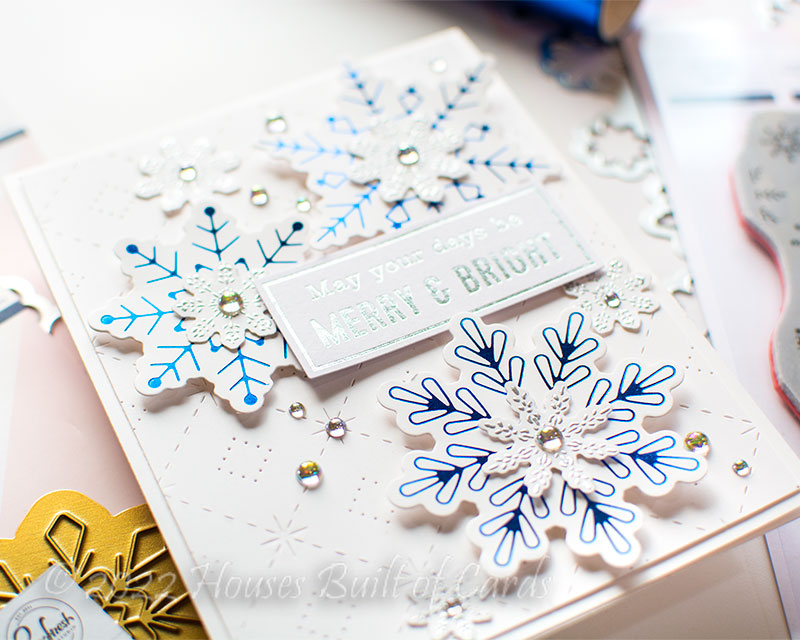
A few more of those Clear Iridescent drops finish this card off!

And, still using those foiled sentiments, but this time with another fun new stencil in the release!

For this card, I stenciled the background with a fresh and fun mix of ink colors, and then for the final stencil layer, used sparkly glimmer paste for some shine.

Once that dried thoroughly, I die cut it with a Stitched Rectangle, and mounted with foam on a pink cardbase.

I added some Curvy Foliage die cut from white, and the sentiment popped up with foam adhesive in the center for a bit of dimension, and to hide the ends of the greenery.

I added a bunch of sparkly jewels in coordinating colors clustered in groups of three around each swirl - I love the playful feeling of adding all of those!
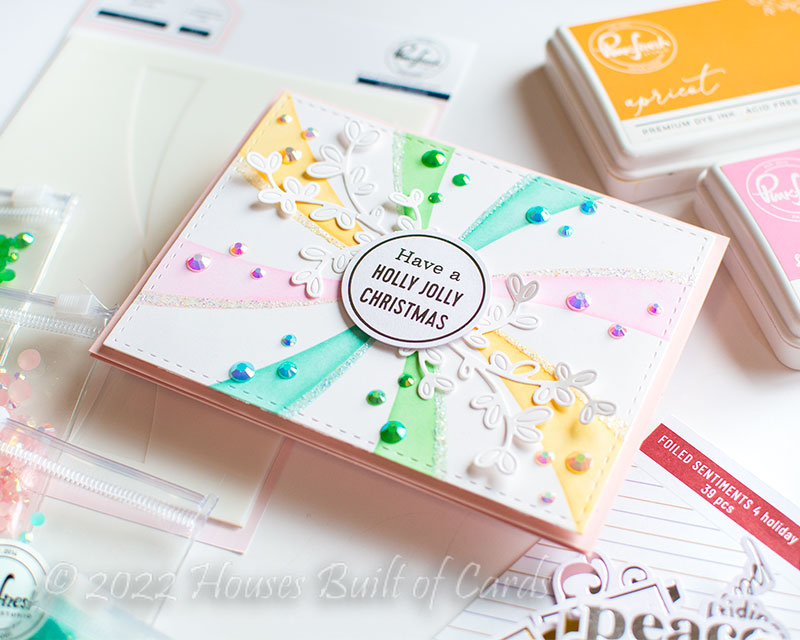
I love non-traditional colors as well, and this is even more fun with these bright happy colors!

And just like that, the last two cards are swapping back to a FAR more traditional color palette for Christmas, especially thanks to the gorgeous Holiday Elements washi tape!

There are so many fun elements in the Holiday Elements washi tape - and I love that you can use the coordinating dies to cut the entire panel and all it's bits and pieces.

I used that Sparkling Diamonds coverplate die again, this time on ivory cardstock to add some subtle contrast and a bit of a vintage feel - it matched the style of this wreath so perfectly!

This card also uses another one of those prefoiled sentiments, this time in gold. I love the font, and this is one of my favorite Christmas carols as well!

Finally, a few Mettalic Gold pearls scattered around this card finish it all off quite nicely!

And then, using more of the elements from this washi, I created another custom wreath - using the scrap of the wreath from the beginning of my washi roll - no need to waste anything, right?

Background for this was created using the Geo Blocks hot foil plate - this time without the coordinating stencils. It is a great background, don't you think?

I used two of the flowers, two of the mistletoe clusters, the end of that wreath I mentioned before - and then I just can't resist that little gnome, and have to tuck it on any cards I possibly can! It's just SOOO cute!

I used - of course! - another of those foiled sentiments. Don't you love the different fonts and sizes and styles all in one pack? Such a great value! Finished off with a few more Metallic Gold Pearls, and this card is done!

GIVEAWAY INFO:

Make sure and leave a comment before you leave for a chance to win one of 10 $25 gift certificate to Pinkfresh Studio chosen from comments left across the hop! All winners will be chosen and posted on the Pinkfresh Blog on Tuesday, September 20, 2022 - so make sure and check back to see if you were a winner! Winners must check that page and claim their prize within 2 weeks.
Here is the entire blog hop line-up so you don't miss a single stop - and product links are below - including affiliate links where possible, which simply means if you use one of the links below that I receive a small commission at no additional cost to you. Thanks so much for stopping by! Have a wonderful day!!!