Thursday, February 13, 2014

Cute Tornado

Hello! Whew - today was a busy day! I actually made this last night for the Paper Smooches Fun and Cute Challenge, but took me until today to get it photographed and posted! With Paper Smooches stamps, fun and cute is just a given!


We drove 2 hours each way for a doctors appointment yesterday, and the wind was blowing like crazy on the way home. Granted, it was blowing snow - but the idea for this card popped into my head, and had to be made! I started off by using Borders 1 Dies to cut a mask, then inked my dark gray cardstock with white MFT ink, using the mask to add the shapes. Trying to go for the look of dust!


Next, I colored up that adorable little tornado from Eco Friendly, fussy cut it, and then attached it with foam adhesive to my card base, stamping the dust swirls behind it just before I attached it. 


Finished off by stamping my sentiment, rounding a couple corners, and stamping the sentiment.


Thanks for dropping by! Hope you are having a great evening!!!

Avocado Arts - Forever Yours and Days and Months

Good morning! I'm super excited to be sharing my first post over on the Avocado Arts Blog this morning! I have 3 cards to share today - and lots of pictures:


First up, I made a couple cards with this months stamp set - as soon as I saw this, I fell in LOVE with that adorable love bug! Isn't it the cutest?!?!?


I stamped it on pattern paper, carefully fussy cut it out, then paper pieced a bit of white paper on it. I stamped that tiny "Just Married" sentiment - that conveniently fits just perfectly in the window - then added the little bow on the back. I used Delicata Gold ink to ink up the bow, as well as stamp the sentiment in the window so that they matched just right.


I used some Heidi Swapp color shine in gold and peach on the background, a bit of embossing paste on a stencil, then attached the bug with foam adhesive.


Finally, I stamped and embossed my sentiment on a Simon Says Stamp tilted black banner. Finished off with a bit of bling and some gold sequins. The first picture shows it best, but I also used my Wink of Stella a little on the car for just a touch of extra sparkle!


Next up - I came OH so close to making a one layer card - but I ended up adding a bit of bling in the end!


I inked up "Congratulations" one time, then stamped it off 3 times to give a bit of movement. The tiny hearts are from the little love birds - I just used some washi tape to mask off everything but the hearts.


I colored the glasses with my Copic markers, then added some Stickles over the surface to provide a bit of sparkle.


Then - I had to play with the add on set for this month - this set has so many possibilities - I can't wait to use it for my scrapbooking! But first I decided to make a card with it.


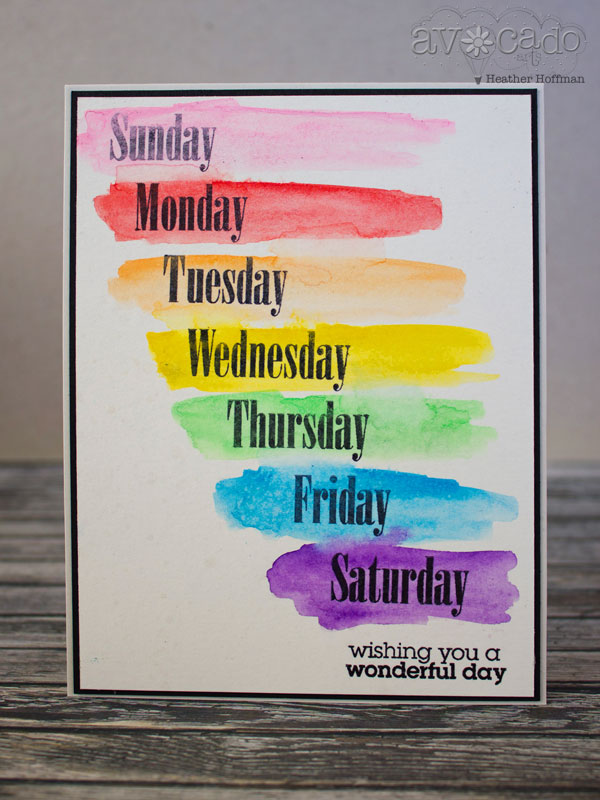
I lined up the days of the week on my stamp press, then added a tiny sentiment from an older stamp set, Wishes and Kind Thoughts. This would have made it super easy to make a large set of notecards, with all the days lined up. So easy to re-ink and stamp over and over.


I inked them with Ranger Archival Ink, stamped on watercolor paper, then used a water brush and some basic watercolors to brush over each day of the week.


I sprayed some Smooch Spritz over the entire thing to magnify the watercolor effect and add a bit of sparkle. It doesn't show very well in the pictures, but maybe you can get a peek in this shot?


Finished off by matting in black card stock to make that panel pop before mounting on my card base.


Thanks so much for stopping by today! Have a wonderful day!

Wednesday, February 12, 2014

Eyelet Outlet Feb Post

Good morning! I'm sharing these cards on the Eyelet Outlet blog today! I recently had a blissful afternoon of free time to play, and the inspiration to go with it - and this is what I ended up making:


For this card, I pulled out my Mini Stitched Flower brads, and Stitched flower brads - I loved how perfectly they matched my pattern paper from Simple Stories Vintage Bliss paper pad. I stamped and heat embossed my Hero Arts stamp silhouette on an oval cut with my Lil' Inkers Designs Stitched Oval die. The banner was cut with Simon Says Stamp tilted banner dies, and my sentiment is from Winnie and Walter's "The Big, the Bold, and the Happy" stamp set.


I am also linking this up with the current challenge at A Blog Named Hero - Flowers:


Next up, I went with a more masculine and simple design:


For this one I used the cameras from the Travel Brads set. The woodgrain background paper is from the same paper pad as above, and the little photos I trimmed from some Carta Bella pattern paper from their Wildflowers 6x6 paper pad. This card made me think of my hubby - he likes nothing better than getting out in the mountains and woods and hiking - and these beautiful pictures reminded me of some of the places he has gone.


Thanks so much for stopping by today! Hope you are having a wonderful week!


Tuesday, February 11, 2014

Invitation to MCS new release!

We are getting ready to celebrate a new release at My Craft Spot - and there is a chance to win your favorite stamp set while you wait! Can't wait to share these goodies with you - but in the meantime, hop on over to THIS post to join in the pre-release fun!


RC Washi Tape Challenge

Hello! It's time for another week of inspiration for this month's challenge at Ribbon Carousel - this month we are breaking out the washi tape!
Here is my card:


I used some washi tape on the bottom of my card, then stamped my big hello sentiment several times after inking it once with Hero Arts shadow ink. The sentiments both came from my Winnie and Walter stamp set that I am in love with - The Big, the Bold, and the Happy. I added a couple coats of Wink of Stella to the main hello, then stamped friend underneath. Finished off by rounding off a couple of corners, and adding a bit of bling from Michael's that matched just right!


Here is the info on the challenge - I hope you'll join us:

 It's the second week of our Ribbon Carousel #90 challenge- using washi tape on your creations! 


And what's up for grabs this month?  How about some beautiful wood SPOOLS that are made in the USA and hand drilled here at our shop.  We're giving away a set of 10 spools filled with your choice of beautiful seam binding, baker's twine or May Arts ribbon.


Just a reminder that our Ribbon Carousel Crewmates have divided up into FOUR teams. Each week you will see fresh projects for this month's challenge!


There are only three (3) rules you must follow to be eligible for the prize:

  1. You MUST use ribbon, twine, thread, washi tape or anything that comes on a spool on your creation 
  2. Your project must be based on the theme of the month. 
  3. You must add a NEW project to the inlinkz below and link directly back to your project on your blog or online gallery. (Unfortunately, we've had participants who would have won the challenge, but they didn't do a direct link to their blog or online gallery post and I couldn't find their creation!)


Monday, February 10, 2014

Hummingbird Hope

Good morning again! I went to a craft fair yesterday afternoon, and before I left I stamped several images on a couple sheets of cardstock, and brought them and my Copics along to help occupy my time. Wise move, since I think all the snow kept people at home and it was pretty slow. This way I got several images colored and just had to come home and put them on cards! Here is one of them:


I was inspired by the colors in the current Runway Inspired Challenge Photo:


Once I got home, I cut my image out with a Lil' Inker's Stitched square die, and stamped my sentiment. The images and sentiment all came from Unity Stamp Company's January 2014 Kit of the Month.


I also couldn't resist adding a double coat of Wink of Stella - which is always so hard to capture in the photos, but looks so pretty in real life! The hummingbird in particular looks so sparkly and gorgeous! This picture shows it a little better:


Added some background paper from My Mind's Eye, as well as a strip from Crate Paper, then finished off with a couple sequins and enamel dots.


Thanks for stopping by! Have a wonderful day!!!

Pinterest Inspired with Neat and Tangled

Good morning! I have really been trying lately to use some more of the inspiration that I pin on Pinterest - today's card is one example:


Here is where I got my inspiration - LOVED the soft pretty colors and bokeh effect. 


I used Neat and Tangled's You + Me Stamp set. I heat embossed the hearts with gold Zing embossing powder, as well as the sentiment. 


Next, the cardstock was inked with distress ink, misted with some Mister Huey's mist and then I blotted a bit off to soften the effect. I then added a strip of glittery May Arts ribbon to separate the two parts of the card. 


I am linking this up with the current Little Tangles Challenge


Thanks for stopping by! Have a great week!